Use the Replication page of the Settings dialog to specify default values for some options related to creating objects for the Replication benchmark test.
The default settings apply to new Create Objects for Replication steps.
To specify default Replication test settings
Specify values to be used as default settings when creating objects for a Replication benchmark test. Review the following for additional information:
| Database Size | Specify a database size. The Benchmark Scale readjusts according to the database size you specify. |
| Benchmark Scale |
Specify a Benchmark Scale factor to be used to scale up table sizes and increase data. See Benchmark Scale Factor for more information. The database size readjusts according to the scale factor you specify. After adjusting benchmark scale (or database size) review the estimates for individual and total table sizes in the Object Details grid. |
| Show Empty Tables | Select to display any tables that will be created but not populated with data. |
Use the Table Structure page of the Settings dialog to specify default values for the Replication tables.
The default settings apply to new Create Objects for Replication steps or new Replication tests.
To specify default table structure settings
Specify default settings to be used when creating objects for a Replication benchmark test. Review the following for additional information:
| Number of Tables | Specify a default value for the number of tables to include in a new Create Objects for Replication step. |
| Number of Columns per Table | Specify a default range for the number of columns to include in each table in a new Create Objects for Replication step. |
| Add | Click to add a column.Then define the column details by entering values in the grid. See Replication Table Options Tab for more information. |
| Ave. Number of Statements per Commit | Specify a default value for the number of statements to include in a commit. |
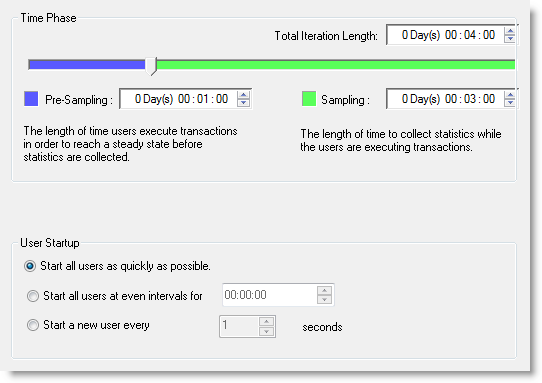
The Timing page of the Settings dialog specifies timing phases associated with an item.
Note: If you modify the default settings in the Settings dialog, the changes apply to new jobs only, not to existing jobs.
|
Section |
Field/Icon |
Description |
|---|---|---|
|
Time Phase |
Total Iteration Length |
The composite of the Pre-Sampling and Sampling time. |
|
|
Pre-Sampling |
The length of time users execute transactions in order to reach a steady state before statistics are collected. |
|
|
Sampling |
The length of time used to collect statistics while the users are executing transactions. |
|
User Startup |
Start all users as quickly as possible |
Starts all users immediately after a test begins. |
|
|
Start all users at even intervals for |
Sets the amount of time in which to start all users at even intervals. The interval duration is equal to this value divided by the number of users. |
|
|
Start a new user every [n] seconds |
Starts a new user, then waits the [n] number of seconds before starting the next user. |
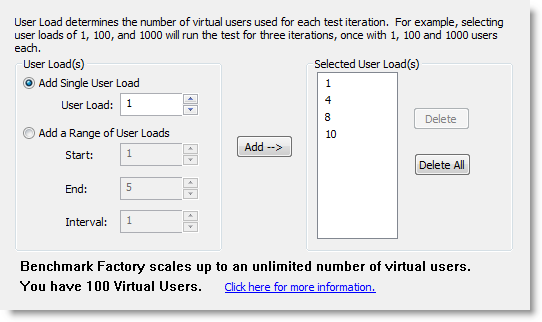
You can use the User Load page of the Settings dialog to specify default settings for the number of virtual users for each iteration of a test. Then, when creating a new job in the New Job wizard, you can use these default settings or specify new settings for the job.
Note: If you modify the default settings in the Settings dialog, the changes apply to new jobs only, not to existing jobs.
|
Section |
Field/Icon |
Description |
|---|---|---|
| User Load |
Add Single User Load
|
Specify a single user load, then click Add to add it to the selected user loads. |
|
|
Add a Range of User Loads
|
Specify a range, then click Add to add the range to the selected user loads. |
Benchmark Factory comes with 100 virtual users by default. See Add Virtual Users for more information about adding virtual users.
You can use the Latency page of the Settings dialog to specify default values for latency. Latency is delay added to the execution of a transaction to control of how fast transactions are submitted to the system-under-test. Use Latency to model real-world user interactions.
The default latency settings apply to transactions you add through the Transactions tab.
Note: If you modify the default settings in the Settings dialog, the changes apply to new jobs only, not to existing jobs.
To specify default settings for Latency
To specify no latency, select No Delay. To add latency, select one of the other options. Review the following for additional information:
| No Delay | Select to specify no latency. See No Delay for additional information. |
| Transaction Rate |
Select this option to set a transaction rate by specifying the interval between successive transactions arriving at the server. See Interarrival Time for more information. Interarrival Time—Select one of the following:
|
| Real-World Delays |
Use this option to simulate real-world processing by inserting a delay before and/or after each transaction execution. For each delay type, you can insert a fixed time by selecting Absolute, or you can select one of the distribution models for specifying time. To learn more about distribution models, see Latency Distribution Models. Keying Time—Inserts a delay before execution to simulate the amount of time spent performing data entry. See Keying Time for additional information. Think Time—Inserts a delay after execution to simulate the amount of time "to think" about the results of the previous transaction. See Think Time for additional information. |
