Latency is delay added to the execution of a transaction to control how fast transactions are submitted to the system-under-test. Latency is used to either make the transaction execution rate more like real-world executions or control the transaction rate. This delay can be added to the beginning and/or end of a transaction execution.
To specify latency values for an individual transaction, edit the transaction using the Transactions tab of the New/Edit Job Wizard. You can do this either at the time you add transactions/scenarios to a test or any time after the job is created.
You can also specify latency for all the child transactions of a test or user scenario at one time. See Replace Child Latencies for more information.
Benchmark Factory allows you to set default latency values for the transactions you add.
Real-World Delays: Add Keying Time and Think Time to create a workload that accurately simulates real-world users, as opposed to a workload that submits transactions as fast as possible. Using real-world delays allows for easier interpretation of the results. If you do not add delay, it might be difficult to equate N virtual users running with no delay to an accurate number of real users.
Interarrival Time: Specify Interarrival Time to create a workload in which transactions arrive at the system-under-test at a specific interval. This method allows you to set the timing relationship between the executing transactions and is commonly used when replaying a captured workload.
To modify latency values
Modify latency options. To specify no latency, select No Delay. To add latency, select one of the other options. Review the following for additional information:
| No Delay | Select to specify no latency. See No Delay for additional information. |
| Transaction Rate |
Select this option to set a transaction rate by specifying the interval between successive transactions arriving at the server. See Interarrival Time for more information. Interarrival Time—Select one of the following:
|
| Real-World Delays |
Use this option to simulate real-world processing by inserting a delay before and/or after each transaction execution. For each delay type, you can insert a fixed time by selecting Absolute, or you can select one of the distribution models for specifying time. To learn more about distribution models, see Latency Distribution Models. Keying Time—Inserts a delay before execution to simulate the amount of time spent performing data entry. See Keying Time for additional information. Think Time—Inserts a delay after execution to simulate the amount of time "to think" about the results of the previous transaction. See Think Time for additional information. |
No Delay means that transactions execute as fast as possible. As soon as one transaction is processed, the next transaction is issued against the server. In the case of a mixed workload test, each virtual user issues transactions as fast as possible.
The No Delay option is used when the goal of the test is to stress the system to its limits, without concern for accurately simulating users. With No Delay specified, a relatively low number of users can stress the system to its limits. However, there is no easy way to correlate N virtual users running with no delay to some number of real users.
Keying Time is used to simulate the amount of time spent performing data entry (entering information) before executing a transaction. In many cases, Keying Time is used with Think Time to provide a delay both before and after a transaction executes.
Specifying a Keying Time inserts a delay (either fixed or variable) before each transaction execution.
Think Time is used to simulate the amount of time spent thinking about the results of the previous transaction. This could be time spent performing analysis on the results of a database query.
Specifying Think Time inserts a delay (either fixed or variable) after each transaction executes.
Using the maximum number of users on an Agent provides better utilization of machine configuration. For example, you can run one machine with ten users and another with 100 users. This allows light-weight machines to be used with more powerful machines.
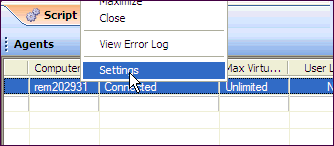
To specify Maximum Virtual Users
Right-click the agent in the Agent pane of the Benchmark Factory Console and select Settings.
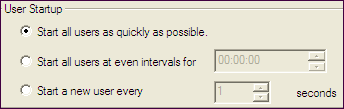
When running a load test, you have the option of staggering user startup. This allows you to adjust startup loads if, for example, you are having issues with overloading of servers when all of the users attempt to start at the same time.
To stagger user startup
You can install agents on multiple agent machines in order to run tests using multiple agents. To configure Benchmark Factory with multiple agents you must:
For best results, install remote agents through your Benchmark Factory console. You can install remote agents from the Settings dialog (Edit | Settings | Agent) or from the Agent page of the New/Edit Job Wizard. See Install Remote Agent on Windows for more information.
You can also install agents manually on the agent machine. If you do, you must configure the agent on the agent machine (see below). Then, in your local Benchmark Factory, you must set up the agent to register it with the console. See Set Up New User Agent for more information.
If you set up an agent machine by installing Benchmark Factory manually, you must configure the agent on the agent machine.
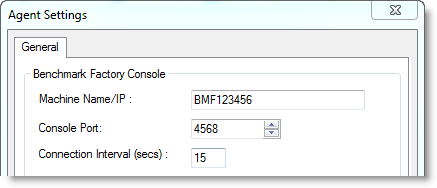
Each Benchmark Factory Agent must be configured with the address of the Benchmark Factory Console. Each Agent sends load testing results back to the Benchmark Factory Console.
If you use only the agent installed locally on the console machine, make sure your local agent is configured with the IP address (name) of your local machine.
To configure Benchmark Factory Agents (Windows)
In Machine Name/IP field, enter the address of the Benchmark Factory console machine. In the Console Port field, enter the port for the Benchmark Factory console.
To run a job using multiple agent machines, after the agents are installed and configured, you must set up (or add) each remote agent to the Benchmark Factory console.
To run a job with multiple agents
Note: When you run a job using one or more local agents, if Agent utilization of resources on the local machine is too high, errors could occur.
When you run multiple Agents for load testing, you can view the Agents results as they run from the Benchmark Factory Console.
To view the Agents from the Benchmark Factory Console