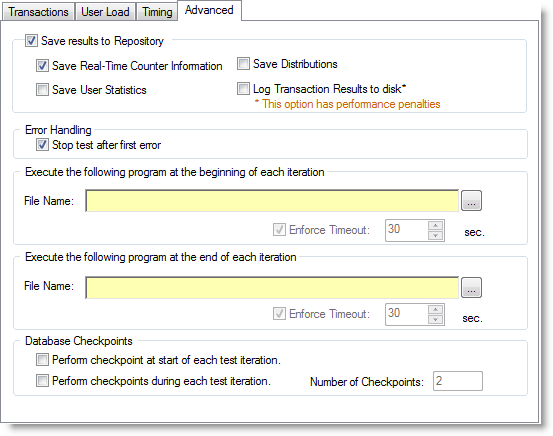
You can use the Advanced tab to specify the information to save in the Repository during a test run, to set error handling properties, and to specify database checkpoints for the test.
The repository is a database where all Benchmark Factory information is saved. It contains information about the transactions stored in each benchmark DLL and statistical information from benchmark executions.
To specify Advanced options
Select the Test Options tab. Then select the Advanced tab.

Specify advanced options. Review the following for additional information:
|
Section |
Description |
|---|---|
|
Save results to Repository |
Select to save test information to the Repository. Then select one or more of the following options:
|
|
Error Handling |
Stop test after first error—The test is stopped when an error is reported. You can specify a default setting in Edit | Settings | Error Handling. See Error Handling Settings. |
|
Execute the following program at the beginning of each iteration |
(Available only for benchmark tests and some capture/replay tests.) Browse to and select the file to execute at the beginning of each iteration. Note: This field accepts BFScripts. Enforce Timeout—Select and enter a time to enforce a timeout on the file executing. |
|
Execute the following program at the end of each iteration |
(Available only for benchmark tests and some capture/replay tests.) Browse to and select the file to execute at the end of each iteration. Note: This field accepts BFScripts. Enforce Timeout—Select and enter a time to enforce a timeout on the file executing. If the file does not complete in the specified time, it is stopped and the job continues. |
|
Database Checkpoints |
Perform checkpoint at start of each test iteration—Initiates a database checkpoint at the beginning of a test iteration. Perform checkpoints during each iteration—Initiates a database checkpoint during a test iteration. Number of checkpoints—Specifies the number of checkpoints to initiate. |
Settings on the Options tab allow you to apply scaling to the user scenarios (transactions) for a particular test.
To apply scaling to user scenarios
Modify options. Review the following for additional information:
| Enable Userload scaling (simulation) |
Select to enable scaling for all user scenarios in the selected test.
|
| Execute by time | Sets the time and length of the capture replay test. |
The Add SQL Transactions function allows you to add a SQL statement transaction to a test in the Job workload.
To add a SQL statement transaction to a test
 to open the list of SQL transactions. Then select Add SQL Transactions.
Or click 
 to import SQL from a file.
Modify the remaining options on the SQL Statement tab. Review the following for additional information:
| Statement Name | Enter a name for the statement, or use the default. |
| Execution Method |
Select an execution method for the SQL statement.
|
 |
Click to execute the SQL statement. See Run SQL Preview for more information. |
 |
Click to add a bind variable.
|
Benchmark Factory allows you to import and execute SQL from an .xml file. When you attempt to import very large Oracle trace files into Benchmark Factory, they are converted to editable .xml files.
You can edit the .xml file in the Benchmark Factory Session Editor.
To add SQL from an XML file
 . The Add User Scenario dialog opens.
 to browse to and select an .xml file containing the SQL you want to import.
To edit SQL statements in an XML file
After selecting the .xml file in the Add User Scenario dialog, click Edit. Or select the scenario in the Transactions tab and click Edit.

The .xml file opens in the Benchmark Factory Session Editor.

Under Session Details, select the SQL statement you wish to edit. The statement displays in the SQL Statement view.
To adjust latency, select the Latency tab. See Specify Latency for more information.