
Licensing View
The Licensing View in the Recovery Manager Console is a place where you can view license allocation information and manage the license file and allocated licenses.
To display the Licensing View
- From the main menu, select Manage | Licensing.
The Licensing View looks similar to the following:
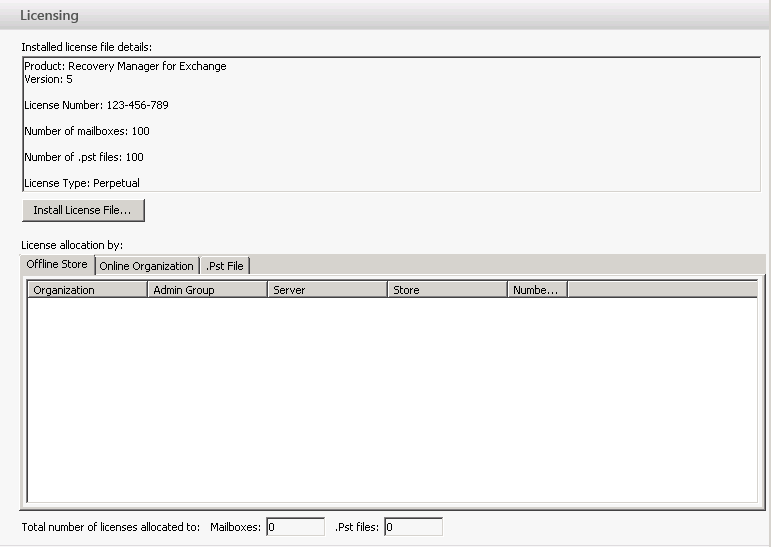
The Licensing View includes the following elements:
- Installed license file details. This area provides information about the installed license file, such as the license type and the licensed number of mailboxes and .pst files.
- Install License File. This button allows you to install a new license file.
- Offline Store. This tab provides license allocation information for each registered offline Exchange store and Domino database
- Online Organization. This tab provides license allocation information for each on-premises or cloudbased Exchange organization that includes online mailboxes registered as source storages.
- .Pst File. This tab provides license allocation information for each Personal Folders (.pst) file registered as a source storage.
Installing a new license file
In order to register more source storages without revoking any allocated licenses, you need to obtain and
install a new license file holding a greater number of licenses for the items you want to register.
To install a new license file
- From the main menu, select Manage | Licensing.
- In the right pane (the Licensing View), click Install License File.
- In the Select License File dialog, locate the Quest license file (*.dlv) and click Open.
Configuring Recovery Manager for Exchange
To configure the various parameters of Recovery Manager for Exchange, open the Settings dialog box: From the main menu, select Tools | Settings.
The Settings dialog box has the following tabs:
- Preferences. On this tab, you can select what you want to show, search, and restore with Recovery Manager for Exchange. You can also use this dialog to display or hide some additional information in the Recovery Manager Console.
If not stated otherwise, the options on this tab apply to items originating from any version of Lotus Domino or Exchange Server.
This tab provides the following elements:
- User items. When this check box is selected, you can view, search for, and restore user items located in Recovery Manager for Exchange storages, including messages, posts, calendar items, notes, journal items, meetings, and tasks. By default, this check box is selected.
- Soft-deleted (recoverable) items. When this check box is selected, you can view, search for, and restore the contents of the Recoverable Items folder in Exchange Server 2010, Exchange Server 2013 and Exchange 2016 databases and soft-deleted items in Lotus Domino and earlier versions of Exchange Server databases registered with Recovery Manager for Exchange as storages.
- Hidden items. When this check box is selected, you can view, search for, and restore hidden items located in Recovery Manager for Exchange storages. Hidden items include, for example, associated folder messages.
- System mailboxes. When this check box is selected, you can view, search for, and restore system mailboxes located in Recovery Manager for Exchange storages.
- System folders. When this check box is selected, you can view, search for, and restore system folders located in Recovery Manager for Exchange storages.
- Restore folder permissions. With this check box selected, Recovery Manager for Exchange restores mailbox and public folders along with their permissions stored in the source storage.
Note that Recovery Manager for Exchange cannot restore folder permissions that are exclusively stored in Active Directory.
- Show total number of items (without subfolders). When this check box is selected, you can view the total number of items in folders next to folder names in the left pane. The provided number only includes the items selected in the Show, search, and restore area on this tab. This option does not support and thus excludes items in public folders.
- Show warning when opening an attachment. When this check box is selected, a warning message appears every time you open an attachment located in a registered storage.
- Skip errors in searches, restores, and deletes. With this check box selected, messages for which errors are encountered during search, restore, or delete operations are automatically skipped.
That is, such messages are not restored, deleted, or displayed in the search results.
- More Options. This tab includes the following elements:
- Naming. Set naming preferences for the new folders or .pst files being created during mailbox restore operations.
- Security. Click the Edit Security button to view or change the access permissions that will be applied to the new target files being created during restore or export operations.
- Store access credentials for online Exchange. Causes Recovery Manager for Exchange to store access credentials (user name and password) with which you access online mailboxes or public folder hierarchies from within the Recovery Manager Console or Management Shell. With this check box selected, Recovery Manager for Exchange securely stores the access credentials you enter, so you do not have to enter them again next time you access the same online mailbox or public folder hierarchy.
To store access credentials, Recovery Manager for Exchange relies on the functionality provided by Windows. If this check box is unavailable, it indicates that this functionality is not enabled or unavailable in your version of Windows.
- Duplicates. You can use this tab to select how you want to handle message duplicates during search and restore operations.
Under Messages, you can select one the following options:
- Allow duplicate items to be created. The messages you are restoring do not overwrite any of their duplicates located in target storages or files. The restored messages and their duplicates will coexist in target storages or files.
- Replace all duplicates with restored items (restore takes longer). The messages you are restoring overwrite all their duplicates in target storages or files without any warning.
- Replace duplicates only if restored items are newer (restore takes longer). The messages you are restoring overwrite their duplicates in target storages or files only if these duplicates are older than the messages being restored.
- Do not restore duplicates (restore takes longer). The messages whose duplicates are found in target storages or files are not restored.
Under Mailboxes and folders, you can select the following options:
- Create new folder if target folder already exists. Allows you to avoid creating a new folder if the target restore location already includes a folder whose name matches the name of the mailbox or folder being restored.
- Create new .pst file if target .pst file already exists. Allows you to avoid creating a new Personal Folders (.pst) file if the target restore location already includes a .pst file whose name matches the name of the mailbox or folder being restored.
Under Search, you can select the following check box:
-
Do not include message duplicates in search results (search takes longer). Returned search results will not include message duplicates. Selecting this check box may significantly increase the time of search operations.
- Web Interface. This tab is only available when the Web Interface is installed. On this tab, you can view and change the Web Interface output folder specified during Recovery Manager for Exchange installation. Web Interface output folder is a local folder that stores files generated during the restore and export operations performed in the Web Interface.
Use the Web Interface output folder text box to type a new folder path.
- Logging. You can use this tab to specify the Recovery Manager for Exchange logging options.
- Log files location. Shows the path to the location where Recovery Manager for Exchange currently saves its log files. You can change the location: type the path to a new location in the text box or click Browse, then browse and select a new location.
- Enable extended logging. Enables extended logging of the Recovery Manager for Exchange events. When this check box is cleared, only error messages are written to the Recovery Manager for Exchange log files.
- Reports. You can use this tab to select whether you want Recovery Manager for Exchange to collect the latest data on search, restore, and preview operations and automated tasks and include this data into the reports.
- Collect data for reports. Specifies to collect the latest data for reports. Selecting this option can slow down the Recovery Manager for Exchange performance.
- Do not collect the data. Specifies not to collect the latest data for reports. With this option selected, Recovery Manager for Exchange generates outdated reports.
- Indexing. You can use this tab to enable the storage indexing feature to accelerate RMEX search capabilities.
- Index source storage (slows performance, consumes disk space). Enables the indexing feature.
- Indexing Url. Specifies the location of the Indexing service. The default port that is used by the service is 9200.
- Exclude attachment content or Include attachment content. Using these options you can include or exclude the attachment content from indexing.
- Start indexing immediately after the source is registered. Use this option to start indexing immediately after you add a storage.
- Start indexing between. Specifies schedule for indexing.
Required Exchange Server DLLs
To work with Exchange Server databases, Recovery Manager for Exchange requires several dynamic link libraries supplied with Microsoft Exchange Server. You need to link Recovery Manager for Exchange to the .dll files supplied with the Exchange Server version that was used to create the Exchange databases you want to work with.
To configure Recovery Manager for working with Exchange Server databases
- Open the Recovery Manager Console.
- From the main menu, select Manage | Exchange DLLs.
- Under Exchange Server versions, select the list entry representing the Exchange Server version that was used to create the databases you want to work with.
- Click Link, and browse to select the distribution package or installation folder of the Exchange Server version you selected in step 4. When finished, click OK.
If you want to link Recovery Manager for Exchange to other Exchange Server versions, repeat steps 4 and 5.
- When finished, click OK.
The required Exchange Server files are copied to the Recovery Manager for Exchange computer.
In this section:
- Exchange Server 2016 DLLs
- Exchange Server 2013 DLLs
- Exchange Server 2010 DLLs
- Exchange Server 2007 DLLs
- Exchange Server 2003 DLLs
- Exchange Server 2000 DLLs
- Exchange Server 5.5 DLLs
Exchange Server 2016 DLLs
To work with Exchange Server 2016 databases, Recovery Manager for Exchange requires the following files supplied with Exchange Server 2016:
- Ese.dll
-
Microsoft.Exchange.Data.Common.dll (required only for the Indexing feature)
On a computer with Exchange Server 2016 installed, this file is located in <Exchange Server 2016 installation folder>\Bin. By default, the Exchange Server 2016 installation folder is %ProgramFiles%\Microsoft\Exchange Server.
In the Exchange Server 2016 distribution package, this file is located in Setup\Serverroles\Common.
|
|
|

Exchange Server 2013 DLLs
To work with Exchange Server 2013 databases, Recovery Manager for Exchange requires the following files supplied with Exchange Server 2013:
- Ese.dll
-
Microsoft.Exchange.Data.Common.dll (required only for the Indexing feature)
On a computer with Exchange Server 2013 installed, this file is located in <Exchange Server 2013 installation folder>\Bin. By default, the Exchange Server 2013 installation folder is %ProgramFiles%\Microsoft\Exchange Server.
In the Exchange Server 2013 distribution package, this file is located in Setup\Serverroles\Common.
|
|
|
Exchange Server 2010 DLLs
To work with Exchange Server 2010 databases, Recovery Manager for Exchange requires the following files supplied with Exchange Server 2010:
- Ese.dll
-
Microsoft.Exchange.Data.Common.dll (required only for the Indexing feature)
On a computer with Exchange Server 2010 installed, this file is located in <Exchange Server 2010 installation folder>\Bin. By default, the Exchange Server 2010 installation folder is %ProgramFiles%\Microsoft\Exchange Server.
In the Exchange Server 2010 distribution package, this file is located in Setup\Serverroles\Common.
|
|
|
Exchange Server 2007 DLLs
To work with Exchange Server 2007 databases, Recovery Manager for Exchange requires the following .dll files supplied with Exchange Server 2007:
- Ese.dll
- Exchmem.dll
- Jcb.dll
-
Microsoft.Exchange.Data.Common.dll (required only for the Indexing feature)
On a computer with Exchange Server 2007 installed, these files are located in <Exchange Server 2007 installation folder>\Bin. By default, the Exchange Server 2007 installation folder is %ProgramFiles%\Microsoft\Exchange Server.
In the Exchange Server 2007 distribution package, these files are located in Setup\Serverroles\Common.
|
|
|
Exchange Server 2003 DLLs
To work with Exchange Server 2003 databases, Recovery Manager for Exchange requires the following .dll files supplied with Exchange Server 2003:
- Ese.dll
- Exchmem.dll
- Exosal.dll
- Jcb.dll
On a computer with Exchange Server 2003 installed, these files are located in <Exchange Server 2003 installation folder>\Bin. By default, the name of the Exchange Server 2003 installation folder is Exchsrvr.
In the Exchange Server 2003 distribution package, these files are located in Setup\I386\Exchange\Bin.
Exchange Server 2000 DLLs
To work with Exchange Server 2000 databases, RRecovery Manager for Exchange requires the following .dll files supplied with Exchange Server 2000:
- Ese.dll
- Exchmem.dll
- Exosal.dll
- Jcb.dll
On a computer with Exchange Server 2000 installed, these files are located in <Exchange Server 2000 installation folder>\Bin. By default, the name of the Exchange Server 2000 installation folder is Exchsrvr.
In the Exchange Server 2000 distribution package, these files are located in Setup\I386\Exchange\Bin.
Exchange Server 5.5 DLLs
To work with Exchange Server 5.5 databases, Recovery Manager for Exchange requires the following .dll files supplied with Exchange Server 5.5:
- Ese.dll
- Exchmem.dll
On a computer with Exchange Server 5.5 installed, these files are located in %SystemRoot%\System32.
In the Exchange Server 5.5 distribution package, these files are located in Server\Setup\I386.