Q: How agents match public folders?
A: Generally, agents match public folders by the folder’s PR_SOURCE_KEY. However if the public folder selected in public folder collection as a target root public folder already exists in the target organization, then its PR_SOURCE_KEY will not be the same as PR_SOURCE_KEY of the corresponding source root public folder. PFSA and PFTA store matching information for such public folders in their Config.mdb databases.
Q: Is it possible to move public folder between public folder mailboxes in Exchange 2013 or higher organization after synchronization begins?
A: Yes, public folder created by PFTA in Exchange 2013 organization can be moved to another public folder mailbox using New-PublicFolderMoveRequest. That does not require change of synchronization settings for public folders. This approach is useful if after you start synchronizing public folders, you reveal that there is not enough space for public folder content in a certain target public folder mailbox.
In this example we will guide you through migration of large public folders from source Exchange organization to target Exchange 2013. Note that we assume that you don’t have any public folders in Exchange 2013 organization yet.
Step 1: Determining Public Folders Size
As a first step we determine the total size of public folder content and its distribution over public folders:
| .\Transport Planning |
842 |
3.2 |
| .\Management Consulting |
271 |
5.4 |
| .\Offices |
6800 |
155,0 |
| .\Finance |
2001 |
184,9 |
| Total: |
9914 |
348.5 |
Total size is around 348GB which exceeds the Microsoft’s 100GB limit for a single public folder mailbox in Exchange 2013 organization. Therefore, we need to split source public folder hierarchy into public folder branches with size less than 100GB each. After that, branches will be migrated to target public folders residing in different Exchange 2013 public folder mailboxes.
Large public folders over 100GB that should be split up are listed in the following table.
| .\Offices |
6800 |
155,0 |
| .\Finance |
2001 |
184,9 |
Small branches from the below table can be migrated to a single target public folder mailbox as their total size does not exceed the size limit.
| .\Transport Planning |
842 |
3,2 |
| .\Management Consulting |
271 |
5,4 |
Step 2: Planning Public Folder Migration
Now we need to plan how to split large public folders into branches. As an example, we will start with splitting up the .\Offices branch and its subfolders. The size of its content is around 155GB which greatly exceeds the 100GB limit. Therefore, we need to split it into branches in the say way as we did for the root level public folders on step 1.
The following table contains sizes of subfolders that are located within the .\Offices branch.
| Source public folder path |
Size in GB |
| .\Offices\Paris |
50,2 |
| .\Offices\London |
32,4 |
| .\Offices\Moscow |
28,7 |
| .\Offices \<all other subfolders> |
43,7 |
Now every branch is below the 100GB limit and we can start planning how to map the branches to target public folder mailboxes. To migrate a certain source branch to the target public folder residing in the specific public folder mailbox using Migration Manager for Exchange, we will need to create that target public folder manually in each public folder mailbox. This folder will act as a “target root” in Migration Manager for Exchange public folder collection.
We suggest the following public folder collection design:
- Name: Collection_01
- Description: Migration of public folders under “.\Offices”
- Members of the collection: 4 sync pairs
| 1 |
.\Offices |
.\Offices |
PFMailbox01 |
| ..\Paris EXCLUDED WITH SUBFOLDERS |
| ..\London EXCLUDED WITH SUBFOLDERS |
| ..\Moscow EXCLUDED WITH SUBFOLDERS |
| ..\<ALL OTHER SUBFOLDERS INCLUDED> |
| 2 |
.\Offices\Paris |
.\Offices\Paris |
PFMailbox02 |
| 3 |
.\Offices\London |
.\Offices\London |
PFMailbox03 |
| 4 |
.\Offices\Moscow |
.\Offices\Moscow |
|
Step 3: Migrating Public Folders
Before configuring public folder synchronization job and collection, take the following steps:
- Create a first public folder mailbox in your Exchange organization. This mailbox will be the primary hierarchy public folder mailbox and no data will be migrated to it.
- Create PFMailbox01, PFMailbox02, and PFMailbox03 secondary public folder mailboxes and corresponding public folders in them.
|

|
NOTE: The source branches .\Offices\London and .\Offices\Moscow can be migrated to the same target public folder mailbox PFMailbox03 as the total size which is the sum of their sizes (32,4GB and 28,7GB) is less than 100GB. |
| .\Offices |
PFMailbox01 |
| .\Offices\Paris |
PFMailbox02 |
| .\Offices\London |
PFMailbox03 |
| .\Offices\Moscow |
PFMailbox03 |
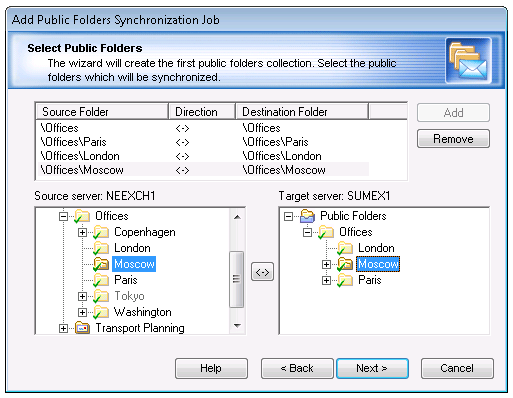
Now we can configure a public folder synchronization job in Migration Manager for Exchange console as follows:
- As you open the Add Public Folders Synchronization Job wizard, the target public folders created for each branch previously will be already displayed in the right pane.
- Now we add the first pair of public folders that should be migrated to the destination folder and exclude subfolders that should not.
|
|
NOTE: If you plan to utilize two-way synchronization of public folders, then corresponding target public folders should be excluded as well. |

- After that we can start adding public folder pairs for remaining branches \Offices\Paris, \Offices\Moscow, and \Offices\London:
|
|
NOTE: When you select a pair of folders in the upper pane, you see which public folders are included in that migration pair. All public folders that are not included in the pair will be grayed out. |
-
Finally, we can complete the wizard and start actual public folder synchronization. For more information, see Public Folder Synchronization Process.
Migrating Public Folders with Replicas
If a public folder in the source organization has replica on another source server, such folder will be grayed out in tree view. The example of such public folders is the Tokyo folder. By default the Tokyo folded is included in the migration, but PFSA is not able to migrate folders that do not have local replicas.
There are to options how to migrate such public folders:
- Replicate source public folder to the Exchange server for which you configured the public folder synchronization job. As soon as folder replicates, it will be involved into synchronization process.
- Add a public folder synchronization job for the source Exchange server where local replica for that public folder resides, and synchronize the public folder using that job.
To enable this feature, run the following command:
Set-MMExProjectOptions -MigrateRecoverableItems $true
Please consider the following:
- Migration of Recoverable Items is supported in all scenarios supported by MAgE that source exchange protocol is EWS.
- Migration Manager for Exchange migrates data from the following subfolders of Recoverable Items folder:
- Deletions
- Purges
- DiscoveryHolds
- Versions
- Filter for Recoverable Items is supported.
- Only supported types of Recoverable Items can be migrated
- In-Place Hold and Litigation Hold should be disabled as described below.
- Items in DiscoveryHolds folder may not be migrated in case the target DiscoveryHolds folder does not exist. DiscoveryHolds folder may not be created by the target Exchange server. To allow DiscoveryHolds folder creating by Exchange server, perform the following:
Disabling target In-Place Hold and Litigation Hold for mailbox migration and calendar synchronization
In order to prevent the duplication of items of Recoverable Items folder, we highly recommend to turn off In-Place Hold (not applicable to Exchange 2010) and Litigation Hold for every migrated target mailbox for the time of migration.
Why do I need to do it?
If a user who is placed on In-Place Hold or Litigation Hold modifies specific properties of a mailbox item, a copy of the original mailbox item is created before the changed item is written. The original copy is saved in the Recoverable Items folder. This process is known as "copy-on-write" page protection. The "copy-on-write" page protection applies to items residing in any mailbox folder.
By design, some actions in source Exchange or performed by Migration Manager for Exchange will lead to the growth of the Recoverable Items folder as the automatic purging of this folder is disabled when a mailbox is in the In-Place Hold and Litigation Hold state.
- Message deleted at source. A copy of deleted message is put into the Recoverable Items folder at target.
- Message modified at source. By design, Migration Manager for Exchange will delete the original message at target then migrate the modified message. A copy of original message is put into the Recoverable Items folder at target.
- Resynchronizing a mailbox (Resync). By design, Migration Manager for Exchange will remove all migrated messages at target then migrate all the messages. A copy of all messages is put into the Recoverable Items folder at target.
Please refer to the following Microsoft KB articles:
Turning on In-Place Hold and Litigation Hold
After mailboxes are switched (Switched status)., In-Place Hold and Litigation Hold can be turned on in the target .
Considerations
Please, consider the following:
- By design, Migration Manager for Exchange will still synchronize changes from source to target for a period after user switched (Switched status). During this period, source changes may cause duplicates in target Recoverable Items subfolders. In general, these changes usually are not very significant. In the other hand, if the administrator undoes switch a switched user, the In-Place Hold and Litigation Hold should be disabled in the target.
- Changes made during migration may cause duplicates in Recoverable Items folders because In-Place Hold or Litigation Hold remain enabled on the source for backward sync in case of 2-way Calendar sync
- Calendar item deleted at target. A copy of deleted message is put into the Recoverable Items folder at source.
- Calendar item modified at target. By design, Migration Manager for Exchange will delete the original message at source then migrate the modified message. A copy of the message is put into the Recoverable Items folder at source.
- Resynchronizing a mailbox (Resync). By design, Migration Manager for Exchange will remove all migrated Calendar items at source then migrate all the messages. A copy of all messages is put into the Recoverable Items folder at source.
- Items from the Recoverable Items folder are not restored to its original folders - the destination folder will be chosen automatically by the item class.
