Adding a Mailbox Collection
To create a new mailbox collection for an existing mailbox synchronization job, right-click the job in the management tree and click Add Collection.
This will start the Add Mailbox Collection Wizard, which will help you to set up and configure a new collection for the mailbox synchronization job. Each step of the wizard is described below.
Step 1. General Options
Specify the following general options:
- The name of the mailbox collection
- Optionally, a text description
- Whether the collection will be enabled immediately after creation
- The instance of the Migration Agent for Exchange that will process this collection
Step 2. Select Mailbox Database
Here, you can explicitly specify the target mailbox database where you want this collection's mailboxes to reside.
Select one of the following:
- Move them to this mailbox database
Select this option to explicitly specify the mailbox database to which existing mailboxes will be moved from any mailbox database that they are currently in.
- Leave them in their current mailbox database
Select this option if you have no mailbox database preferences. Also use it if you have already rearranged mailboxes in the target organization's mailbox databases prior to the migration and you want to keep your configuration.
Step 3. Workflow
When processing the collection Migration Manager will attempt to follow the schedule you specify on this page. By default, the option to Start as soon as possible is selected. Change this if you want to specify a date when the collection processing should be started.
Do one of the following:
- Select Start as soon as possible to make Migration Manager start moving the mailboxes in this collection immediately.
- Select Do not start before to make Migration Manager start processing the collection no sooner than the specified date, but this might not be the first collection in the queue.
Step 4. Collection Items
The collection can be populated with user accounts, groups and organizational units. To change the item list, use the buttons next to it.
|

|
NOTE: Migration Manager for Exchange does not process groups nested in organizational units (OUs). |
Step 5. Configure Mailbox Switching
The final step in mailbox migration is to switch to the target mailbox, making it the primary mailbox for the user. You can select to perform this step automatically and specify a schedule for it.
However, you may want to defer this step in case there are problems and perform the switch manually when you have made sure the mailboxes are ready.
You can also select to skip automatic switching for mailboxes with corrupted messages and set a threshold value for the number of corrupted messages. This allows you to manually investigate such mailboxes to make sure nothing of value is lost, and later complete their migration manually.
Reconfiguring Mailbox Collections
To change the original settings you specified during mailbox collection creation, open the properties of the collection.
Skipping Messages
After you created collection, you can configure filter settings that let you exclude from migration certain message classes and/or messages that are older than a specified number of days. For that, open Properties of the collection, select the Filters node in the dialog box that appears, and specify message classes to be excluded from the migration scope.
You have two options to exclude specific message class from the scope:
- Skip messages older than
If this option is selected, Migration Agent for Exchange will skip all specified message classes or certain message classes of messages that are older than a specified number of days.
- Skip all messages of the following classes
If this option is selected, Migration Agent for Exchange will skip all specified message classes or certain message classes of messages regardless of their age.
|

|
Caution: Use separate line for every message class. |
Use the following syntax for message classes:
- IPM.Post.*
Skips all messages of the IPM.Post type and its subtypes.
- IPM.Note.Shortcut
Skips all messages of the IPM.Note.Shortcut type.
- IPM.*.EnterpriseVault.Shortcut
Skips all messages which type has the IPM prefix and the EnterpriseVault.Shortcut suffix.
|
|
NOTE:
- You can use an asterisk wildcard character in names of message classes.
- For the list of basic message classes, see the Item Types and Message Classes article. You may also use third party tools to specific determine message classes.
|
When specifying filters for a collection, consider the following:
Manually Switching Mailboxes and Undoing Mailbox Switch
- Select the node of the mailbox collection you need.
- In the right pane, go to the Statistics tab.
- Select the mailboxes you need in the table at the bottom
- The Actions pane shows either the Switch or the Undo Switch action, depending on the state of the mailboxes. Click the action to perform the operation.
|
|
NOTE: After mailbox is switched, Migration Agent for Exchange continues synchronizing mail data from the source to the target mailbox to ensure that the most recent messages are successfully migrated to the target mailbox. Therefore, before removing mailbox from the collection after switch, check that mailbox was not processed during last migration session according to its Last Processed Time value. |
Setting Up a New Legacy Mailbox Synchronization Job
Selecting Legacy Mailbox Synchronization Job in the job type dialog box will start the Add Mailbox Synchronization Job Wizard, which will install the mailbox synchronization agents and help you to set up and configure the job.
This section guides you through each step of the wizard and explains the mailbox synchronization options.
|
|
NOTE: Resource mailboxes are migrated to Microsoft Exchange 2007 as user/legacy mailboxes, not as room/equipment mailboxes. |
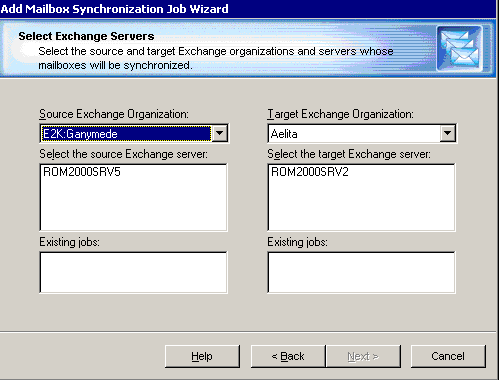
Step 1. Select Exchange Servers
Select the source and the target servers for the legacy mailbox synchronization job. The wizard will display the existing legacy mailbox synchronization jobs in which the selected servers already participate.
Step 2. Select Mailbox Database
During migration, a mailbox database is automatically associated with every target mailbox. Here, you can explicitly specify the target mailbox database where you want the mailboxes to reside.
|
|
NOTE: Prior to Exchange 2010, a mailbox database was known as a mailbox store. |
Do one of the following:
- Select the Move them to this mailbox database option to explicitly specify the mailbox database to which existing mailboxes will be moved from any mailbox database that they are currently in. The mailbox databases listed for this option are hosted on the target Exchange server selected for the legacy mailbox synchronization job.
- Select the Leave them in their current mailbox database (no matter what Exchange server hosts option if you have no mailbox database preferences. Also use it if you have already rearranged mailboxes in the target organization's mailbox databases prior to the migration and you want to keep your configuration.
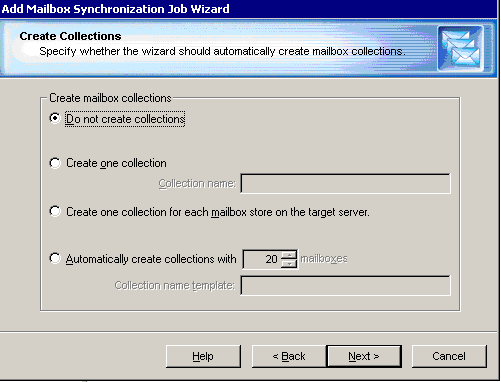
Step 3. Create Collections
The wizard can automatically create mailbox collections for the job. You can select one of the following options:
- Not to create mailbox collections. In this case you should later create collections manually as described below.
- Create one mailbox collection. In this case the wizard will prompt you to populate the collection in the next step.
- Create a separate mailbox collection for each mailbox store on the target server. In this case the name of each collection will be the same as the name of the target mailbox store to which the mailboxes from the collection will be migrated. In the next step, the wizard will allow you to populate each of the collections.
- Automatically create collections with the specified number of mailboxes. In this case the wizard will create collections that are already populated, each with the specified number of mailboxes. You should also specify the collection name template; the wizard will add the number of the collection to this template when naming each collection.
Step 4. Populate Collections
The next step of the wizard allows you to populate the collections if you selected to create either one collection for the job or a collection per each target mailbox store. Select the collection name from the list to populate it.
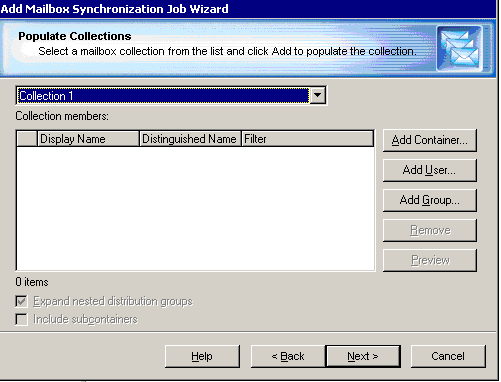
You can add mailboxes to the collection in the following ways:
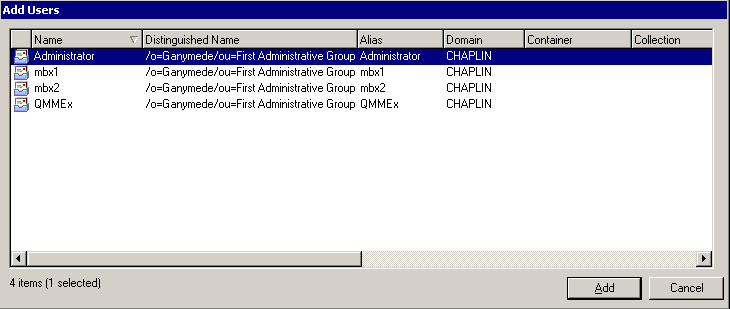
- Explicitly add mailboxes to the collection by clicking the Add User button and selecting mailboxes from the list.
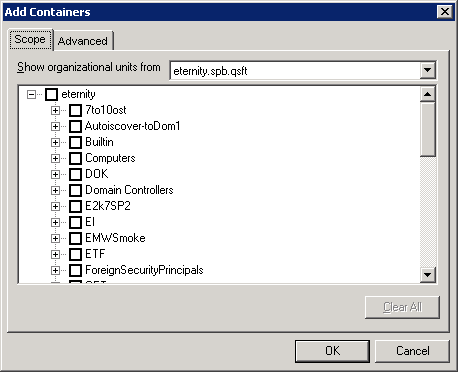
- Implicitly add mailboxes located in the containers by clicking the Add Container button and selecting the appropriate container check box. To add the mailboxes from the subcontainers, select the Include subcontainers check box. Only mailboxes hosted on the source server are migrated.
You can create and apply a display filter to reduce clutter in the list using the Advanced tab.
- Implicitly add mailboxes listed in the groups. To add the mailboxes listed in the nested groups select the Expand nested distribution groups check box. Only mailboxes hosted on the source server are migrated.
This page also allows you to preview the list of mailboxes added to the collection by clicking the Preview button.
Step 5. Specify Agent Installation Path
The wizard will install the mailbox synchronization agents and transmission agent synchronization agents on the source and target Exchange servers. If by the time you install the mail agents, any other agents or components have been already installed on these servers, you will not be allowed to specify the installation path for the agents; they will be installed in the location where the QMMEx$ServerName$ shared folder has been created.
By default the shared folder is created in the Windows %SystemRoot%\System32 folder. On Microsoft Exchange x64 the default shared folder is created in the %SystemRoot%\SysWOW64 folder.
Step 6. Complete the Wizard
After the agents are installed, the wizard will inform you that you can start the legacy mailbox synchronization job. We recommend that you verify all the agents and collection settings before starting the mailbox synchronization. The available options are discussed in theChanging Legacy Mailbox Collection Settings and Changing Mailbox Synchronization Agents’ Settings topics in this guide.
Step 7. Commit Changes
After a new job is created, it is marked with an exclamation mark. This means that you need to update the mailbox synchronization agents’ databases before starting the job. Right-click the job in the management tree and click Commit Changes on the shortcut menu to update the agents’ task lists on the remote servers.
You can also commit changes for all the legacy mailbox synchronization jobs you have created. To do that, right-click the Mailbox Synchronization node in the management tree and select Commit All Mailbox Synchronization Jobs from the shortcut menu.
Adding a Legacy Mailbox Collection
To create a new legacy mailbox collection for an existing legacy mailbox synchronization job, right-click the job in the management tree and click Add Collection.
This will start the Add Mailbox Collection Wizard, which will help you to set up and configure a new collection for the legacy mailbox synchronization job. Each step of the wizard is described below.
|
|
Caution: Though Remote Users Collections are also added using the Add Mailbox Collection Wizard, the steps for creating a Remote Users Collection are somewhat different. Please pay attention to the notes regarding Remote Users Collections in the descriptions of the steps below. |
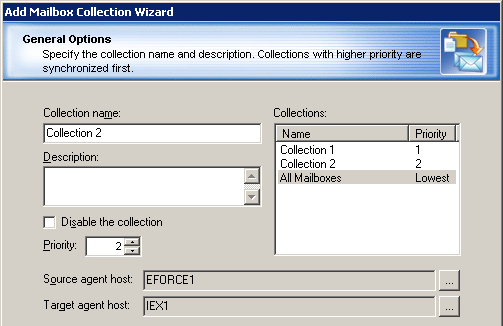
Step 1. General Options
In the first step of the wizard, specify a name for the collection and set its priority. You can optionally provide a text description for the collection.
For load balancing purposes, you have the option of selecting two specific registered agent hosts that will work with the source mailboxes and target mailboxes respectively.
You can temporarily disable the collection and it will not be involved in the synchronization process until you enable it.
Step 2. Select Mailbox Database
You can override the target mailbox settings configured for the legacy mailbox synchronization job (see the Step 2. Select Mailbox Database section of theSetting Up a New Legacy Mailbox Synchronization Jobtopic for details).
|
|
NOTE: Do not change the mailbox database for a collection that is already running. |
Step 3. Workflow
Set the preferred start date and other options for migrating the collection.
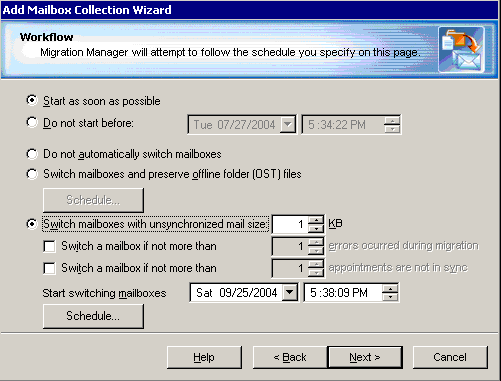
Each switch and synchronization option provided by this step is discussed in detail below:
- By default, the option to start as soon as possible is selected. You can specify a particular date and time to start migrating the collection.
- If you prefer to switch mailboxes manually using the Migration Manager console (rather than have the mail agent switch the mailboxes automatically), select the Do not automatically switch mailboxes option. For more information about the advantages and disadvantages of a manual switch, refer to the Mailbox Switch topic of this guide.
- To create a Remote Users Collection, select the Switch mailboxes and preserve offline folder (OST) files option. The mail agent will recreate the target mailboxes corresponding to the mailboxes of this collection (if they exist) and will try to preserve the offline folder (OST) files for these mailboxes. Since a mailbox processed by the mail agent within a Remote Users Collection is not available while it is being processed, it is recommended to schedule such a collection for off hours using the Schedule button.
- If you want the mailbox synchronization agents to switch the mailboxes from the collection once they are synchronized, select the Switch mailboxes with unsynchronized mail size option and specify the size of mail that can remain unsynchronized by the time the agent starts switching mailboxes.
You can optionally select whether a mailbox should be switched even if errors occurred during synchronization or if there are appointments that were not processed by the Calendar Synchronization Agent. Please note that no mail will stay unsynchronized by the time when the mailbox is finally switched, since the mailbox switch is a complex process and the mail agent makes several passes along the mailboxes of the collection between the moment when the switch is started and the moment when the mailbox is switched.
Use the Start switching mailboxes box to specify the preferred starting time of the automatic switch performed by the mail agent.
To schedule the time when the collection should be processed by the agent, click the Schedule button and select the times when the agent is allowed or not allowed to process the collection.
Step 4. Populate the Collection
You can add mailboxes to the collection in the following ways:
- Explicitly add mailboxes to the collection by clicking the Add User button and selecting mailboxes from the list.
- Implicitly add mailboxes located in the containers by clicking the Add Container button and selecting the appropriate container check box. To add the mailboxes from the subcontainers as well, select the Include subcontainers check box. Only mailboxes hosted on the source server are migrated. You can create and apply a storage filter to either the mailboxes of the server or to the mailboxes of the selected mailbox store using the Storage and Advanced tabs.
- Implicitly add mailboxes listed in the groups. To add the mailboxes listed in the nested groups, select the Expand nested distribution groups check box. Only mailboxes hosted on the source server are migrated.
|
|
NOTE: Migration Manager for Exchange does not process groups nested in organizational units (OUs). |
To preview the list of mailboxes added to the collection, click Preview.
Step 5. Complete the Wizard and Commit Changes
After the new collection is created, the job is marked with an exclamation mark that means that you need to update the mailbox synchronization agents’ databases. Right-click the job in the management tree and click Commit Changes on the shortcut menu to update the agents’ task lists on the remote servers.
Importing Legacy Mailbox Collection Members
As explained in the previous sections, a mailbox collection can be populated when you set up a legacy mailbox synchronization job or when you add a mailbox collection to the synchronization job. A third way to populate a mailbox collection is by importing a file with a list of mailboxes, which you might have created as an Excel spreadsheet or a plain text file.
Right-click the legacy mailbox synchronization job node in the management tree and click Import Members on the shortcut menu.
This will start the Import Mailbox Collection Members wizard. The wizard's steps are described below.
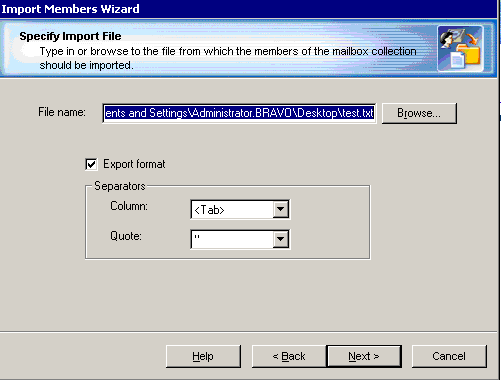
Step 1. Specify Import File
Type the full path to the file or browse to it. Select the character used as the column separator and for quoting.
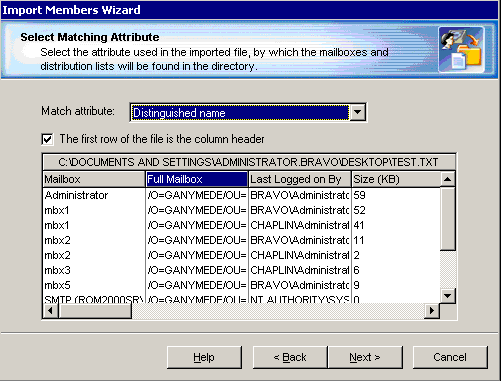
Step 2. Select Matching Attribute
The wizard displays the data from the file you specified. Indicate whether the first row of the table is the column header.
Select the attribute from the Match attribute list and click on the header of the column that contains this attribute. In the example below, the wizard will search for mailboxes whose Distinguished Name is equal to any value in the selected column.
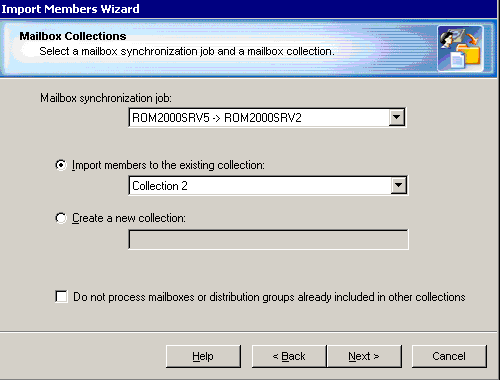
Step 3. Mailbox Collections
Select the legacy mailbox synchronization job and the collection to be populated. The wizard can either import members to an existing collection or create a new mailbox collection.
If the import file contains mailboxes that have already been added to other mailbox collections, you might not want to remove them from those collections. In this case, select the check box at the bottom of the page.
Step 4. Complete the Wizard and Commit Changes
The wizard displays the number of entries from the import file that were applied and the number of errors.
After you click Finish, the job is marked with an exclamation mark that means that you need to update the mailbox synchronization agents’ databases. Right-click the job in the management tree and click Commit Changes on the shortcut menu to update the agents’ task lists on the remote servers.
