Chat now with support
Chat with Support

Foglight 5.9.4 - Web Component Tutorial

Using the Web Component Tutorial Tutorial 1: Drag and Drop Tutorial 2: Creating a Dashboard Tutorial 3: Adding a Drilldown Page Tutorial 4: Adding Views Tutorial 5: Using a Grid Tutorial 6: Reports Tutorial 7: Creating a Form Tutorial 8: Renderers Tutorial 9: Adding Questions and Answers Tutorial 10: Sending Messages to Other Users

Bean Input components

This tutorial introduces the usage of Bean Input components as a way of collecting data. Notice that very few context keys were declared, which makes it a much more efficient mechanism for collecting and storing data, especially when large amounts of data inputs are required.

Dialog component

If you set a flow on a component in a form, it is triggered independently. This ability, combined with the new smart update functionality, removes any HTML-induced restrictions on how a particular page and its submissions need to be structured.

The proper way to take advantage of this feature is to not use the existing submit action on the form, but to use the Form Dialog component. Additionally, the Wizard component also supports this dual mode of update.

The Form Dialog component allows you to specify multiple actions and draws them in a standard way. If the form is a popup, it automatically renders a cancel button that provides the same functionality as clicking the Close button in the title bar to close the window.

The input elements of the form are then added to whatever layout you need, and added to the Form Dialog itself.

Additional activities

A better design is to decouple saving the information from the act of adding or removing each manager. The functions can be changed so the person doing the data entry adds and removes rows as before, but this time only the table updates. The changes are not saved, and if the user logs out, the data is lost. This design permits a review of all the changes. If it turns out that the user wants to cancel the edits, the user logs out and the changes are lost, but the original data remains.

A separate Save button is used to commit the edits to the table.

Add a Save button to the table

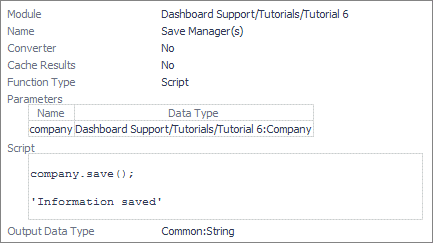
Change the way that managers are added and removed. The tutorial is presented in such a way that a manager is added to the database immediately after disposing of the dialog component. Similarly, managers are deleted by choosing Remove Manager. To allow for the changes to be reviewed, change the functions so that updating the manager list is a separate action triggered by a button on the table toolbar. The table updates as managers are added and deleted, but the changes are not be committed until the Save button is clicked.

This is a particularly easy change to make. All you need to do is move the Groovy statement company.save() to a new function called Save Manager(s) and invoke it from a new table toolbar button called Save.

Related Documents

The document was helpful.

Select Rating

I easily found the information I needed.

Select Rating