
Protecting virtual machines
To protect one or more agentless ESXi virtual machines (VMs), do the following:
|
NOTE: Quest recommends that VMware Tools be installed on virtual machines (VMs) you want to protect on vSphere or ESXi hosts. When VMware Tools are installed on a VM using a Windows operating system (OS), the backups that the Rapid Recovery Core captures use Microsoft Volume Shadow Services (VSS). For information on the behavior of agentless VMs with or without VMware Tools, go to: https://support.quest.com/technical-documents/rapid-recovery/6.3/user-guide/28#TOPIC-1190705. |
|
1 |
From the Rapid Recovery Core Console button bar, click the Protect drop-down menu, and then select |
|
• |
If you have multiple repositories defined, or you want to establish encryption, select Advanced (show optional steps). |
|
3 |
Click Next. |
|
4 |
|
Optionally, to save your credentials to Credentials Vault, click the plus sign next to the text box. For more information, see https://support.quest.com/zh-cn/technical-documents/rapid-recovery/6.3/user-guide/46#TOPIC-1190774. | |
|
6 |
Ensure that Use Rapid Snap for Virtual host-based protection is selected. (This option is selected by default). |
|
7 |
Click Next. |
|
8 |
On the Select Machines page, select the VMs you want to protect. You can use the drop-down menu to display a tree of Hosts and Clusters or of VMs and Templates exactly as they appear in your vCenter/ESXi environment. |
|
9 |
If you want to automatically protect new VMs when they are added to the host, select Auto protect new machines, and then complete the following steps. |
|
a |
Click Next. |
|
b |
On the Auto Protection page, select any containers in which you expect to add new machines. |
|
c |
Click Next. |
|
10 |
Click Next. |
|
11 |
On the Protection page, select the appropriate protection schedule settings as described below: |
|
• |
To use the default protection schedule, in the Schedule Settings option, select Default protection (hourly snapshots of all volumes). |
|
• |
To define a different protection schedule, in the Schedule Settings option, select Custom protection. |
|
• |
If you specified default protection, then click Next and continue to Step 14 to the ABM Settings page. |
|
• |
If you specified custom protection, then click Next and continue to the next step to configure a protection schedule. |
|
13 |
On the Protection Schedule page, define a custom protection schedule and then click Next. For details on defining a custom protection schedule, see https://support.quest.com/technical-documents/rapid-recovery/6.3/user-guide/32#TOPIC-1190721. |
|
14 |
Optionally, on the ABM Settings page, select Enable Active Block Mapping, and then complete the following information: |
|
If you opted to exclude subdirectories, click Add and enter the location in the Path table for each item you want to exclude. |
|
15 |
Click Next. |
|
• |
If you selected a Typical configuration for the Protect Machine Wizard in Step 2 and specified default protection, then click Finish to confirm your choices, close the wizard, and protect the machine you specified. |
|
• |
If you selected Advanced configuration for the Protect Machine Wizard in Step 2, and default protection, then click Next to see repository and encryption options. |
|
17 |
On the Repository page, select the repository you want to use to store recovery points for this machine, and then click Next. |
|
18 |
If you want to use encryption keys for data stored in the repository, on the Encryption page select Encrypt the data at rest in a repository, and then do either of the following: |
|
• |
To select an existing encryption key to apply to all new data stored in your repository, select Encrypt data using Core-based encryption with an existing key, and from the Select encryption key drop-down menu, select the encryption key. |
|
• |
To define a new encryption key at this time to apply to all future data stored in your repository, select Encrypt data using Core-based encryption with a new key, and then enter information about the key as described in the table below: |
|
19 |
Click Finish to save and apply your settings. |
|
NOTE: The first time protection is added for a machine, a base image (that is, a snapshot of all the data in the protected volumes) transfers to the repository indicated in your Rapid Recovery Core following the schedule you defined, unless you specified that the Core should initially pause protection. For information on pausing and resuming protection, see https://support.quest.com/technical-documents/rapid-recovery/6.3/user-guide/33#TOPIC-1190723. |
Configuring Cloud account
To add a cloud account, do the following:
|
1 |
Creating an Azure storage account. For more information, see https://support.quest.com/zh-cn/technical-documents/rapid-recovery/6.3/user-guide/71#TOPIC-1190877. |
|
2 |
Creating an Azure Active Directory web application. For more information, see https://support.quest.com/zh-cn/technical-documents/rapid-recovery/6.3/user-guide/72#TOPIC-1190879. |
|
a |
|
b |
|
c |
Select Microsoft Azure Resource Management (for Virtual Export) from the Cloud type drop-down list. |
|
To obtain this value from the Azure UI, select Azure Active Directory > Properties > Directory ID. | |
|
Enter the application ID for your Azure AD application precisely. To obtain this value from the Azure UI, select Azure Active Directory > App registrations, select your application, and from the Settings pane, copy the Application ID. | |
|
Enter the secret key for this account. You must obtain this value from the Azure when you set up the key. If you do not record it, you must create a new secret key. From the Azure UI, to see or create secret keys, select Azure Active Directory > App registrations, select your application, click | |
|
Enter the subscription ID for your Azure account precisely. To obtain this value from the Azure UI, select |
Monitoring Rapid Recovery Server
To collect Rapid Recovery Server data in Foglight, create a Rapid Recovery agent in Foglight first. To create a Rapid Recovery agent, go to Homes > Protection > Rapid Recovery > Administration.
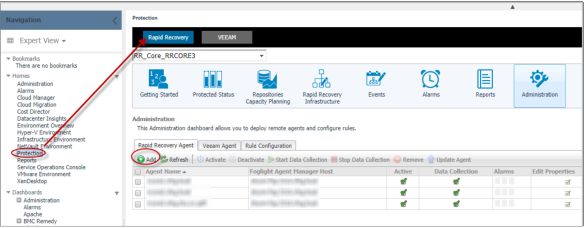
For more information, see Administration Tab > Creating Rapid Recovery Agent in Foglight Protect Dashboard Guide.
Monitoring vCenter
|
IMPORTANT: 1. Before creating your first VMware Performance agent, you must configure a Virtual Center user with sufficient privileges. For more information, see Enabling VMware Performance Agents to Collect Data from a Virtual Center in the Foglight for VMware Installation Guide. 2. If the protected vCenter in rapid recovery is using IP, ensure that the vCenter is monitored by the same IP. However, if the protected vCenter in rapid recovery is using FQDN, ensure that the vCenter is monitored by the same FQDN. |
For more information, see Using Foglight for VMware > Interacting with Foglight for VMware > Configuring monitoring agents for data collection in Foglight for VMware User and Reference Guide.