This page explains how to change the Site URL Name for a model Site in Evolve.
The Site URL Name is the part of the URL which is specific to a particular site.
For Dynamic Sites this is:
http://<server-name>/<evolve-IIS-site-name>/sites/<site-url-name>/
For Static Sites, this is:
http://<server-name>/<evolve-IIS-site-name>/statics/<site-url-name>/
Change the Site URL Name for a Dynamic Site
To change the Site URL Name for a Dynamic Site:
In Evolve Designer, navigate to the Deployments > [server-name] > Model node
Change the Site URL Name to the new name you want to use, ensuring the text is lower case, and has no spaces or special characters
Publish the Site
The Site is Published, is displayed on the Evolve Multi-Sites page, and can be accessed directly at the new URL.
Change the Site URL Name for a Static Site
To change the Site URL Name for a Static Site:
In Evolve Designer, navigate to the Deployments > [server-name] > Model node
Change the Site URL Name to the new name you want to use, ensuring the text is lower case, and has no spaces or special characters
Publish the Site
The Site is Published and can be accessed directly at the new URL.
|
|
When you publish the Site with a changed Site URL Name, the original Site still exists and can still be accessed via the original URL. To completely remove the original Site, you must: 1. On the Evolve server machine, browse to <your-evolve-install-path>\Data\Statics 2. Delete the folder named as your original Site URL Name. |
|---|
The Evolve REST API was added to provide backwards compatibility support for the discontinued Web Portal SOAP API.
Where it differs slightly is in the method of calling the API. This has been modified to use the more standard RESTful http approach, using
POST, GET, PUT and DELETE protocols.
All of the calls return a json response, but can optionally return XML. The XML returned is equivalent to the older Portal API, and so should
ensure it is relatively simple to integrate, in-place of the older service.
To configure the API, it is first necessary to enable it from within Evolve:
Having configured and ensured the Evolve server is functioning.
Start Evolve Designer with Administrator Permissions.
Goto your Evolve server settings
Check the box 'Enable Web REST API"
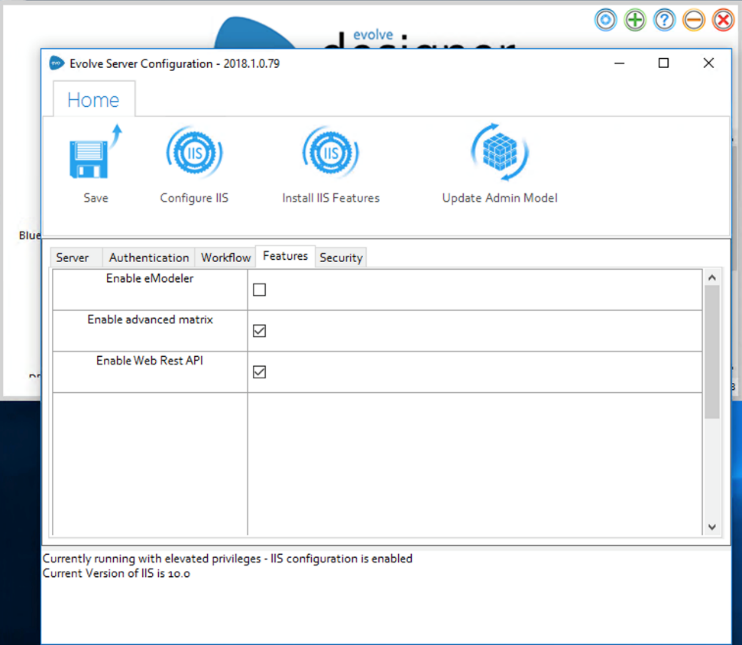
Save the configuration
Press "Configure IIS"
The default endpoint for the API will be:
http://<your-server>/WebRESTAPI/api/<path to endpoint>
To use the REST API, please see the documentation, located here
|
|
When using the API, always remember to use the /auth endpoint to authenticate first, and remember to include the returned token |
|---|

