
Changing Resource Utilization Settings
|
Navigation: Modifying Content Matrix Configuration and Settings > Changing Resource Utilization Settings |
How many threads can be used simultaneously per job in Metalogix Content Matrix is controlled by the Edit Resource Utilization Settings option, which is accessible from the Settings ribbon at the top of the Console UI.
If the option is clicked, a dialog containing a slider will appear that will allow control of the number of threads available within a single action. If the slider is moved all the way to the left, this will turn off multithreading and only allow a single thread to be used during the action. (For more information on threading, refer to the Microsoft article About Processes and Threads.)
NOTE: Turning off multithreading in this way can be a valuable way of troubleshooting whether multithreading is causing issues.
If the slider is left in the middle, it will allow twice the number of processors in threads to be created per action. For example, if the machine running Metalogix Content Matrix has a two core CPU, four threads will be able to be used if the slider is in the below state:

Moving the slider farther to the right will allow more threads to be used, but can potentially overwhelm system resources. This could lead to potential errors if the system resources cannot handle the data being migrated. There is a chance that if the speed is too high, you would see a slowdown in the overall migration, because the migration is trying to run actions faster than the resources properly allow.
While this value can be set through the Content Matrix Console, you can also set it through the back end, if the UI setting does not seem to be working for you. Please contact Quest Support for more information on this back end setting.
Configuring Content Matrix for Distributed Migration
You can use Distributed Migration to significantly improve the time it takes to complete large migration jobs by distributing the workload efficiently across the resource pool. The distributed model enables parallel processing of migration jobs that reduces migration time, and enables higher utilization, better workload throughput and higher productivity from deployed resources.
The feature consist of a central Distributed Database and one or more Distributed Migration agents.
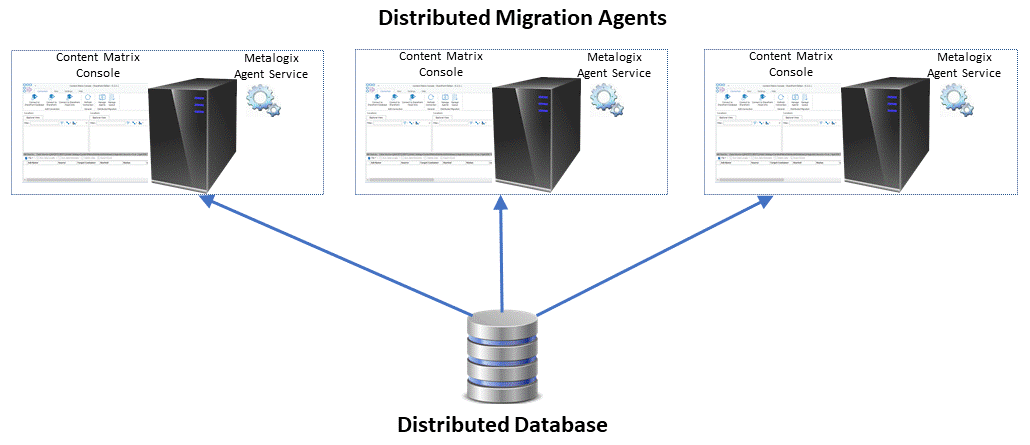
Distributed Migration Components
Distributed Migration relys on the following components:
Distributed Database
This is a SQL Server database that contains the repository or queue of migration job definitions which the agents can run. Distributed Migration agents share the same Distributed Database.
NOTE: The Distributed Database cannot be a SQL CE database.
Agents
Agents are physical or virtual machines on which you can run migrations remotely. Installed on each agent are the Content Matrix Console and the Metalogix Agent Service, which handles job queuing and processing. Any available agent can pull a migration job that has been set to Run Remotely directly from the Distributed Database.
Any logging information is then be sent to the Distributed Database.
When an agent is running a migration job, any interaction with the agent, such as changing a configuration setting, is not recommended.
If Distributed Migration was configured prior to version 9.2:
To provide more efficient resource utilization, the Distributed Migration model has been re-architected to eliminate the use of a Controller to push jobs to agents. Instead, Distributed Migration uses a Windows Service that allows any available agent to pull a migration job that has been set to Run Remotely directly from the Distributed Database.
If you configured Distributed Migration prior to version 9.2, you will need to reconfigure each agent in order to continue using Distributed Migration and to run any migration jobs remotely.
Refer to the Reconfiguring Distributed Migration After an Upgrade guide for more information.
NOTE: You will notice after an upgrade that the Configure Distributed Migration and Configure Self-Service options no longer display in the Content Matrix Console ribbon (Self-Service Migration has been removed as of version 9.2) and the Manage Agents dialog is empty.
Important Note About Global Mappings and Environmental Settings
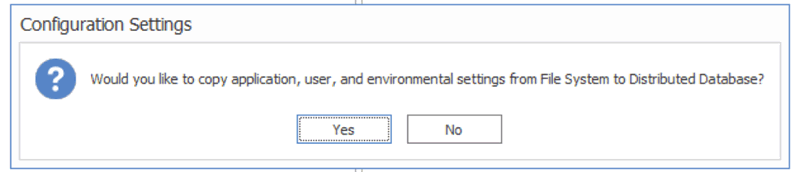
The first time that a connection is made to the Distributed Database, Global (Domain, Url, Guid, and User) Mappings and environmental settings are copied from the connecting user's local machine and used by all agents. With subsequent connections to the Distributed Database, a pop-up displays with the option to overwrite Mappings and local settings with those used by the currently-connecting user's machine.
Global Mappings and settings can be copied from any machine that connects to the Distributed Database, even if it is not configured as an agent.
Distributed Migration System Requirements
|
Navigation: Configuring Content Matrix for Distributed Migration > Distributed Migration System Requirements |
Requirements for the Distributed Database
·The Distributed Database must use a Microsoft-supported SQL server.
·The Distributed Database can reside on any machine in network, provided that all agents have access to that machine.
·The Distributed Database should be created from the Metalogix Content Matrix Console.
NOTE: It is recommended that SQL Server Authentication be used to connect to the Distributed Database, as it will allow for cross-domain connections.
Requirements for an Agent Machine
·An agent machine or workstation should have 16 GB of free RAM.
NOTE: An agent machine can be a physical or virtual machine.
·Microsoft .NET Framework 4.7.2 must be installed on the machine.
·The agent machine must meet all the prerequisites as specified in the Metalogix Content Matrix Console Advanced Installation Guide.
·The machine must allow remote connections to itself.
·All instances of Windows PowerShell must be closed.
·The following services must be started:
§Remote Registry
§Server Service
§Workstation
|
|
· If a migration job is using SP 2013 or later DB as a source connection, then users can only run jobs remotely on an agent that meets the connection requirements for the same DB version as the machine from which the migration is configured. This means that the agent machines must either: §Have the same version of SharePoint installed on or be a SharePoint WFE for a comptible version. OR §Be a 64-bit machine that has no version of SharePoint installed on it. ·Local Object Model (OM) connections to SharePoint are not supported when using Remote Agents. - A Local OM connection to SharePoint can only be made when Metalogix Content Matrix is installed on a machine that is running SharePoint (a SharePoint server or WFE). Since this type of connection can be made on the Host machine, but cannot be guaranteed to also be available on an agent machine, it is not a supported connection adapter for running migrations using remote Agents. For making remote Object Model connections, make sure the Metalogix Extension Web Service (MEWS) is installed on each agent machine. |
|---|

Configuring Agents for Distributed Migration
|
Navigation: Configuring Content Matrix for Distributed Migration > Configuring Agents for Distributed Migration |
Configuring an Agent for Distributed Migration consists of the following high-level tasks:
I.Install the latest version of Content Matrix then create and/or connect to the Distributed Database.
II.Copy the Agent Service installation files to the agent machine and install from a Command Prompt.
III.For the first agent, generate a unique security certificate for the Metalogix Agent Service.
NOTE: Once created on the first agent, the name of the certificate is stored in the Distributed Database and then it can be copied to other agents. (The same certificate needs to be used across all agents.)
IV.Install the Metalogix Agent Service, which
·installs the Agent Service as a Windows service
·installs the certificate to My User Account storage
·saves the certificate name to the Distributed Database
V.Start the Metalogix Agent Service.
Permission Requirements
The account used to configure agents for Distributed Migration must:
·be an Administrator
AND
·have permissions to Log on as a Service (via Administrative Tools > Local Security Policy > User Rights Assignment).
To install the latest version of Content Matrix then connect to the Distributed Database:
1.Log into the machine using an account that meets Permissions Requirements.
2.Download or copy the latest version of the Content Matrix installation kit to the machine.
3.Install the Content Matrix Console and the Metalogix Extension Web Service (MEWs). (See the Metalogix Content Matrix Advanced Installation Guide for details.)
4.Open the Console and create/connect to the Distributed Database as follows:
a)From the Job List, choose File > Connect to Distributed Database.
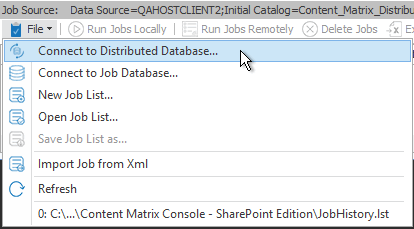
b)Select the SQL Server and SQL Database you want to connect to.
NOTE: Remember to use the same Distributed Database for all agents in the "cluster."
Whenever a machine connects to the Distributed Database, a pop-up will display with the option of copying User Mappings and other local machine settings to the database.
CAUTION: If you are configuring multiple agents, remember that if you click [Yes], any User Mappings and settings that already exist in the Distributed Database will be overwritten.
5.Close the Content Matrix Console.
To run the Agent Service application on the agent machine:
1.Copy the ContentMatrixAgentService_[version].zip file from the Content Matrix download folder and extract the files (a recommended location is C:\Program Files (x86)\Metalogix\Agent Service).
2.Either:
·navigate to the Agent Services folder and double-click Metalogix.Agent.exe
OR
·open a Command Prompt and change the directory to point to Metalogix.Agent.exe.
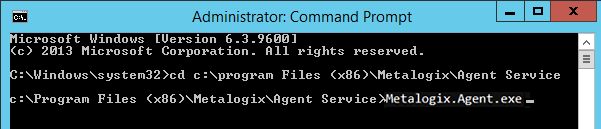
You will be provided with the following options:
·Generate a Security Certificate for the Metalogix Agent Service
·Install the Metalogix Agent Service
·Uninstall the Metalogix Agent Service
For each option, you will be prompted to provide the required information. If a default value is provided, you can either press <Enter> to accept the default or manually override it.
NOTE: Alternatively, you can configure agents by entering arguments manually.
To generate a self-signed certificate for agents:
NOTE: Create the certificate for the first agent only, then copy that certificate to additional agent machines. Make sure that the folder into which you are generating the certificate already exists.
Select the option Generate a Security Certificate for the Metalogix Agent Service.
You will be prompted to provide:
·the certificate name
·the certificate password
·the path to the location to which the certificate will be generated
NOTES:
·When generating a certificate, there is no need to enter the file extension as it will be ignored.
·It is necessary to use double quotation marks (" ") to enclose:
§a password that contains special characters
§a file path that contains spaces
To install the Metalogix Agent Service:
NOTE: If you have already created a self-signed certificate on the first agent, make sure it is copied to the other agent(s) before performing this procedure .
Select the option Install the Metalogix Agent Service.
You will be prompted for:
·the Administrator account (in the format domain\username).
·the Administrator account password
·the path to the location of the certificate
·the certificate password
NOTE: It is necessary to use double quotation marks (" ") to enclose:
·a password that contains special characters
·a file path that contains spaces.
To Start the Metalogix Agent Service:
1.Navigate to Administrative Tools > Services > Metalogix Agent Service.
2.Right-click and choose Start.