
Copying Content Types as a Separate Action
|
Navigation: Copying SharePoint Objects as a Separate Action > Copying Content Types as a Separate Action |
NOTE: This option is generally only recommended if the source site has already been migrated over to the target, or if you are trying to copy content types over to a different target location.

To copy content types as a separate action:
1.In Explorer View, select the site from which you want to copy content types.
2.Right-click and choose Copy Site.
3.Select the target location.
4. Right-click and choose Paste Site Objects > Content Types.
5.If you want to copy the content types to any child sites below the selected node, check the Copy Content Types Recursively box.
NOTE: If you leave this box unchecked, content types will be copied to the selected site only.
6.Select the Content Types on the source site that you want to copy and move them to the Content Types to copy pane.
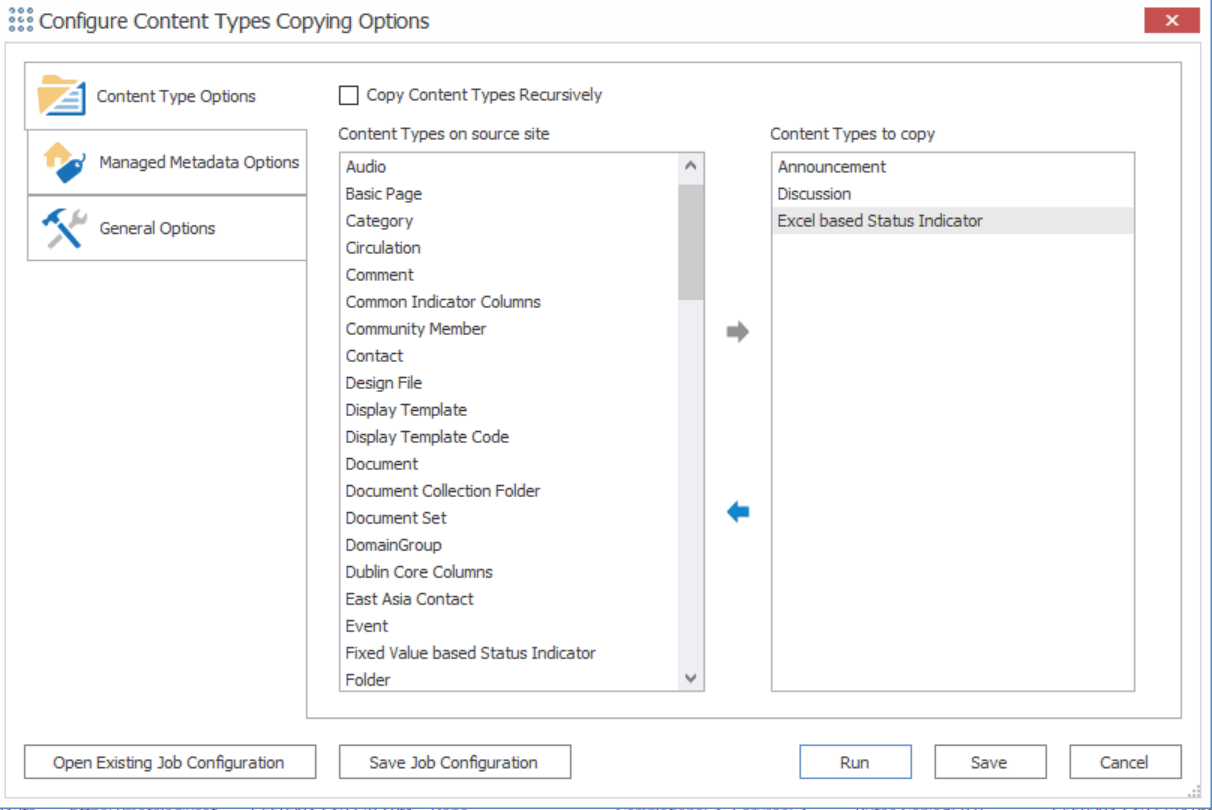
NOTE: Content types from the parent site structure will be copied in case there is any inheritance that needs to be preserved.
You can now save or run the action.
Copying Classic Web Parts as a Separate Action
|
Navigation: Copying SharePoint Objects as a Separate Action > Copying Classic Web Parts as a Separate Action |
NOTE: This option is generally only recommended if the source site has already been migrated over to the target, or if you are trying to copy content types over to a different target location
To copy classic web parts as a separate action:
1.In Explorer View, select site whose web parts you want to copy.
2.Right-click, and choose Copy Site.
3.Select the target site to which you want to copy the web parts.
4.Right-click and choose Paste Site Objects > Web Parts.
5.Complete the Configure Default Web Part Page Copying Options dialog - Classic Web Parts tab as you would if you were performing a full migration.
You can now save or run the action.
Configuring Global Mappings as a Separate Action
|
Navigation: Copying SharePoint Objects as a Separate Action > Configuring Global Mappings as a Separate Action |
You can configure global (user, domain, URL, an/or Guid) Mappings as part of a full migration or as a separate action.
REMINDER: Global Mappings are not migration-specific but rather apply to all environments to which Metalogix Content Matrix is connected.
To initiate global mapping configuration as a separate action:
1.From the Metalogix Content Matrix Console ribbon, select Configure Global Mappings.

2.Continue as you would if you were configuring global mappings as part of a full migration.
Updating Site Collection Settings After a Migration
|
Navigation: Copying SharePoint Objects as a Separate Action > Updating Site Collection Settings After a Migration |
Metalogix Content Matrix can update the Site Collection Administrators site collection quotas after the initial migration.
NOTE: The account that is running Metalogix Content Matrix must already be a Site Collection Administrator.
To update Site Collection Settings:
1.In the Explorer View, select the site collection whose settings you want to update.
2.Right-click and choose Change Site Collection Settings > Admin and Quota Settings.
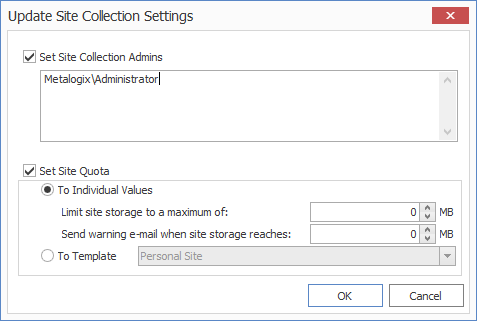
3.To update the list of Site Collection Administrators, check the Set Site Collection Admins box.
NOTE: The current list of Site Collection administrators is listed in the window below the check-box. To add a user to the list, manually enter the domain/username in the window. Multiple users can be added by using a semicolon (";") to separate each user account.
Metalogix Content Matrix does not validate these users, so if the user does not exist, or if there are any spelling error, they will not be detected.
Removing all users from the Site Collection Administrators collection, including the account that is currently logged into Metalogix Content Matrix, can cause issues, since once the change has been updated the migrating account, as well as other accounts, would no longer have permissions to perform any actions (or migrations) on that Site Collection. It is highly recommended that at least one account (the migrating account) is left in the Site Collection Administrators collection.
4.To update the site quota settings, check the Set Site Quota box.
§check the Set Site Quota box, and
§select the appropriate option:
§To Source Value (default) - the quota value from the source site will be used.
§To Individual Values:
·Limit site storage to a maximum of: "X" Mb - The maximum size of the new site collection., in megabytes (Mb)
·Send warning e-mail when site storage reaches: "X" Mb - The size at which to send a warning e-mail to the Site Collection Administrator, that the site collection is getting near it's set volume capacity.
·To Template - Match the same value for a site template on the target side.
NOTE: This drop down list will only display site templates that contain a site quota value.