
Mapping Roles
|
Navigation: Configuring Copying Options > Permissions Options > Configuring Permissions Options > Mapping Roles |
When you select Override Role Mappings and click the [...] button from the Permissions Options tab, you can set a name based mapping for permissions role mappings that will override any other existing permissions role mapping that is set up.
This option uses conditional logic so these mappings can be set for all cases, or can be set to only be used in specific cases. For example, an Override Role Mappings can be set up to map "Admin" to "Manage Hierarchy" for any nodes that start with a specific value. Or the same mapping can be set up for an entire site.
To set up a role mapping:
1.In the Edit Role Mappings dialog, click Add to add a new mapping.
2.In the Edit Mapping section:
a)Enter the permission role from the source that you want to Map.
b)Enter the permission role in the target that you want to map To.
c)From the On drop-down, select the scope of the mapping: All SharePoint Objects, Sites, Lists and Libraries, Folders, or List Items and Documents.
3.If you want to filter the objects to which you want to apply the mapping, click [Edit] to display the Define Mapping Condition dialog and apply any filter expressions
When you close the Define Mapping Condition dialog, the filter(s) you applied will display in the Where box.
4.If you want to add another mapping, repeat Steps 1-3.
5.When you have finished mapping roles, click [OK] .
These mappings will now be used in the migration.
Mapping Options
|
Navigation: Configuring Copying Options > Mapping Options |
To configure Mapping options:
1.If you want to Map Audiences, check this box.
NOTE: Unlike the Copy Audiences option, the Map Audience option uses an algorithm to map the source audiences GUIDs (Globally Unique Identifier) to target audiences GUIDs. This mapping is based on the audience name, and allows Metalogix Content Matrix to maintain any audience targeting information between servers. If an audience on the source doesn't have an equivalent audience on the target, it gets mapped to the closest matching one. The mapping algorithm is used since audiences on the source and target can have different properties available to them, and they may not match exactly.
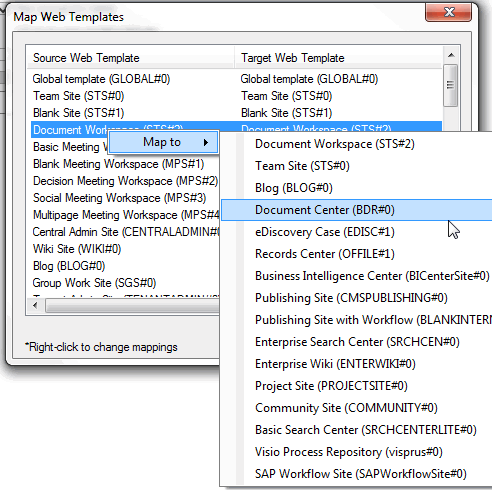
2.If you are migrating sites and want to map child sites to different site templates on the target:
a)Check the Map Child Site Template box.
b)Click the [ ] button to display the Map Web Templates dialog.
c)Select the row containing the Source Web Template you want to map, right click, and choose the new corresponding Target Web Template.
NOTES: For subsequent migrations, site template mappings will persist until changed.
This options will change the site template mapping for any sub-sites within the migration (and the mapping for any subsequent site migrations). Depending on the level at which you initiated the migration, you can change the top-level template on either the Site Collections Options tab or the Site Options tab.
3.If you want to rename any sites, lists, and/or folders at the target:
a)Check the Rename Specific Sites, Lists and Folders box.
b)Click the [ ] button to display the Rename Specific Site, Lists and Folders dialog.
c)Enter the new internal Name and Title (that is, the display name).
NOTE: A slightly different version of this feature is available depending on the level of the migration.
4.If you want groups to be mapped to the target site by name instead of by membership, check the Map groups by name box.
5.If you chose to Map groups by name and you also want to overwrite any groups on the target, check the Overwrite existing groups box.
NOTE: If you leave this box unchecked, users will be appended into existing groups.
6.If you initiated the migration from the folder or item level and want to map source columns to different target columns:
a)Check the Map list item data to different columns box.
b)Click the [ ] button to display the Column Mapping dialog.
c)Follow the procedure for Mapping Columns.
7.Once the source and target side columns have been selected, click Map. These columns will now be mapped to each other, and the mapping will populate in the bottom window.
8.When you have finished mapping columns, click [OK].
9.If you want to map missing users from the source to a specified user account:
a)Check the Map missing users to: box.
b)Enter the full account name of the user you want to map to.
NOTES:
§This text field does not authenticate, so any spelling mistakes will not be automatically corrected.
§This option does not apply to the Primary Administrator or Secondary Administrator options, when migrating a SharePoint Site Collection.
10.For migrations to SharePoint Online using the Import Pipeline, if you want to migrate the names of users who are disabled in or have been deleted from Active Directory, check the Allow copying of deleted Active Directory users box. When you select this option, the name of a disabled or deleted user will display as metadata (for example, in the Modified by column of a list/library) but will not be associated with an actual Active Directory account.
NOTES:
·If missing users are mapped to another user account, the mapping to the user account will take precedence.
·This option is disabled for migrations to SharePoint on premises.
11.If you want to map users, domains, URLs, and/or GUIDs between source and target, click [Edit Global Mappings...] to display the Specify Global Mappings... dialog. Continue with the procedure for Global Mappings.
Mapping Columns
|
Navigation: Configuring Copying Options > Mapping Options > Mapping Columns |
You can map columns from the source connection into separate columns on the target when migrating content into a SharePoint target when you select Map list item data to different columns and click the [...] button from the Mapping Options tab.
NOTES:
·This option is only available when migrating folders or items from the source into an existing list or document library on the target. If migrating a site or list, this option will not be available.
·Currently, Metalogix Content Matrix supports mapping of single column at the source to a single Managed Metadata column at the target. Mapping the same source column to multiple Managed Metadata columns at the target may cause problems.
To map columns:
1.Use the information in the following table to determine the appropriate action to take.
NOTE: You can Filter items in each window to narrow displayed lists.
|
If you want to ... |
Then... |
|---|---|
|
manually map each individual source column to a target SharePoint column |
·From the left (source) window, select the Item that you want to map. ·From the right (target) window, select an available Item. ·Click the Map icon. |
|
create a new column on the target for any columns that are selected on the source side |
·From the left (source) window, select the Item that you want to map. ·Click the Target icon to display the New Mapping Target dialog. ·Enter a Column Name. ·If you want the column to be created as a site column, check the Create as Site Column, , and choose a column type from the Group drop-down. ·If you want to add the column to a content type that exists on the target: §check the Add to content type scoped at target site box AND §select the content type to which you want to add the column from the Type drop down. |
The mappings you create will display in the bottom window. (Note that you can also Unmap individually-selected mappings in the bottom window or Clear all mappings from the bottom window.)
2.Click [OK] once all desired mappings have been made and return to the Configuration Options dialog.
Global Mappings
|
Navigation: Configuring Copying Options > Mapping Options > Global Mappings |
When you click [Open Global Mappings] from Mapping Options tab, the Specify Global Mappings dialog displays, allowing you to set:
NOTE: Global Mapping can also be performed as a separate action.