The Web Browser object provides the ability to configure Internet Explorer and Firefox settings as well as the operating system's Internet settings.
Select the appropriate web browsers to allow Desktop Authority to make changes to on the client.
Desktop Authority can set the clients default web browser setting. Select the specific web browser from the drop list or select Leave alone to not change the default browser setting on the client.
|
|
Note: This setting is supported in the OS versions up to Windows 7/2008. |
The home page section handles whether Desktop Authority should be allowed to set the browser's home page setting on the client. There are three options to choose from.
Selecting Leave alone will tell Desktop Authority to ignore the home page setting. The home page setting on the client will not be touched. Select Set home pages to have Desktop Authority set the home page(s) to the specified URL. This option will not lock the user's ability to change this setting on the client. Select Set home pages and prevent users from changing to have Desktop Authority to set the home page(s) to the specified URL and lock the setting so the user cannot change it.
Enter the URL for the home page in the box below. You can set multiple home page tabs by specifying a home page link for each tab on its own line.
The downloads section is where you will specify a file save location for files downloaded in the web browser on the client.
If the file location is not set, the browser's file download location will not be touched. Therefore, whatever option is set in the web browser's settings will be used.
The Tabs section contains options that are related to using the browser with multiple tabs.
Starting in Windows 7, you can quickly preview open windows that are in the taskbar. With the web browser that has multiple tabs open, you will also be able to preview the individual tabs when you hover the mouse over the browser icon in the taskbar. All tabs open in the browser will be displayed with a small preview above the taskbar.
Set this check box to one of three (3) different states: on (enabled) 


This option will save a user from accidentally closing the browser window if they only meant to close a single tab. Set this check box to one of three (3) different states: on (enabled)
The web browser has an option to control the active tab when a link is clicked that causes a page to be loaded in a new tab. Set this check box to one of three (3) different states: on (enabled)
Quick tabs is an Internet Explorer feature that allows you to see thumbnails of all open tabs in a single tab. Clicking on the thumbnail will activate the associated tab. In Firefox this feature is called All Tabs Preview, and is not enabled by default.
Set this check box to one of three (3) different states: on (enabled)
This option controls whether a new tab is created when a link is clicked or if the link is opened within the same tab. Set this check box to one of three (3) different states: on (enabled)
Set this check box to one of three (3) different states: on (enabled)
The Pop-ups section is used to configure the browsers pop-up blocker as well as create a pop-up blocker exception list. Select one of four options from the drop list to configure the browsers pop-up blocker.
Select Leave alone to ignore this setting on the client's web browser. The option that is currently set on the client's web browser for the pop-up blocker will not be touched. Select Turn on pop-up blocker to enable the pop-up blocker and do not allow pop-up windows to open. Select Turn off pop-up blocker to disable the pop-up blocker and allow the browser to open all pop-ups. Select the Turn on pop-up blocker and don't allow user to change it option to enable the pop-up blocker option in the client browser and lock it so the option cannot be changed.
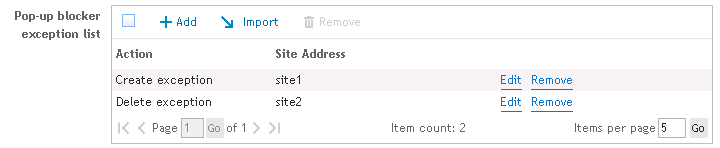
Selecting the option, Turn on the pop-up blocker, will enable the pop-up blocker exception list. The pop-up blocker allows for certain URLs to ignore the pop-up blocker.
When a pop-up is blocked, the browser can inform you by displaying an Information Bar letting you know the pop-up window was blocked. This option controls whether the information bar is displayed or not. Set this check box to one of three (3) different states: on (enabled)
Update the exception list by clicking the Add or Remove button. Click the Import button to import a list of URLs to the exception list.
When importing, the import file must be a tab delimited text file containing a Site Address and Action.
Example:
| site1 |
add |
| site2 |
remove |
Provides the following result when imported:
Figure 53: Results of imported exception list
If selected, this option will delete all pop-up blocker exceptions that are defined on the client. If this option is not selected, the exceptions created on the client will be left alone.
Browsing history keeps track of the pages that have been visited in the web browser in the last xx days. Set this check box to one of three (3) different states: on (enabled)
The download history window keeps track of files that are downloaded to the client, including files that are opened in the browser. When enabled, this option will tell the browser to keep track and remember the download history. Disabling this option will alert the browser to not bother keeping a history of downloaded files. Gray the check box to disable Desktop Authority’s control of this option. The option that is currently set on the client's web browser will not be touched when this is grayed.
When closing the web browser on the client, the history can be saved or not, depending on how the option is set in the browser. Set this check box to one of three (3) different states: on (enabled)
Clear the check box to disable the browser's history on the client. Gray the check box to disable Desktop Authority’s control of this option. The option that is currently set on the client's web browser will not be touched when this is grayed.
Another form of history that can be preserved on the web browser is AutoComplete history. This is where the browser will help you fill in or suggest to you what you may be typing if it is similar to something typed previously. In Firefox, this feature is called the Location bar.
There are options for the Form history, Browsing history, Favorites/bookmarks and Feeds (IE only). For each of these, select the check box to one of three (3) different states: on (enabled)
A cookie contains information from a visited website and is stored on your computer. Most often they are used to remember certain settings for the site and are used for your return visit. Desktop Authority can configure the cookie settings for the web browser on the client.
A first-party cookie is a cookie that is issued by the web site that you are visiting.
A third-party cookie is issued by a site other than the one you are currently visiting.
Session cookies allow users to be recognized within a single website. Any page changes or item or data selection you do is remembered from page to page.
Select Leave alone to ignore the cookie settings on the client. Select Don't accept cookies to not allow cookies to be stored on the client at all. The other cookie options are Accept session cookies only, Accept session and first party cookies, and Accept session, first party and third party cookies.
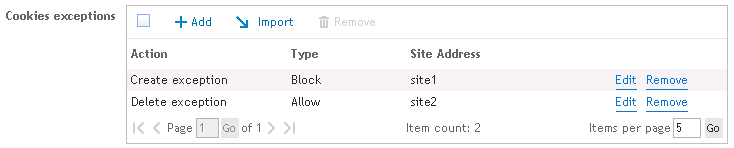
There are always exceptions to the rule. You can create an exception list. This exception list will allow specific sites to handle cookies differently than the regular configuration. Click Add to add a site as an exception. Click Remove to remove a site from the list. Click the Import button to import a list of URLs to the exception list.
When importing, the import file must be a tab delimited text file containing an Site Address, Type and Action.
Example:
| site1 | block |
add |
| site2 | allow |
remove |
Provides the following result when imported:
Figure 54: Results of imported exception list
If selected, this option will delete all cookie exceptions that are defined on the client. If this option is not selected, the exceptions created on the client will be left alone.
Both Internet Explorer and Firefox have the built-in ability to store passwords for future uses. In Firefox this is part of the Security options. In Internet Explorer it is part of the AutoComplete settings on the Content tab.
Set this check box to one of three (3) different states: on (enabled)
Phishing is a method that tricks you into divulging personal information by use of fake websites, email messages. Internet Explorer uses a Phishing filter and SmartScreen method to help combat these methods of gaining access to personal and/or sensitive information. They can also help by preventing the installation of malicious software or malware.
The Phishing filter/SmartScreen options can be configured by setting the Phishing filter/SmartScreen option. Set this check box to one of three (3) different states: on (enabled)
This Firefox option will check whether the site you are visiting may be an attempt to interfere with normal computer functions or send personal data about you to unauthorized parties.
Set this check box to one of three (3) different states: on (enabled)
This Firefox option will actively check whether the site you are visiting may be an attempt to mislead you into providing personal information (phishing).
Set this check box to one of three (3) different states: on (enabled)
A password exception list can be created. This exception list will allow specific sites to handle remembering passwords differently than the regular configuration. Click Add to add a site as an exception. Click Remove to remove a site from the list. Click the Import button to import a list of exceptions to the list.
When importing, the import file must be a tab delimited text file containing a Site Address and Action.
Example:
| site1 |
add |
| site2 |
remove |
Provides the following result when imported:
Figure 55: Results of imported exception list

If selected, this option will delete all password exceptions that are defined on the client. If this option is not selected, the exceptions created on the client will be left alone.
Firefox will warn you when a website tries to install an add-on and blocks the installation prompt.
Set this check box to one of three (3) different states: on (enabled)
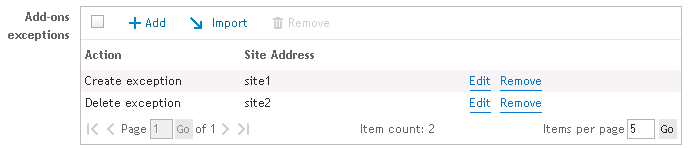
To allow installations from a specific site, add an Exception to the exception list. The exception list will allow the installation of add-ons from specific sites differently than the regular configuration. Click Add to add a site as an exception. Click Remove to remove a site from the list. Click the Import button to import a list of exceptions to the list.
When importing, the import file must be a tab delimited text file containing a Site Address and Action.
Example:
| site1 |
add |
| site2 |
remove |
Provides the following result when imported:
Figure 56: Results of imported exception list
If selected, this option will delete all Add-on exceptions that are defined on the client. If this option is not selected, the exceptions created on the client will be left alone.
Each of these pages can be configured for the selected web browser(s) to be locked and unavailable to the user or unlocked and available for changes by the user. Access to the Internet Options pages include the General settings, Security settings, Content settings, Connection settings, Programs/Applications settings and the Advanced settings are controlled by this setting.
The check boxes can be set to one of three (3) different states: on (locked/unavailable for changes)
|
|
Note: In Firefox, there is a special circumstance that occurs with the Advanced and Connection settings dialog. This differs from Internet Explorer because the Connection settings dialog is tied to the Advanced settings tab. |
If either the Connection page OR the Advanced page is set to be locked (
If the Connection page and the Advanced page are set to locked (
|
|
Note: Proxy Settings for Firefox are configured in the Windows system settings which can be verified in the Control Panel > Internet Options applet. |
This setting will automatically detect the proxy settings for your network.
Set this option to one of three (3) different states: on (enabled)
Automatic configuration of the proxy uses a proxy auto-config (PAC) file to define how the web browsers are to automatically choose the proper proxy server.
Set this option to one of three (3) different states: on (enabled)
Type an address (URL) or file name that will be used for the automatic configuration script.
Manually configuring the proxy server for your LAN connection requires you to specify the specific host and port for each web protocol.
Set this option to one of three (3) different states: on (enabled)
If Use a proxy server for your LAN connection is selected, you must enter the specific proxy information (host or ip, and port) for each protocol. Proxies can be set for HTTP, SSL, FTP, Gopher and SOCKS protocols. Once the HTTP Proxy is entered, you may elect to use these settings for all protocols.
Specify, if any, one or more sites or IP addresses to ignore proxy settings for. Separate each exception with a semicolon (;).
|
|
Note: When adding a site to the exceptions list, it is preferred that an asterisk precede the site name. This is required for IE browsers, however FireFox will work without specifying the asterisk. The exception dialog box also allows a wildcard character (*) to be used in the place of zero or more characters in an ip address. For example, you can use "123.1*.66.*" to bypass addresses such as "123.144.66.12," "123.133.66.15," and "123.187.66.13." |
Set this option to one of three (3) different states: on (enabled)
To lock the proxy settings so the user is not able to change the settings on the client, select this box. Clear this box to leave the proxy configuration open and available for change by the client.
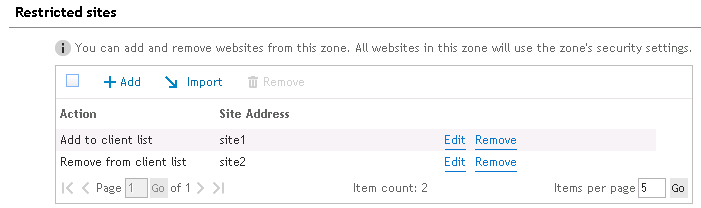
Restricted sites are web sites that you do not trust. Sites that are restricted are not able to be visited. Click Add to add a site to the restricted site list. Click Remove to remove the selected site. Click the Import button to import a list of restricted sites.
When importing, the import file must be a tab delimited text file containing a Site Address and Action.
Example:
| site1 |
add |
| site2 |
remove |
Provides the following result when imported:
Figure 57: Results of imported restricted sites
If selected, this option will delete all restricted sites that are defined on the client. If this option is not selected, the restricted sites on the client will be left alone.
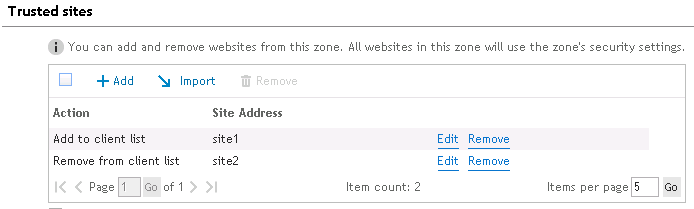
Trusted sites are web sites that you unconditionally trust. This can be in the form of a URL or IP address. Click Add to add a site to the trusted site list. Click Remove to remove the selected site. Click the Import button to import a list of trusted sites.\
|
|
Note: When entering a URL the HKCU\Software\Microsoft\Windows\CurrentVersion\Internet Settings\ZoneMap\Domains key is updated. If an IP address is entered the Ranges key, HKCU\Software\Microsoft\Windows\CurrentVersion\Internet Settings\ZoneMap\Ranges is updated. Please refer to the Microsoft article: Internet Explorer security zones registry entries for advanced users (Article ID: 182569) for more details on the ZoneMap keys. |
When importing, the import file must be a tab delimited text file containing Site Address and Action.
Example:
| site1 |
add |
| site2 |
remove |
Provides the following result when imported:
Figure 58: Results of imported trusted sites
If selected, this option will delete all trusted sites that are defined on the client. If this option is not selected, the restricted sites on the client will be left alone.
Select this option to allow only https: sites to be added to this zone. Unchecked, you will be able to add any site to this zone.
The Local Intranet zone contains all network connections that were established by using a Universal Naming Convention (UNC) path, and Web sites that bypass the proxy server or have names that do not include periods (for example, http://local), as long as they are not assigned to either the Restricted Sites or Trusted Sites zone.
Select this box to allow Windows to automatically determine which sites are port of the Intranet. Unselect this box to detect which sites are deemed to be part of the Local intranet security zone.
With the local intranet not being automatically detected, select this box to include all local sites in the intranet security zone, as long as they do not belong to any other zone.
With the local intranet not being automatically detected, select this box to include all sites that bypass the organization's proxy server in the intranet security zone.
With the local intranet not being automatically detected, select this box to include network paths in the intranet security zone.
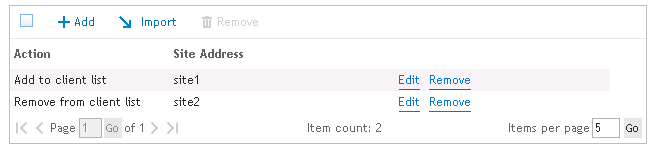
Click Add to add a site to the trusted site list. Click Remove to remove the selected site. Click the Import button to import a list of trusted sites.
When importing, the import file must be a tab delimited text file a Site Address and Action.
Example:
| site1 |
add |
| site2 |
remove |
Provides the following result when imported:
Figure 59: Results of imported local intranet sites
If selected, this option will delete all local intranet sites that are defined on the client. If this option is not selected, the restricted sites on the client will be left alone.
Select this option to allow only https: sites to be added to this zone. Unchecked, you will be able to add any site to this zone.
The Web Browser object allows for the configuration of custom Firefox settings. If you wish to configure something in the Firefox browser that is not offered on the Web Browser object, it can be configured in the Global or Profile Definitions. See AddCustomFirefoxPref for custom setting details.
Select the Validation Logic tab to set the validation rules for this element.
Select the Notes tab to create any additional notes needed to document the profile element.
When adding or modifying a profile object element, the description appears above the settings tab. Enter a description to annotate the element. The default value for new profile elements can be changed by going to the system Preferences.
The Windows Firewall object allows Microsoft's Windows Firewall to be enabled or disabled on any validated computer having the Windows XP x86 SP3 or Windows XP x64 SP2 operating system installed. The ability to specify certain port and program exceptions is also specified on this object's setting tab. Windows Firewall is only applicable on Windows XP x86 SP3 and Windows XP x64 SP2 or greater.
Select an action (Enable/Disable) to configure the Windows Firewall component on client computers.
This check box can be set to one of three (3) different states: on (enabled) 


Select this check box to display a visual notification to the user when the Firewall blocks a program from accepting an incoming request. The notification dialog box will allow the user to determine if the Windows Firewall should allow the program to keep blocking the program or to allow incoming requests to the program. Clear this check box for no visual notification or occur. Gray the box to leave the client’s setting untouched.
This check box can be set to one of three (3) different states: on (enabled)
Select this check box to enable File and Print sharing on each validated client. Clear this box to disable File and Print sharing on each validated client. Gray the box to leave the client’s setting untouched.
This check box can be set to one of three (3) different states: on (enabled)
Select this box to disallow all excepted traffic specified in the exceptions list. Clear this box to allow traffic. Gray the box to leave the client’s setting untouched.
The Exceptions list is a holding place for all Firewall port and program exceptions. Click Add to add an exception to the Exception list. Click Edit to edit an existing exception on the list. Click Delete to remove a configured port or program from the Exception list.
Select Open or Close from the Action list. This will configure the specified port to be opened or closed for incoming traffic.
Select TCP, UDP or Program from the Protocol list to specify the type of port or program to be configured.
When the Type is set to TCP or UDP, type the port number to be opened or closed into the Exception entry box. When the Type is set to Program, specify the path to the executable program into the Exception entry box.
Type a meaningful description or reason for the exception in the Description box.
Select Any Computer, My Network (subnet) only or Custom List from the Scope list. Any Computer specifies that incoming traffic on the port is allowed regardless of where it is coming from. My Network (subnet) only specifies that incoming traffic on the specified port is allowed only if the request is coming from the local network. Custom List specifies that incoming traffic from any computer specified in the custom list is allowed. Delineate the custom list of IP addresses by commas.
The Windows Firewall Advanced tab allows specific types of ICMP messages to be enabled or disabled. ICMP messages are used for diagnostics and troubleshooting. The requests listed below are types of requests that the computer may or may not need to respond to. Select each Internet request type that the computer will respond to. Clear each Internet request type that the computer will not respond to.
A rule in the Domain profile applies when a computer is connected to a domain.
Check this box to allow an inbound connection request even if it does not match a Domain profile rule. This check box can be set to one of three (3) different states: on (enabled)
Check this box to allow an outbound connection request even if it does not match a Domain profile rule. This check box can be set to one of three (3) different states: on (enabled)
A rule in the Private profile applies when a computer is connected to a private network location.
Check this box to allow an inbound connection request even if it does not match a Private profile rule. This check box can be set to one of three (3) different states: on (enabled)
Check this box to allow an outbound connection request even if it does not match a Private profile rule. This check box can be set to one of three (3) different states: on (enabled)
A rule in the Public profile applies when a computer is connected to a public network location.
Check this box to allow an inbound connection request even if it does not match a Public profile rule. This check box can be set to one of three (3) different states: on (enabled)
Check this box to allow an outbound connection request even if it does not match a Public profile rule. This check box can be set to one of three (3) different states: on (enabled)
Select the Validation Logic tab to set the validation rules for this element.
Select the Notes tab to create any additional notes needed to document the profile element.
When adding or modifying a profile object element, the description appears above the settings tab. Enter a description to annotate the element. The default value for new profile elements can be changed by going to the system Preferences.
External Folders Used by Desktop Authority
Desktop Authority for VPN Clients
|
|
Note: Please refer to the File Paths appendix for the correct path(s) based on the version of Desktop Authority you are using. |
The Replication process logs the files and target folders that are copied during the replication process. The log file can be found in (32-bit OS) %Program Files%\Quest\Desktop Authority\Desktop Authority Manager\SLRepl.log or (64-bit OS) %Program Files (x86)%\Quest\Desktop Authority\Desktop Authority Manager\SLRepl.log.
During replication, user management files are published to the User Management target replication folder. By default, this folder is NETLOGON (%windir%\SYSVOL\sysvol\DomainName\scripts is shared as NETLOGON). The files are published from the SLscripts$ share (32-bit OS) - %Program Files%\Quest\Desktop Authority\Desktop Authority Manager\Scripts or 64-bit - %Program Files (x86)%\Quest\Desktop Authority\Desktop Authority Manager\Scripts).
Also during replication, computer management files are published to the Computer Management target replication folder. By default, this folder is located at SYSVOL\[DomainName]\Policies\Desktop Authority\Device Policy Master. The files are published from (32-bit OS) - %Program Files%\Quest\Desktop Authority\Desktop Authority Manager\Device Policy Master or (64-bit OS) - %Program Files (x86)%\Quest\Desktop Authority\Desktop Authority Manager\Device Policy Master.
Some files are published to the \SYSVOL\[DomainName]\Policies\Desktop Authority\Desktop Authority Agent 8.0 folder.
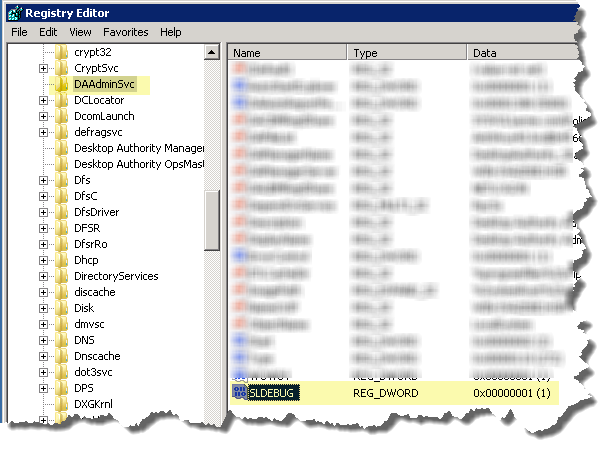
*Both the StatusGateway and Administrative Service log files can be enabled by setting or creating a registry key for the service.
Add or modify the SLDEBUG registry value in "HKLM\SYSTEM\CurrentControlSet\services\DAAdminSvc"
Set SLDEBUG to a DWORD whose value <>0 (1) to enable the log files.
Figure 60: Editing the DAAdminSvc in the Registry
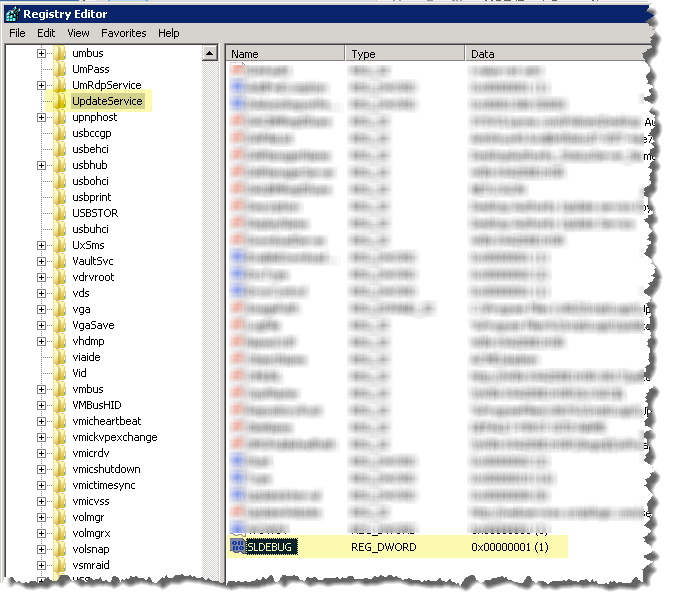
*Both log files can be enabled by setting or creating a registry key for the service.
Add or modify the SLDEBUG registry value in "HKLM\SYSTEM\CurrentControlSet\services\UpdateService"
Set SLDEBUG to a DWORD whose value <>0 (1) to enable the log files.
Figure 61: Editing the Update Service in the Registry
Desktop Authority uses the User's temp directory to store log files that pertain to the actual user events related to Desktop Authority. The users temp directory can be found in %TEMP%\ Desktop Authority.
Client configuration logs for the Web Browser and Folder Redirection profile objects
SL Agent COM object is used for logging events (logon, logoff, inactivity and COM object registration) on the client
Detailed diagnostic log files for User based events. The log files are time stamped and record all User Management configuration settings applied to the client.
The SLTrace Update Service Locator logs entries showing the determination of which Update Service the client should use based on response time. Services are queried from a list servers provided by the Engine which are based on the computer’s site.
Other files may appear in the User’s temp directory for more in-depth troubleshooting, if necessary.
Computer based log files will be stored on each individual client machine in the Windows temp directory, %windir%\Temp\Desktop Authority.
Detailed diagnostic log files for Computer based events. The log files are time stamped and record all Computer Management configuration settings applied to the client.
The SLTrace Update Service Locator logs entries showing the determination of which Update Service the client should use based on response time. Services are queried from a list servers provided by the Engine which are based on the computer’s site.
Various files are stored on each client utilizing Desktop Authority. There are 3 folders that may be used depending on the Desktop Authority features used and the client platform. These folders are %SystemDrive%\Quest\Desktop Authority, %SystemDrive%\%Program Files%\Quest\Desktop Authority, %SystemDrive%\%Program Files (x86)%\Quest\Desktop Authority.
USB/Port Security client files are stored in the %Program Files%\Quest\Desktop Authority folder.
The following files are stored in %Program Files%\Quest\Desktop Authority or %Program Files (x86)%\Quest\Desktop Authority

