Chat now with support
Chat with Support

Migrator for Notes to SharePoint 6.15 - User Guide

Migrator for Notes to SharePoint Migrator for Notes to SharePoint Console
Overview Console configuration using the setup wizard Advanced configuration options Database discovery QuickPlace/Quickr discovery Domino.Doc discovery Discover directory entries Import database records Notes databases Applications Classification Rules Classification Rule Properties SharePoint Targets Scheduled tasks Reports Task history Link Analyzer/Updater/Finalizer License
Migrator for Notes to SharePoint Designer Migration jobs Appendix: Reference information

Generate InfoPath form template

This action allows you to migrate your Notes Forms to InfoPath Form Templates.

From the first page of the wizard, choose which type of template you would like to create. Select Form Library, to create a form template to be used in a SharePoint Form Library. Select List to create a form template to be used in a SharePoint List Form. This type is only available for SharePoint 2010/2013/2016/2019 Enterprise edition and requires InfoPath 2010/2013.

If you select List, go to Template for form library for the wizard details.

Template for form library

If you selected to create an InfoPath form template to be used in a SharePoint Form Library, then the second page of the wizard allows you to name the generated template file (if only one Form was selected), or select a folder to save the templates into (if multiple Forms were selected - destination filename will be the Form name). If any of the selected forms exist on-disk, a dialog box will launch asking the user to confirm overwriting the existing forms.

Form Template compatibility

Add attachment section to rich text controls

Enabling this option will cause a repeating Attachment section to be added after every rich text control that is migrated. This is because Rich Text fields in InfoPath do not support attachments like they do in Notes.

The second page of the wizard is where you select the Notes form elements to be migrated.

Do not migrate elements that are

Paragraphs in a Notes Form can be marked hidden based on several different factors. If unchecked, the paragraphs are migrated regardless of the hide setting, but the check boxes in this section can be used to honor the hide setting in Notes. So if "Hidden in Read mode" is checked, then if a paragraph is marked "hide when opened for reading", the paragraph will NOT be migrated.

Create InfoPath Sections for elements that are

The corresponding check box must be unchecked for this to be enabled. Checking one of these will cause paragraphs hidden by the given method to be wrapped in an InfoPath "Section" control. This is handy because it allows the InfoPath developer to refer to the entire hidden area with a single identifier, making show/hide logic easier.

The third page of the wizard is where you set the default control sizes.

Control measurements

Some fields in Notes do not have a specified size, like text fields and dialog lists. When these controls are mapped to InfoPath controls, they need to be given a width and sometimes a height. These options specify the default height/width for controls that do not have a set size in Notes. If the Auto check box is selected, no width or height value is needed. When set to Auto, the InfoPath field takes up no screen space until you type into it, then it grows as necessary, similar to Notes. Not all field types support the Auto feature. Only the supported field types will have this option available.

Set fields in table cells to 100% width

If a table cell contains a control that does not have size specified in Notes, checking this box will cause InfoPath to set the control width to 100%, instead of the width set in the Control measurements. This may provide a table rendering closer to the original table in Notes.

The fourth page of the wizard is used to set which Notes fields are migrated to InfoPath, and how those fields should be mapped when creating a InfoPath document migration job later. For more information, see Generating InfoPath forms (post version 5.2).

The following is a description of the options:

Table 22. Options

Notes field name

Name of the field on the Notes form to be migrated. This is not modifiable.

Migrate to InfoPath

If checked, the Notes field will be migrated to the new InfoPath form template. To exclude a field from being migrated, uncheck the corresponding check box.

Setup field for data mapping

If checked, the field will be marked available for mapping when this generated template is used to setup a document migration job.

InfoPath field name

The name of the corresponding InfoPath field that is generated. This name can be changed if desired.

Options

This is a dropdown list that is dependent on the field type. For date/time field types, you can specify what part of the date/time to migrate. When the generated template is used to create a InfoPath document migration job, this field serves as a hint on what type of data is in the Notes field and how it should be encoded

The fifth page of the wizard shows you the options you have selected.

Table 23. Options

Write migration report

Enabling this option will create an HTML file in the template's destination folder named templatename.html. This file is a report of the form migration job, showing all paragraphs, tables, text, controls and other elements of the Notes form, and what was done to migrate the element to the InfoPath form template.

Write detailed log files

The InfoPath XSN file format is comprised of several files archived together in the Microsoft CAB format. Selecting this option will leave these generated files on-disk in a folder named template_Migrator for Notes to SharePointiplog, in the same folder as the completed template. These may be helpful to Customer Support when diagnosing a problem.

Create developer documentation version of the form template

This will create a separate InfoPath XSN named template_DevMarkup.XSN which gives the developer extra information about the Form. Currently, we are marking all hidden paragraphs and HTML pass-through text with a circled H icon. Hovering over the H in Form fill-in mode will show some text indicating why the field was hidden. The following Notes field Formulas are marked with an F icon: Default Value, Input Translation, and Input Validation. Other markups may be added in the future.

Once the migration is complete, a dialog box will appear with the buttons:

Launch Form Template in Design Mode - launches InfoPath in design mode, so the developer can make changes to the template
Fill-out the Form - shows a preview of what the generated form would look like to an end-user
View Detailed Migration Report - opens the migration report in the default web browser

The migrated form will appear as a .XSN file in the selected folder. If the option Write migration log files is checked, in the folder will be a subfolder named formname_Migrator for Notes to SharePointiplog. This folder contains all the source files that comprise the InfoPath template, and a log file named "Migrator for Notes to SharePoint_infopath_log.txt" if the form migration failed. These are useful for debugging in case the template does not load properly in InfoPath.

The newly migrated form can now be used to migrate Notes documents to InfoPath documents. For more information, see Generating InfoPath forms (post version 5.2).

InfoPath's rendering engine is HTML based, so most of the form's text, fonts, colors, styles, and tables will be migrated as straight HTML in the same way HTML is generated today. The following Notes properties and fields are migrated:

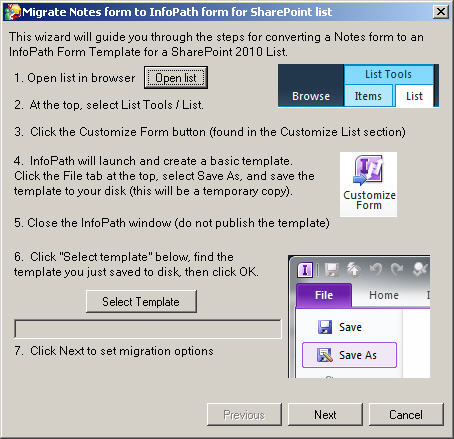
Template for list form

If you selected to create an InfoPath form template to be used in a SharePoint List Form, then you will need to select a migration job that will be used.

Do not migrate elements that are…: Paragraphs in a Notes Form can be marked hidden based on several different factors. If unchecked, the paragraphs are migrated regardless of the hide setting, but the check boxes in this section can be used to honor the hide setting in Notes. So if "Hidden in Read mode" is checked, then if a paragraph is marked "hide when opened for reading", the paragraph will NOT be migrated.
Create InfoPath Sections for elements that are…: The corresponding check box must be cleared for this to be enabled. Checking one of these will cause paragraphs hidden by the given method to be wrapped in an InfoPath "Section" control. This is handy because it allows the InfoPath developer to refer to the entire hidden area with a single identifier, making show/hide logic easier.
Control measurements: Some fields in Notes do not have a specified size, like text fields and dialog lists. When these controls are mapped to InfoPath controls, they need to be given a width and sometimes a height. These options specify the default height/width for controls that do not have a set size in Notes. If the Auto check box is selected, no width or height value is needed. When set to Auto, the InfoPath field takes up no screen space until you type into it, then it grows as necessary, similar to Notes. Not all field types support the Auto feature. Only the supported field types will have this option available.
Set fields in table cells to 100% width: If a table cell contains a control that does not have size specified in Notes, checking this box will cause InfoPath to set the control width to 100%, instead of the width set in the Control measurements. This may provide a table rendering closer to the original table in Notes.

Generate third-party form template

You can migrate a Notes form to a third party form, such as Nintex, and place it in SharePoint.

1
Right-click a database and select Generate Third-party Form Template.
11
Click Close.
Related Documents

The document was helpful.

Select Rating

I easily found the information I needed.

Select Rating