
Creating/Editing source data definitions
|
• |
|
• |
Content Pages– These are the primary types of pages created when users type content into the QuickPlace user interface. These pages can contain rich text bodies and multiple attachments. |
|
• |
Imported Pages– These are pages are created when users import Word files or HTML files. These pages typically contain the imported file itself, plus an HTML rendering of the file generated by QuickPlace or Quickr. |
|
• |
Link Pages– These pages are simple links to other pages (internal to the QuickPlace or Quickr). |
|
• |
Calendar entries– These pages contain fields for scheduling events and contain special fields for organizing attendees, repeating meetings. |
|
• |
Task entries– These pages contain fields for managing to-do items and contain special fields for organizing due dates and assignees. |
|
• |
Discussion pages– These pages implement a topic/response hierarchy used in threaded discussions. |
|
• |
Members– These pages contain information about the team members who typically use the QuickPlace. |
|
• |
Orphans– These are all the other pages that are not members of any specific view or folder in the QuickPlace or Quickr (except for the Index). In practice, these pages are often out-of-date or otherwise not useful (as evidenced by the fact that there is not direct navigation to them) and they can be omitted in many migration scenarios. |
|
7 |
From the Document Selection tab, select which documents in the current Cabinet should be included in the query. You can control which types of documents are selected for migration. The default is to migrate only published documents. You can choose to migrate only unpublished documents by selecting the “unpublished documents” radio button or both types of documents by selecting the “all documents” radio button. Select the Binders only option to extract Binders instead of Documents. To migrate the binders to SharePoint folders, select the “Migrate mapped data to folders” option on the Advanced Tab of your Target Data Definition. |
|
8 |
Add Data Fields to specify the data columns you want to extract from each row selected. Click Add, and select a column. |
|
A dynamic value based on the Notes @Formula you specify. You should also specify the Formula property (for example "@Uppercase(Subject)". A sample use case for this column type is if you do not want to migrate large attachments from Notes to SharePoint. To filter out the large attachments, use the following formula as your selection criteria: | |||||||||||||||||||
|
Extract a rich text item value as plain text, HTML, or MIME (MHT) formatted data. | |||||||||||||||||||
|
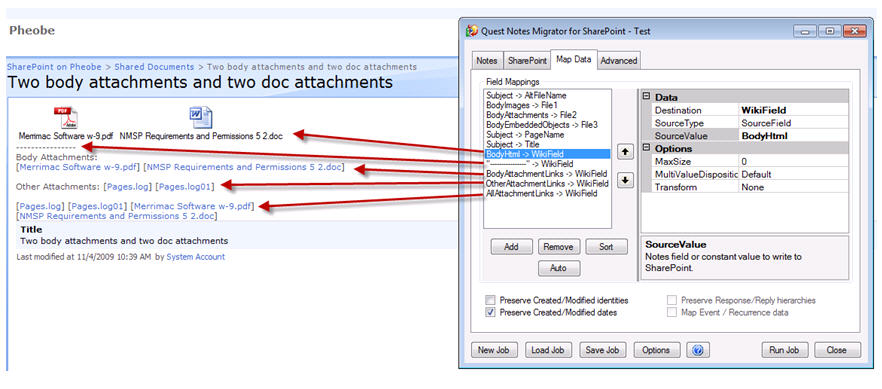
In most cases, set the Option to HTML for mapping to SharePoint. Specifying the FormName to render with is optional. If you do not specify one, each document will be rendered with its default form (using the “FORM” Item in each individual document). Images, objects, and attachments from the form may be included in your migration job by using the AttachmentScope property in those source data definition columns. To accomplish this, the AttachmentScope property includes the choice: “RenderWithForm”. If you choose this, you again can specify an optional FormName property. This should match the FormName you specified with the Render columns. | |||||||||||||||||||
|
The Compression option, Zip, gives you the ability to compress Notes file attachments while migrating them to SharePoint. There are a number of good reasons for wanting to do this: To configure a set of global exceptions to this rule, use the Compression Exclusions option on the Notes tab of the tool's Options dialog. This option allows you to specify any file extensions that should never be zipped. This would typically include media files that are already well-compressed and would not benefit from zipping. | |||||||||||||||||||
|
Convert the contents of the selected Notes document into an XML document (such as an InfoPath® form). | |||||||||||||||||||
|
The subsequent properties you can specify will vary depending on the ColumnType you choose. In most cases, you can specify an Alias for the field and a ReturnType. You can override the name of any data column by specifying the Alias property. In some cases, additional options may be available:
RenderWithForm returns all the images, objects or attachments from the form that is being rendered. You can specify an optional FormName property. This should match the FormName you specified with the Render columns.
|
|
9 |
From the Preview Data Query tab, select Test to execute the Command against live data. Any results from executing the command will be displayed in the Results dialog box. |
|
• |
The Max Records option allows you to limit the number of Notes records to be viewed to a predetermined number. |
|
• |
The Skip option allows you to skip the first ‘x’ number of Notes records. When used in conjunction with the "Max Records" option, you can view distinct chunks of data. |
|
• |
Remove This Field: Removes the custom field from the Source Data Definition. |
|
• |
Go to Definition: Opens the Definition tab containing the custom field properties. |
Creating/Editing data targets
You can create the following data targets:
|
• |
SharePoint
|
NOTE: Migrator for Notes to SharePoint is now capable of local or remote SharePoint servers. To control the mode of operation, click Options and go to the “SharePoint” tab. For details on how to configure your type of SharePoint connectivity, see Customizing Global Options. If your installation is configured to access remote SharePoint servers, the list of available sites contains information about each site's level of connectivity. You can add additional sites to the list by clicking the Sites button. |
|
NOTE: If you want to generate a new SharePoint list that does not exist in the location described on the SharePoint tab, select Create SharePoint List. The new List will be based on the List Template identified in your Target Data Definition. This will allow you provision entire SharePoint lists and document libraries as part of your migration job. If you want any fields identified in your Target Data Definition but not in the destination List to be added to the list, select Add or upgrade List Fields. This will allow you to upgrade the schema SharePoint lists and document libraries as part of your migration job. If you want Migrator for Notes to SharePoint to automatically add provisioned lists or document libraries in to the Quick Launch area in the target SharePoint site, select When creating List, Add to Quick Launch. If you want Migrator for Notes to SharePoint to enable versioning to the SharePoint list, select When creating List, enable versioning. If you want to remove any items previously displayed in the destination list, select Delete Current List Items. This option may be disabled depending on how your tool Options are set. This option can cause data loss. Be sure that you really want to remove all existing documents from the list. |
|
5 |
To allow provisioning of Content Types in the target list, select the Allow management of Content Types check box. Click the Add button to enter the Content Types that should be added to the target list. Associate a Notes Form to the Content Type in order to automatically assign the Content Type to all migrated records that are associated with the Form. |
|
6 |
From the Data Fields tab, click Load from SharePoint List. This will automatically create Field definitions for all the writable fields found in the SharePoint List you selected. Similarly, the Load From Source Fields button will automatically create Field definitions for all the columns in your Source data definition. |
|
NOTE: If you select Managed Metadata as target type, ensure you add the terms to the termset bound to the column, or you set Adding Missing Terms to Term Store to True so the content in source field can be migrated to the target column. |
|
• |
Text: Buttons will be rendered as texts. |
|
• |
IconOrButton: Buttons will be rendered as not-clickable icons, or buttons (for PDF document only). |
|
NOTE: You can create customized Target Data Definitions by altering a loaded default template and saving it with a new name. The new pmtrg file can then be selected for future migration jobs. Once you complete the template changes and return to the Designer SharePoint tab (Step 12 below), click the Save button in the Target Data Definition area. |
|
7 |
Define a view. From the Advanced tab, click New. The Edit a SharePoint view dialog box allows you to define the SharePoint view. Only Standard SharePoint views can be defined. Migrator for Notes to SharePoint does not create other view types like datasheets or calendar views. This editor has all the same view definition properties as the view editor in SharePoint except it does not contain any mobile settings. |
|
• |
The “Filter” tab is where you define a filter. This is optional. Select the radio button Show items only when the following is true to define your filter. Select the field and its criteria for the filter. By selecting the Show more columns link, you can add additional criteria to your filter. |
|
• |
|
• |
Integer, Currency and Number fields also have Average, Maximum, Minimum, Sum, Standard Deviation, and Variance |
|
• |
When you click Next, some validation will occur: a migrated column must have a name, new Calculated fields must have a formula, field names cannot be duplicated, and new fields cannot duplicate those in the target definition. Next to the formula box for new fields there is an Edit button which will launch the Formula Editor.
|
|
8 |
Select the Migrate attachment icons as image files check box to allow the original attachment icons in Notes to appear in SharePoint. |
|
10 |
Select the Migrate document fields to custom properties check box to migrate any document properties in the PDF to SharePoint. This is selected by default. |
|
11 |
Select the names of the SharePoint templates that "match" this data definition. More than one template can match. Use the Select button to add or remove multiple selections. |
|
12 |
Click OK. |
|
• |
Write new item - Do not check for duplicates and simply write a new SharePoint record for each Notes document encountered. This is the fastest option if you expect duplicates to be rare. If you are migrating QuickPlace or Domino.Doc versions, each version of a document will be created as a new SharePoint record. |
|
• |
Replace existing item - If a duplicate record is encountered, delete the prior SharePoint version and then migrate the document again. |
|
• |
Create new version (if modified) - If a duplicate record is encountered and the Notes document has been modified since it was previously migrated, the new document will be created as a new version of the old document. If the SharePoint list or library does not support versioning, then the document will be migrated as a separate record. Use this option to create corresponding versions of a SharePoint record for each version of the document in QuickPlace or Domino.Doc when you are migrating multiple versions. If you are migrating to a list that is already created, enable SharePoint version control. |
|
• |
Skip item - If a duplicate record is encountered, then ignore the Notes document. |
|
• |
Update existing item (mapped fields) - If a duplicate record is encountered, update the mapped fields of the item. |
|
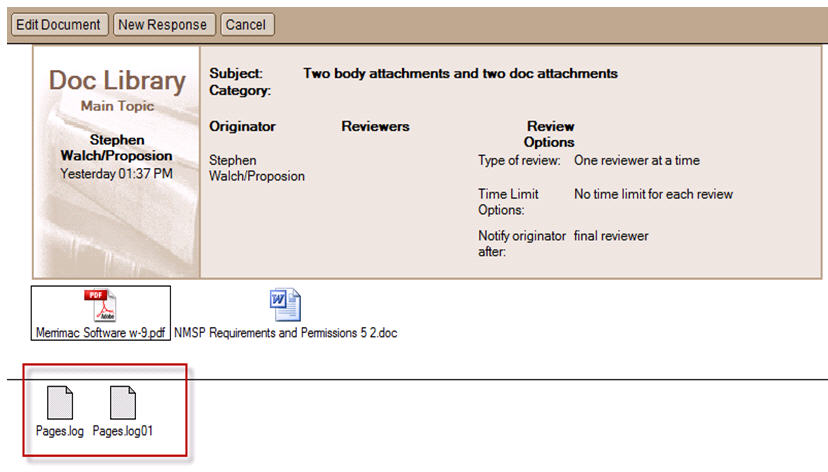
NOTE: To update the document content, your field mapping must include BodyHtml, BodyAttachments, BodyEmbeddedObjects, and BodyImages. |
|
14 |
If you want to save a new or modified Target Data Definition, click Save in the Target Data Definition area. Enter a new file name that reflects the change. (For example, if you have changed the Document page size to A4, a good name would be WordA4.pmtrg.). Then click Save. |
SQL Server
|
c |
if you want to generate a new table that does not exist in the SQL database described on the SQL Server tab, select Create Tables. The new table will be based on the Data Fields in your Target Data Definition. The Add Table Fields checkbox is automatically selected as you select Create Tables. |
|
d |
|
e |
select the Migrate attachment icons as image files check box to allow the original attachment icons in Notes to appear in SharePoint. |
|
5 |
From the Data Fields tab, click Load from SQL Server database. This will automatically create Field definitions for all the writable fields found in the database tables you selected. Similarly, the Load from Source Fields button will automatically create Field definitions for all the columns in your Source data definition. |