Calendar Synchronization
Calendar synchronization allows for migration of the Calendar folder data. It is recommended that calendar data migration be performed in parallel with the mailbox and free/busy data migration so that the users can view other users’ free/busy data and can schedule meetings regardless of the environment they log on from.
|

|
Caution: If you are performing calendar synchronization in Microsoft Exchange 2007, it is recommended that the Public Folder database exists in your Exchange 2007 environment. |
To begin calendar synchronization, right-click the Calendar Synchronization node in the management tree and click Add Calendar Synchronization Job. This opens a dialog box that lets you select one of the following methods to synchronize calendars:
- Calendar Synchronization Job
- Office 365 Calendar Synchronization Job
- Legacy Calendar Synchronization Job
The guidelines for choosing the right type of job are in the Calendar Synchronization Process topic.
|

|
NOTE: Office 365 calendar synchronization is described in the dedicated Migrating to Microsoft Office 365 document. |
You can track the calendar synchronization progress using the Statistics dashboard. For information on how to do that, see Tracking the Migration Progress.
Setting Up a New Calendar Synchronization Job
A calendar synchronization job is currently the only method for synchronizing calendars with Microsoft Exchange 2013 or higher.
Step 1. Source Exchange Organization
Specify the source organization with the calendars to be synchronized and the credentials to use for performing the synchronization. You can use the same account both for working with Active Directory and for running Exchange configuration operations, or you can use separate accounts.
Step 2. Target Exchange Organization
Specify the target organization to synchronize calendars with and the credentials to use for performing the synchronization. You can use the same account both for working with Active Directory and for running Exchange configuration operations, or you can use separate accounts.
Step 3. Set Up Migration Agent for Exchange
The Migration Agent for Exchange is used for performing calendar synchronization operations. This step lets you set up the agent on an agent host that you select.
The default installation path is in the hierarchy of the Program Files system folder. You can customize the path, but your custom path will be used only if there are no previously installed instances of the Migration Agent for Exchange on the computer. Otherwise, the agent will be installed to the same location as the other existing instances regardless of the path you specify.
You can also override the default credentials that the agent will use. However, note that in this case you will be changing the credentials not only for the agent instance you are installing, but also for any existing agent instances on the agent host.
Reconfiguring Calendar Synchronization Jobs
To change the original settings you specified during calendar synchronization job creation, open the properties of the job.
Adding a Calendar Collection
To create a new calendar collection for an existing calendar synchronization job, right-click the job in the management tree and click Add Collection on the shortcut menu.
This will start the Add Direct Calendar Synchronization Collection Wizard that will help you to set up and configure a new collection for the calendar synchronization job. Each step of the wizard is described below.
Step 1. General Options
Specify the following:
- The name of the calendar collection
- Optionally, a text description
- Whether the collection will be enabled immediately after creation
- Whether synchronization is two-way for the collection
- The instance of the Migration Agent for Exchange that will process this collection
When considering two-way synchronization, take the following into account:
- For regular calendar synchronization, the Enable two-way synchronization for this collection option should stay cleared. Select it only if your calendar collection contains shared and/or resource mailboxes which will be used by source and target users at the same time during co-existence period.
-
The Calendar Repair Assistant (CRA) should be disabled during the migration period for both migration source and target if applicable (CRA is available in Exchange 2010 or higher, or in Office 365).
Step 2. Select Mailbox Database
Here, you can explicitly specify the target mailbox database where you want this collection's mailboxes to reside.
Select one of the following:
- Move them to this mailbox database
Select this option to explicitly specify the mailbox database to which existing mailboxes will be moved from any mailbox database that they are currently in. Note that if the mailbox is also included in a collection for a mailbox synchronization job, the mailbox database used by the mailbox synchronization collection will override the one specified here
- Leave them in their current mailbox database
Select this option if you have no mailbox database preferences. Also use it if you have already rearranged mailboxes in the target organization's mailbox databases prior to the migration and you want to keep your configuration.
Step 3. Workflow
When processing the collection Migration Manager will attempt to follow the schedule you specify on this page. By default, the option to Start as soon as possible is selected. Change this if you want to specify a date when the collection processing should be started.
Do one of the following:
- Select Start as soon as possible to make Migration Manager start moving the mailboxes in this collection immediately.
- Select Do not start before to make Migration Manager start processing the collection no sooner than the specified date, but this might not be the first collection in the queue.
Step 4. Collection Items
The collection can be populated with user accounts. To change the user account list, use the buttons next to it.
|
|
NOTE: Migration Manager for Exchange does not process groups nested in organizational units (OUs). |
Reconfiguring Calendar Collections
To change the original settings you specified during calendar collection creation, open the properties of the collection.
Skipping Calendar Items
After you created a calendar collection, you can configure filter settings that let you exclude from migration certain types of calendar items and/or calendar items that are older than a specified number of days. For that, open Properties of the collection, select the Filters node in the dialog box that appears, and specify item types (message classes) to be excluded from the migration scope.
You have two options to exclude specific item type from the scope:
- Skip messages older than
If this option is selected, Migration Agent for Exchange will skip all specified calendar item types or certain types of calendar items that are older than a specified number of days.
- Skip all messages of the following classes
If this option is selected, Migration Agent for Exchange will skip all specified calendar item types or certain types of calendar items regardless of their age.
|
|
Caution: Use separate line for every item type. |
Use the following syntax for item types:
- IPM.Appointment
Skips all Appointments.
- IPM.Configuration.*
Skips all calendar items of the IPM.Configuration type and its subtypes.
|
|
NOTE:
- You can use an asterisk wildcard character in names of item types.
- For the list of basic item types, see the Item Types and Message Classes article. You may also use third party tools to specific determine item types.
|
When specifying filters for a collection, consider the following:
- Specified filter settings apply only starting with the next synchronization session.
- If migration scope enlarges, calendar items that were previously skipped and now are included in the migration scope will not be migrated unless they are modified or you perform a full resynchronization for the mailbox.
- To apply filters for already migrated items you need to perform resynchronization of the mailbox. Note that items filtered out at source will be deleted from the target mailbox.
- By default, item skipping works only for items synced in source to target direction. To apply filters for items synced from target to source for a switched mailbox or during two-way synchronization, change value of the UseFilteringInBackwardSync parameter as described in Configuring Migration Using PowerShell.
Setting Up a New Legacy Calendar Synchronization Job
Selecting Legacy Calendar Synchronization Job in the job type dialog box will start the Add Calendar Synchronization Job Wizard, which will install the Calendar Synchronization Agent and help you to set up and configure the job.
This section guides you through each step of the wizard and explains the calendar synchronization options.
Step 1. Select Exchange Servers
Select the source and target servers for the legacy calendar synchronization job. The wizard will display the existing legacy calendar synchronization jobs in which the selected servers already participate.

Step 2. Select Mailbox Database
The mailbox database that you specify here will be used as the default for all calendar collections of the job. Later you can individually set a target mailbox database for each calendar synchronization collection.
|
|
NOTE: Prior to Exchange 2010, a mailbox database was known as a mailbox store. |
Do one of the following:
- Select the If the target mailboxes do not exist yet, create them in this mailbox database option to explicitly specify the mailbox database where a new mailbox will be created for calendar synchronization. The mailbox databases listed for this option are hosted on the target Exchange server selected for the legacy calendar synchronization job.
|
|
NOTE: This may be a situation where the legacy mailbox synchronization job precedes the legacy calendar synchronization job for particular mailboxes. If these two jobs have different target mailbox database setting, the first setting to be applied stays applied. This means that a subsequent legacy calendar synchronization job will ignore its own setting and use the target mailbox database specified for the legacy mailbox synchronization job that came first. |
- Select the Use the current mailbox database when synchronizing calendars option if you have no mailbox database preferences. Also use it if you have already rearranged mailboxes in the target organization's mailbox databases prior to the migration and you want to keep your configuration.
|
|
NOTE: Do not change the mailbox database for a collection that is already running. |
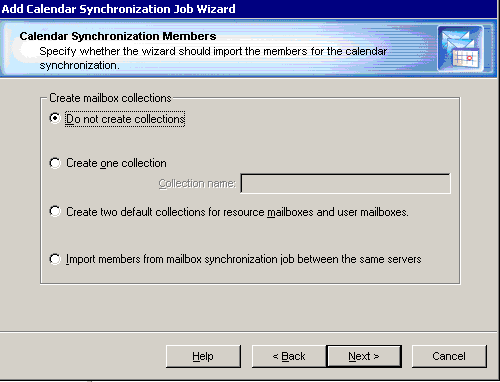
Step 3. Calendar Synchronization Collections
The wizard can automatically create calendar synchronization collections for the job. You can select one of the following options:
- Do not create collections. In this case you should later create collections manually as described below.
- Create one collection. In this case the wizard will prompt you to populate the collection in the next step.
- Create two default collections for resource mailboxes and user mailboxes, one named Resource_mailboxes and the other named User_mailboxes. You will be able to populate each collection in the next step of the wizard. Resource and user calendar collections are processed by the agent differently.
- Import members from mailbox synchronization job between the same servers. The wizard will create a collection and add to it all the mailboxes added to the legacy mailbox synchronization job set up between the same servers.
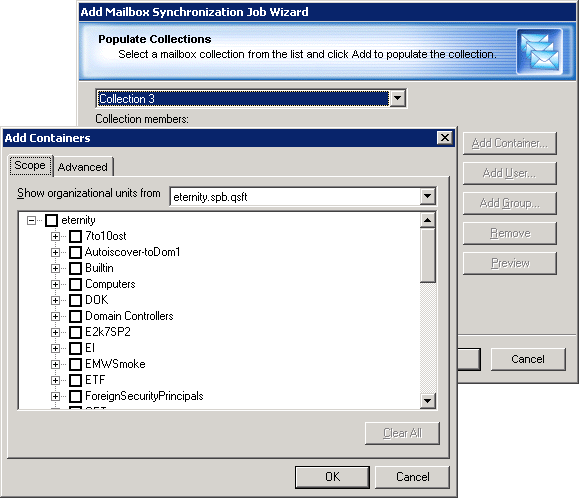
Step 4. Select Mailboxes for Calendar Synchronization
To populate calendar synchronization collections, you can do any of the following:
- Explicitly add mailboxes to the collection by clicking the Add User button and selecting mailboxes from the list.
- Implicitly add mailboxes located in the containers by clicking the Add Container button and selecting the appropriate container check box. To add the mailboxes from the subcontainers as well, select the Include subcontainers check box. Only mailboxes hosted on the source server are migrated.
You can create and apply a storage filter to either the mailboxes of the server or to the mailboxes of the selected mailbox store using the Storage and Advanced tabs.
- Implicitly add mailboxes listed in the groups. To add the mailboxes listed in the nested groups select the Expand nested distribution groups check box. Only mailboxes hosted on the source server are migrated.
To preview the list of mailboxes added to the calendar synchronization collection, click the Preview button.
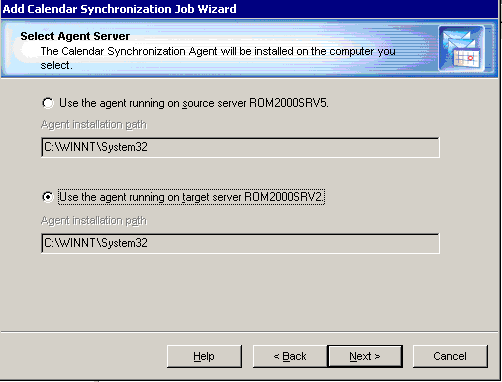
Step 5. Specify Agent Installation Path
The wizard will install the Calendar Synchronization Agent on the source or target Exchange server. If the agent has been already installed on one of the servers involved in the legacy calendar synchronization job, the wizard will ask whether you want the agent that is already installed to perform this job.
By default the agents are installed in the Windows %SystemRoot%\System32 folder. On Microsoft Exchange x64 the default shared folder is created in the %SystemRoot%\SysWOW64 folder.
Step 6. Complete the Wizard and Commit Changes
After the agent is installed, the wizard will inform you that you can start the legacy calendar synchronization job.
After a new job is created, it is marked with an exclamation mark. This means that you need to update the Calendar Synchronization Agent’s database before starting the job. Right-click the job in the management tree and click Commit Changes on the shortcut menu to update the agent’s task list on the remote server.
You can also commit changes for all the legacy calendar synchronization jobs you have created. To do that, right-click the Calendar Synchronization node in the management tree and select Commit All Calendar Synchronization Jobs from the shortcut menu.
