Connecting to SharePoint Using PowerShell
You can create and edit connections to SharePoint using PowerShell. These connections will display in the Content Matrix Console.
To access the PowerShell cmdlets for connecting to SharePoint:
Open a PowerShell or PowerShell ISE session and add the PowerShell snap-ins for the application framework.
The following cmdlets are now available:
·Remove-MLSharePointConnection
To retrieve information about active connections in the Console:
Select (from the PowerShell ISE Command Window) or enter Get-MLSharePointConnections, then run the cmdlet.
Details display for each active connection.
To create a new connection to SharePoint:
1.Select (from the PowerShell ISE Command Window) or enter New-MLSharePointConnection.
2.Select or enter the applicable parameters. Use the information in the following table for guidance.
|
Parameter |
Notes |
|---|---|
|
Address (Required) |
The Url of the SharePoint object (Site, Farm, WebApp or Tenant) you want to connect to. |
|
AuthenticationType (Required) |
Valid values are: ·Windows ·FormsBased ·Adfs NOTE: Currently this cmdlet does not support connecting to SharePoint Online with OAuth authentication. ·UserProvided NOTE: UserProvided authentication is used to make site-level connections to special types of tenants, such as GCC High. To use this type of authentication, you must first run a utility provided by Quest Support and enable the setting EnableUserProvidedAuthentication. Refer to the Quest Support Knowledge Base article Enabling User Provided Authentication in Content Matrix for details. |
|
ConnectionType (Required) |
Valid values are: ·Om (local object model) ·MEWS (remote connection using Metalogix Extension Web Service) ·CSOM (for SharePoint Online targets only) |
|
TargetType (Required) |
Valid values are: ·Site ·WebApp ·Farm |
|
ConnectAsCurrentUser |
Use this parameter if you want to make a SharePoint on-premises connection using the currently logged-in user. NOTE: This parameter is not necessary when using an OM connection, which automatically connects as the currently logged-in user. |
|
MewsVersion |
This parameter is only necessary if you want to use an older version of the Metalogix Extension Web Service. |
|
Password |
The password of the account making the connection. |
|
RememberPassword |
This option is recommended to to ensure that the connection remains active after the PowerShell session has ended. If it is not used, the password will have to be re-entered. |
|
Readonly |
Use this parameter if you want to make a read-only connection to a SharePoint source. |
|
SkipConnectionCheck |
Use this parameter if you want to skip validation of the connection. This is useful if you use a connections factory and speeds up the creation of connections. |
|
User |
The user account making the connection. |
3.Run the cmdlet.
Example Scripts:
New-MLSharePointConnection -Address http://win-pvf4cd21m55/ -AuthenticationType Windows -ConnectionType MEWS -TargetType Site -Password "Pass" -User Administrator -RememberPassword
New-MLSharePointConnection -Address https://metalogixsoftware-admin.sharepoint.com -AuthenticationType Adfs -ConnectionType Csom -TargetType Tenant -Password "Pass" -RememberPassword -User cpqauser@metalogixsoftware.onmicrosoft.com
To edit a connection to SharePoint:
1.Select (from the PowerShell ISE Command Window) or enter Set-MLSharePointConnection.
2.Enter the ConnectionId.
NOTE: You can obtain the ConnectionId by running the Get-MLSharePointConnections cmdlet.
You can now update any of the following parameters, then run the cmdlet:
·ConnectAsCurrentUser (on premises connections only)
·Password
·RememberPassword
·SkipConnectionCheck
NOTE: Use this parameter if you want to skip validation of the connection. This is useful if you use a connections factory and speeds up the creation of connections.
·User
Example Script:
Set-MLSharePointConnection -ConnectionId '91335f9c-9311-439e-9b8e-78d6f7ef480a' -Password pass -RememberPassword -User Administrator
To remove a SharePoint connection:
1.Select (from the PowerShell ISE Command Window) or enter Remove-MLSharePointConnection.
2.Enter the ConnectionId.
NOTE: You can obtain the ConnectionId by running the Get-MLSharePointConnections cmdlet. You can remove multiple connections using the PowerShell pipeline variable.
3.Run the cmdlet.
Example Scripts:
Remove-MLSharePointConnection -ConnectionID '2F91B056-C300-4263-9FA6-17EEDF583594'
Remove multiple connections using the PowerShell pipeline variable:
Remove-MLSharePointConnection -ConnectionID '2F91B056-C300-4263-9FA6-17EEDF583594 ,'2F91B056-C300-4263-9FA6-17EEDF583594','2F91B056-C300-4263-9FA6-17EEDF583594' | Remove-MLSharePointConnection
Preparing for Your Migration
Metalogix Content Matrix offers a number of tools to help you locate and organize data and in preparation for your migration. You can:
·Perform a pre-migration check to identify any potential migration issues
Showing and Hiding Template Rooms
You can migrate eRoom template rooms into SharePoint in the same way you migrate standard eRoom rooms.
These templates are created in eRoom using the Use this eRoom as a template option, in the "Template" options for a selected eRoom.
This option effectively changes the eRoom room into a template. By default, Metalogix Content Matrix will display these templates However, because these templates are slightly different from standard rooms, they can be hidden in Explorer View if you do not want to display them.
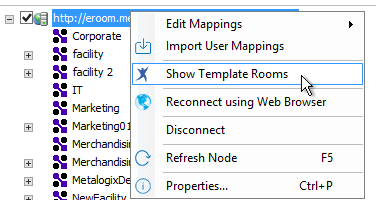
To show/hide template rooms:
1.In Explorer View, select the eRoom root connection.
2.Right-click and choose the applicable option:
§Hide Template Rooms
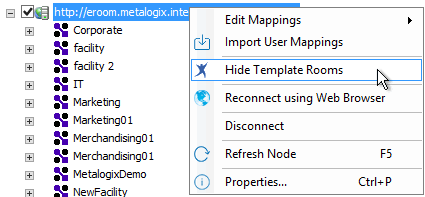
OR
§Show Template Rooms
Any eRoom template rooms that are displayed can be migrated in the same way as any other eRoom rooms.
Performing a Pre-Migration Check
You can use Metalogix Content Matrix to perform a check on eRoom content and reports back any potential migration issues. This includes URL length, file type, and size restrictions.
Each item in eRoom is identified by a URL with its own item ID value. This means that eRoom URL length is not affected by its location within the structure, resulting in eRoom being able to have very deep nested structures. In contrast to this, SharePoint URLs are based on site structure, with a maximum URL length. In SharePoint the maximum URL length that can be entered in the User Interface (UI) for a site is 255 characters, while folder and document items (in a document library) have a maximum URL length of 128 characters.
This creates a situation where invalid URLs can be created when migrating deeply nested eRoom structure to an equivalent SharePoint structure. The Pre-Migration Check feature is designed to help find and identify these types of potential issues. While this feature is checking for any URL length issues, it also checks to see if there are any file types or file sizes that could also cause issues, as well as checking for illegal characters.
These Pre-Migration Check functions are also available using PowerShell.
NOTE: The Pre-Migration Check can only be run on eRoom facilities, rooms, and folders.
To run a Pre-Migration Check:
1.In Explorer View, select the eRoom container node for which you want to run a pre-migration check.
2.Right-click and choose Run Pre-Migration Check to display the Pre-migration Options dialog.
3.Complete the appropriate fields on the General tab:
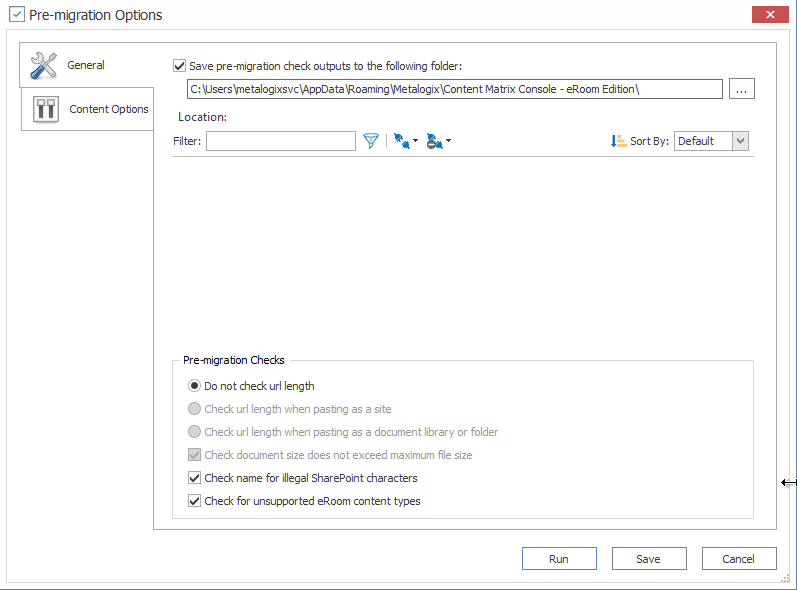
a)If you want to save a CSV file containing the results of the pre-migration check to a specified location:
§Make sure the Save pre-migration check outputs to the following folder is checked.
§Enter or navigate to the file path to which you want to save the file.
By default, this location is the Application Data folder: "<Drive >\Users\<USER>\AppData\Roaming\Metalogix\Metalogix Content Matrix Console - eRoom Edition\."
NOTE: If no issues are found, the Excel files will only contain the column name data, and no actual entries. If any results already exist in the specified location, they will be overwritten.
b)Navigate to and select the target SharePoint Location against which the pre-migration check will be run.
NOTE: When you select a Location, a link to the SharePoint site or list displays to the right side of the Location: header. You can click this link to open the page in a new browser window.
c)Select the applicable Pre-Migration Checks. Use the information in the following table for guidance.
|
If ... |
Then ... |
|---|---|
|
you want to prevent the pre-migration check from running any checks on URL length. |
select Do not check URL length. |
|
·the Location you selected is a SharePoint site (not list) AND ·you want a check to be run against the URL |
select Check URL length when pasting as a site.
NOTE: When this option is selected, a Site URL Results Excel file will be saved to the specified location. |
|
·the Location you selected is a SharePoint site (not list) AND ·you want a check to be run against the URL if a list or library copy is being performed |
select Check URL length when pasting as a document library or folder. NOTE: When this option is selected, a Document URL Results Excel file will be saved to the specified location. |
|
you want to report on any files that are larger than SharePoint site's maximum file size |
check the Check document size does not exceed maximum file size box. NOTE: When this option is selected, a Size Results Excel file will be saved to the specified location. |
|
you want to check the names of all content within the eRoom container for characters that may be illegal in SharePoint |
check the Check name for illegal SharePoint characters box. NOTE: When this option is selected, a Name Results Excel file will be saved to the specified location. |
|
you want to check the eRoom container for any type of eRoom content that is not supported in SharePoint (which includes eRoom inboxes, dashboards, and project schedule database processes) |
check the Check for unsupported eRoom content types box. NOTE: When this option is selected, an Unsupported Results Excel file will be saved to the specified location. |
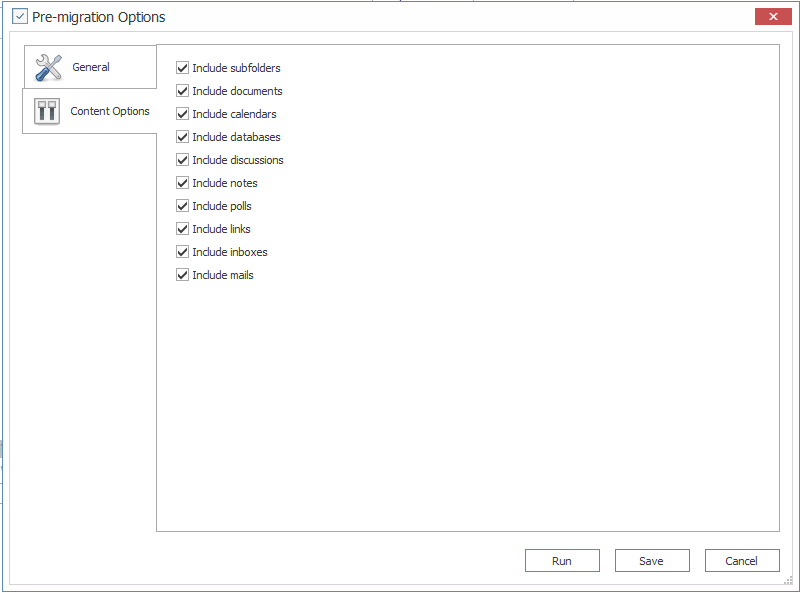
4.Switch to the Content Options tab.
5.Make sure the types of of eRoom content you want to include. Enable the check-box beside any eRoom item types that you want to include in the pre-migration check. For example, if you want to include eRoom databases but not eRoom polls, enable Include databases check-box and deselect the Include polls check-box.