Configuring Copying Options
The Paste [Object] dialog provides a tabbed interface that enables you to configure a migration according to your specifications. Available tabs will vary based on the type of migration that you initiated.
Site Collection Options
If you chose to migrate an eRoom as a SharePoint Site Collection, complete the Site Collection Options tab as described below.
To configure Site Collection Options:
1.Select the existing Web Application within which you want to create the collection from the drop-down.
NOTE: If the Self-Service Mode was selected this option will be set to the default web application and cannot be changed.
2.Enter a Site Title and optional Description.
3.If different than the default, select a default Language for the new site collection.
NOTE: Only languages that have language packs installed in SharePoint will be available for selection.
4.If different than the default, select a base Template for the new site collection.
5.If the Web Application into which you are migrating the Site Collection has more than one Content Database and you would like to specify the one you want to use, select it from the drop-down.
6.Select the appropriate managed path and enter the URL name in the Site URL field.
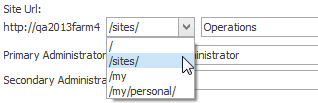
NOTE: The text box is only available when the managed path is not set to the root of the site (as this would overwrite the actual root site), but is available when the managed path is not set to the root.
7.If different from the default (the migrating account), enter the user account that will be the Primary Administrator for the new Site Collection.
The migrating should be set as the Primary (or Secondary) Administrator to help ensure that the account can access the new site collection after its creation, so it can migrate the remaining content.
8.(Optional) Enter a user account that will be the Secondary Administrator for the Site Collection.
NOTE: This field does not authenticate, so any spelling mistakes will not be automatically corrected.
9.If you want to set a Site Quota:
a)Check the Set Site Quota box.
b)Click the [ ] button to display the Set Site Quota dialog.
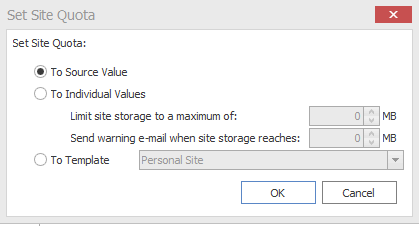
c)Select the appropriate option:
§To Source Value (default) - the quota value from the source site will be used.
§To Individual Values:
§Limit site storage to a maximum of: "X" Mb - The maximum size of the new site collection., in megabytes (Mb)
§Send warning e-mail when site storage reaches: "X" Mb - The size at which to send a warning e-mail to the Site Collection Administrator, that the site collection is getting near it's set volume capacity.
§To Template - Match the same value for a site template on the target side.
NOTE: This drop down list will only display site templates that contain a site quota value.
Collision Options
As with any migration, it is possible that an item on the target may already use the same name as an item being migrated from the source. The two most likely cases of this are:
·Content with the same name exists in multiple locations on the source, and this content may be migrated to the same location on the target.
·Content on the source is updated after an initial migration, and these updates need to be moved across to the target.
To deal with these types of scenarios, Metalogix Content Matrix - eRoom Edition contains a set of Collision Options. These options will help you determine what action they want to be taken if these types of scenarios are encountered during a migration.
To configure Collision Options:
NOTE: Most of the Collision Options refer to a "name" value. The "name" value that is referenced is the unique identifier from SharePoint. In the case of SharePoint sites, this name value refers to the internal name and site name for the created SharePoint site. For SharePoint lists and document libraries this refers to the internal name and title value. SharePoint folders refer to the folder name and documents in SharePoint refer to the document name.
Select the appropriate option. Use the information in the following table for guidance.
|
If you want to ... |
Then ... | ||||||
|
copy the contents from the source to the target so that: ·if objects of the same name exist on the target, the items being migrated will be added to the existing site or list AND ·If individual items are being migrated, a new version will be added to the item on the SharePoint side (provided versioning is enabled) |
select Use Existing Content. NOTE: If you are configuring an Incremental Migration, this will be the only available option. | ||||||
|
overwrite existing content on the target if an object with the same name exists (with the option to rename or delete existing content) |
·Select Overwrite existing content with the same name. ·Select the appropriate sub-option:
| ||||||
|
skip any items in the migration that have the same name as an item that already exists on the target. |
select Skip current content if content with same name exists.
| ||||||
|
delete content on the target that already exists with the same name and migrate the new content to the selected node, even if the content is of different types |
select Rename current content with unique name. When this option is selected, Metalogix Content Matrix will append a numerical value to the end of the name. For example, if an item called "MyFile" exists on the target it would be renamed "MyFile_1, " MyFile_2," and so on. |
Container Options
The Container Options tab enables you to specify how you want Metalogix Content Matrix to migrate specific types of content.
The available options depend on the migration action. For example, if you chose to migrate as a site collection or site, all options would be included, including options to
·Replace all invalid characters in name with: - This check-box option replaces any invalid characters that are found during the migration with a character of your choice. By default this character is set as "_" but this can be changed.
·Enable Tree View Navigation in Site - This check box activates the tree view settings in the target SharePoint site. This means that the Quick (left-hand) Navigation will be changed from it's default view to display a tree view of the navigation instead.
If you chose to migrate as a Document Library, a subset of these options are included.
If you chose to migrate a specific item type (Calendars, Discussion Boards, Links, Polls, etc.), only options specific to that item type is available.