
eRoom Containers - Include Databases
If you chose to migrate an eRoom container as a site collection or site or initiated the migration of an eRoom database, you can specify how the database(s) should be migrated.
To configure Database Options:
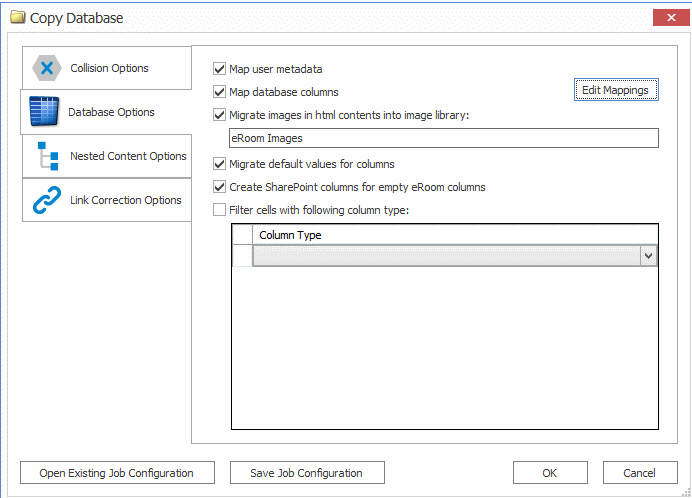
1.In the Container Options tab, make sure the Include Databases box is checked, and click the [...] button to display the Database Options dialog.
NOTE: If you chose to migrate databases directly, Database Options displays as a separate tab, in place of the Container Options tab.
2.If you want users and groups to be migrated to SharePoint, along with their metadata, check the Map user metadata box.
NOTE: If you want to map eRoom users to and target SharePoint users, click the [...] button.
a)Check the Map database columns box.
b)Click [Edit Mappings].
c)Follow the procedure for Column Mapping.
When migrating a source Number-type column to a target Number-type column, if the source column contains any non-numeric characters (with the exception of a single decimal point), they will be stripped when migrated to the target. For more information, see Configuration Considerations when Migrating an eRoom Database to SharePoint.
3.If you want to migrate images in the database(s) into a new SharePoint Picture Library:
§check the Migrate images in html contents into image library, and
§if different than the default name, enter a name for the library that will be created.
4.If you want to migrate default values (also known as initial values) within the eRoom database to the target SharePoint list, check the Migrate default values for columns box.
NOTE: This option only migrates default values to columns that are newly created on the target during migration; it does not migrate default values to existing columns. In addition, this option has the following limitations based on column type:
§For all migration actions, this option does not work for the following eRoom column types: Formatted text, Date, Member list, and Approval.
§For the Paste as Discussion Board migration action, this option does not work for Plain text eRoom columns. For all other migration actions, this option migrates Plain text eRoom columns correctly.
§For all migration actions, this option works correctly for the following eRoom column types: Boolean, Number, Choice list, and Traffic light.
5.If you want to create columns within the SharePoint list for any empty eRoom columns that were in the eRoom database, check the Create SharePoint columns for empty eRoom columns box.
6.If you want to adds filters to the source eRoom database to filter out any columns of a specified type:
§check the Filter cells with following column type box, and
§select the specific column type on which to filter the source eRoom database from the Filter cells with following column type box.
NOTE: The values of this drop-down are populated from the source eRoom side. After a column type has been selected, a new row will appear under the Column Type heading, and additional column type filters can be added.
eRoom Containers - Include Polls
If you chose to migrate an eRoom container as a site collection or site, or initated the migration of an eRoom poll, you can specify how polls should be migrated.
NOTE: eRoom polls are migrated as SharePoint Survey lists.
To configure Poll Options:
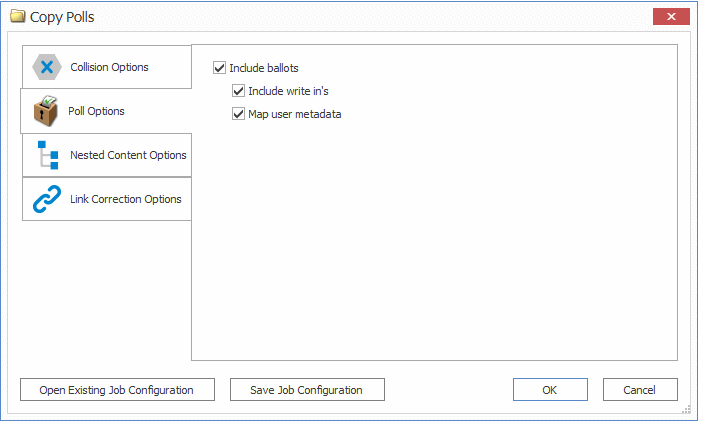
1.In the Container Options tab, make sure the Include Polls box is checked, and click the [...] button to display the Poll Options dialog.
NOTE: If you chose to migrate individual polls, Poll Options displays as a separate tab, in place of the Container Options tab.
2.If you want results in the poll to be migrated to SharePoint:
a)Make sure the Include ballots box is checked.
NOTE: If this box is unchecked, only the poll with its questions will be migrated.
b)Check/uncheck the appropriate sub-option(s):
oWhen the Include write in's box is checked, any "write-in" responses will be included when migrating the ballots. (That is, any poll responses that contain text box replies will be included.)
oWhen the Map user metadata box is checked, users and groups will be migrated to SharePoint, along with their metadata. For more information on this option please see the page on Permissions options.
eRoom Containers - Include Links
If you chose to migrate an eRoom container as a site collection, site, or document library, and you want any links within the eRoom content to be migrated, make sure the Include Links box is checked.
Any links that are found in the migration will be added to the site in a SharePoint Links list. If these links are pointing to internal data their links will be corrected, provided that Link Correction is being used.
Mapping Columns
Column mapping allow you to map one or more columns from the source to SharePoint columns on the target when you click the [Edit Mappings] button is clicked from the Document Options or Database Options tab.
The column mapping option is only available when migrating eRoom containers (rooms or folders) or documents. In the case of migrating eRoom documents, they must be migrating into an existing document library on the target.
NOTE: Mappings are saved as a separate .MLM files.
Known Limitation When Migrating an eRoom Database
When migrating an eRoom database to SharePoint, there is a limitation when migrating a Number-type column to another Number-type column. Any non-numerical characters, with the exception of a single decimal point, are stripped when migrated to the target. For example, "3.6.4" would appear as "364" on the target; "+91 #123.@456.789" would appear as "91123456789" on the target. In order to migrate the source Number-type column as-is, it must be migrated as a Text-type column on the target. For information on migrating an eRoom database to SharePoint, see Migrating an eRoom Database to SharePoint.
To configure column mappings:
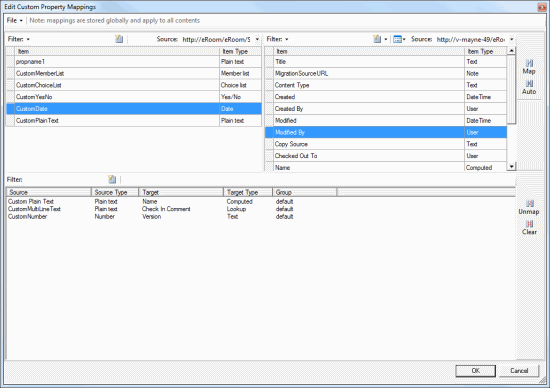
1.From the File drop-down at the top of the Edit Custom Property dialog, choose the appropriate option. Use the information in the following table for guidance.
|
If you want to ... |
Then... |
|
load mappings from a previously-saved Metalogix Mapping setting (.MLM) file |
·choose File > Load. AND ·Navigate to and open the mapping file to populate the Mappings dialog. |
|
create new mappings |
go to the next step. |
2.Use the information in the following table to determine the appropriate action to take.
NOTE: You can Filter items in each window to narrow displayed lists.
|
If you want to ... |
Then... |
|
manually map each individual source column to a target SharePoint column |
·From the left (eRoom column) pane, select the Item that you want to map. ·From the right (SharePoint column) window, select an available Item. ·Click the Map icon. |
|
have Metalogix Content Matrix automatically map source fields to matching target SharePoint columns |
·From the left (eRoom column) pane, select the Item(s) that you want to map. ·Click the Auto icon. |
The mappings you create will display in the bottom window. (Note that you can also Unmap individually-selected mappings in the bottom window or Clear all mappings from the bottom window.
NOTE: If no column currently exists on the target that you want to map to, you must manually create one in the SharePoint User Interface, then return to Metalogix Content Matrix and refresh the connection to SharePoint.
3.To save the mappings in the dialog as a Metalogix Mapping setting (.MLM) file, choose File > Save.
4.Click [OK] once all desired mappings have been made and return to the Configuration Options dialog.