The instructions on this page detail how to use the Explode Diagram feature to:
•Create links from parent to child diagrams
•Open existing child diagrams linked via the feature
•Return to the parent diagram
To use the explode diagram feature in erwin Evolve Suite:
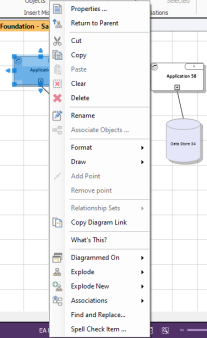
1.In the diagram, right-click an object.
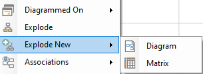
2.Hover over Explode New.
3.Click Diagram.
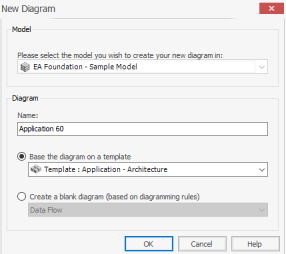
The New Diagram screen appears.
oUse Name to specify the name of the diagram.
oUse Base the diagram on a template to specify template of the diagram.
oUse Create a blank diagram (based on diagramming rules) to create a new blank diagram without any templates.
4.Click OK.
The selected object is linked to a new diagram. You can explode the object to view or open the diagram.
To view an exploded diagram:
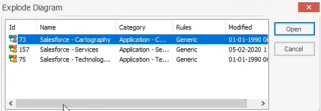
1.On a linked object that is represented on a diagram, click the 
The list of exploded diagrams appears.
2.Select a diagram from the list.
3.Click Open.
The exploded diagram opens. You can view the parent object’s details in the properties of the exploded diagram.
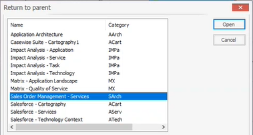
To view parent object or diagram of exploded diagram:
1.Under the Home tab, click Return to Parent.
2.Select a diagram and click Open.
The Parent diagram appears.
To create an exploded diagram in erwin Web Modeler [Evolve 2022.0 and above]:
1.Open the browser and login to erwin Evolve Web Platform.
The list of available model appears.
2.Click on the model, e.g., EA Foundation – Sample Model.
3.Under my menu, click Diagram List.
The list of diagrams opens.
4.Click Diagram List available under my menu.
5.Enter the diagram name in the Filter the content of this page box.
6.Click the Open related object page icon.
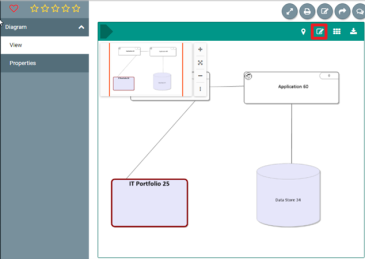
The diagram opens on your object page.
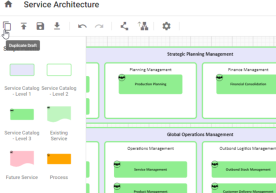
7.Click the Edit Diagram In Web Modeler icon.
|
|
If this icon is not present, please check you have a license for Web Modeler, that Web Modeler is enabled, and you are allocated a Diagrammer license. |
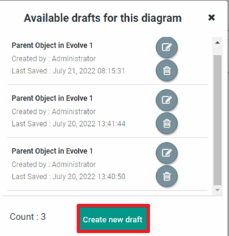
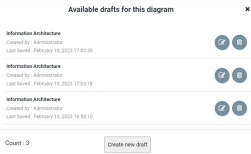
8.Click Create new draft.
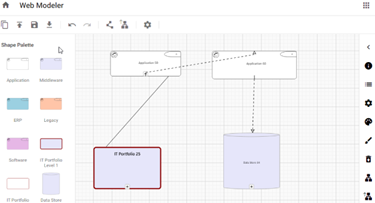
Evolve Web Modeler editor opens in the new tab with the predefined Shape Palette of the template chosen.
9.Select an object.
10.Click 
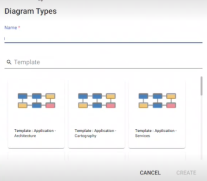
The Diagram Types screen appears.
11.Enter Name and select a Template.
A blank exploded diagram is created. Now, you can drag and drop objects from the shape palette.
12.To publish the diagram, click the 
Once the diagram is published in the Web Modeler, the same diagram can be accessed from the Modeler in the desktop application.
The One Draft Mode enforces only one draft per published diagram. Thus, preventing multiple drafts of the same diagram being edited at the same time.
To enable the One Draft Mode in Evolve Designer:
1.Start Evolve Designer.
2.On the Evolve Designer Models launcher dialog box, click the Configure Evolve Server button.
The Evolve Server Configuration dialog opens.
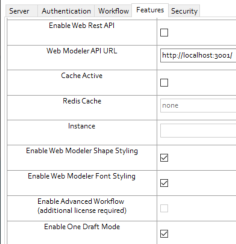
3.Under Features, select the Enable One Draft Mode check box.
4.Click Save.
5.Click Configure IIS and perform full deployment.
This enables the One Draft Mode. Once it is enabled:
•The “Available drafts for this diagram” option is disabled.
Clicking the Edit Diagram In Web Modeler icon bypasses the “Available draft for this diagram” option and redirects you to erwin Web Modeler.
•The “Duplicate Draft” option in erwin Web Modeler is disabled.
Clicking 
oThe “Create new draft” button is disabled.
If a diagram has more than one draft diagram created prior to the setting being enabled, clicking Create new draft, displays a notification, “Unable to create a draft because single draft mode is enabled.”
You can delete unwanted drafts. Once done, you will be redirected to erwin Web Modeler.
|
|
If the diagram already has a draft created, and someone modifies the published diagram via the desktop modeler, then beware that any changes made in the published diagram won't be synchronized in the draft diagrams. To see the changes, delete the unwanted drafts and create a new one. |
Previously if you wanted to use Web Modeler you were restricted to a single server installation. We have now extended the configuration to allow for multi-server (or load balanced) environments.
This topic explains the process to configure MongoDB Replication. This process is only required if you are serving Evolve Web Platform from more than one web server, in a load balanced array.
Configure MongoDB Replication
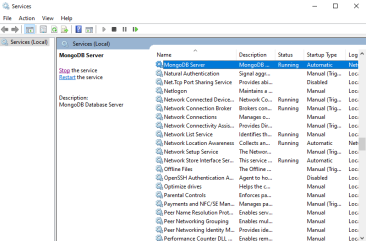
1.Press the Windows key and then click Start.
2.Search for Services.
The Services window appears.
3.Select MongoDB Server.
4.Click Stop.
MongoDB Server service stopped.
5.Go to MongoDB bin folder available at C:\Program Files\MongoDB\Server\4.2\bin.
6.Open `mongod.cfg` file in text editor (For example, Notepad).
7.Update replication property as follows:
replication:
replSetName: "rs0"
8.Bind your system IP address in the following format:
net:
port: 27017
bindIp: <enter system ipv4>, 127.0.0.1
9.Save the`mongod.cfg` file.
10.Start MongoDB Service.
11.Go to C:\Program Files\MongoDB\Server\4.2\bin and open the command Prompt.
12.Run the mongo.exe command.
13.Run the following command:
rs.initiate({_id : "rs0",members: [{ _id: 0, host: "<enter system ipv4>:27017"}]})
|
|
The default MongoDB port number is 27017. If required, you can update it to a different port number. |
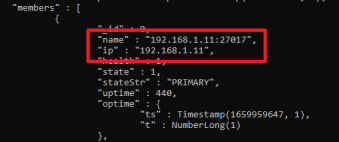
14.Run the rs.status() command to check whether replication is configured successfully.
Successful MongoDB replication is indicated by a response where the members array has the name and IP properties according to the values configured in step 13.
The instructions below explain Evolve Server Configuration to publish your sites on it.
On the main/master server:
1.Start Evolve Designer.
2.On the Evolve Designer Models launcher dialog, click the Configure Evolve Server button.
The Evolve Server Configuration dialog opens.
3.Under Server, select the Primary Server, Share Data Folder and Share MongoDB check boxes.
|
|
In the MongoDB URL option, the IPv4 address will be replaced with the host address, unless you manually update the main machine IP address. |
4.Click Save.
5.Click Configure IIS and perform full deployment.
On the secondary server:
1.Start Evolve Designer.
2.On the Evolve Designer Models launcher dialog, click the Configure Evolve Server button.
The Evolve Server Configuration dialog opens.
3.Under Server, select the Use the Share Data Folder and Use the Shared MongoDB check boxes.
4.Click Features and in the Web Modeler API URL box, replace your host IP address with "localhost".
|
|
The address should be “http://localhost:3001/” after replacing IP address. |
|
|
Before deploying, ensure that MongoDB and Diagrammer services are running. |
5.Click Save.
6.Click Configure IIS and perform full deployment.
|
|
Verify whether the database property is added to the environment variables. |
7.Restart the secondary server.
8.Open erwin Web Modeler.
Verify whether it displays the main server’s erwin Web Modeler drafts and data. This indicates that both machines are connected to the same MongoDB database.
Previously if you wanted to use Web Modeler you were restricted to a single server installation. We have now extended the configuration to allow for multi-server (or load balanced) environments.
This topic explains the process to configure MongoDB Replication. This process is only required if you are serving Evolve Web Platform from more than one web server, in a load balanced array.
Configure MongoDB Replication
1.Press the Windows key and then click Start.
2.Search for Services.
The Services window appears.
3.Select MongoDB Server.
4.Click Stop.
MongoDB Server service stopped.
5.Go to MongoDB bin folder available at C:\Program Files\MongoDB\Server\4.2\bin.
6.Open `mongod.cfg` file in text editor (For example, Notepad).
7.Update replication property as follows:
replication:
replSetName: "rs0"
8.Bind your system IP address in the following format:
net:
port: 27017
bindIp: <enter system ipv4>, 127.0.0.1
9.Save the`mongod.cfg` file.
10.Start MongoDB Service.
11.Go to C:\Program Files\MongoDB\Server\4.2\bin and open the command Prompt.
12.Run the mongo.exe command.
13.Run the following command:
rs.initiate({_id : "rs0",members: [{ _id: 0, host: "<enter system ipv4>:27017"}]})
|
|
The default MongoDB port number is 27017. If required, you can update it to a different port number. |
14.Run the rs.status() command to check whether replication is configured successfully.
Successful MongoDB replication is indicated by a response where the members array has the name and IP properties according to the values configured in step 13.
The instructions below explain Evolve Server Configuration to publish your sites on it.
On the main/master server:
1.Start Evolve Designer.
2.On the Evolve Designer Models launcher dialog, click the Configure Evolve Server button.
The Evolve Server Configuration dialog opens.
3.Under Server, select the Primary Server, Share Data Folder and Share MongoDB check boxes.
|
|
In the MongoDB URL option, the IPv4 address will be replaced with the host address, unless you manually update the main machine IP address. |
4.Click Save.
5.Click Configure IIS and perform full deployment.
On the secondary server:
1.Start Evolve Designer.
2.On the Evolve Designer Models launcher dialog, click the Configure Evolve Server button.
The Evolve Server Configuration dialog opens.
3.Under Server, select the Use the Share Data Folder and Use the Shared MongoDB check boxes.
4.Click Features and in the Web Modeler API URL box, replace your host IP address with "localhost".
|
|
The address should be “http://localhost:3001/” after replacing IP address. |
|
|
Before deploying, ensure that MongoDB and Diagrammer services are running. |
5.Click Save.
6.Click Configure IIS and perform full deployment.
|
|
Verify whether the database property is added to the environment variables. |
7.Restart the secondary server.
8.Open erwin Web Modeler.
Verify whether it displays the main server’s erwin Web Modeler drafts and data. This indicates that both machines are connected to the same MongoDB database.