About Agents
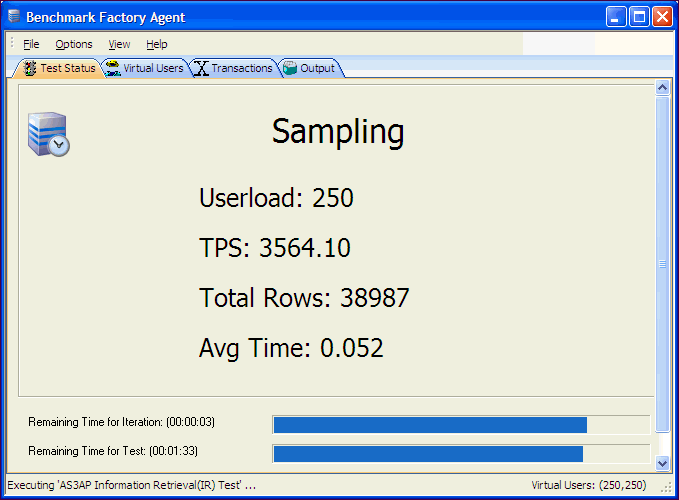
Benchmark Factory Agents reside on each physical client machine and spawn multiple virtual-user sessions. Each Agent generates an information screen with tabs that contain a variety of Agent information. Benchmark Factory can control hundreds of Agent machines.
Each Agent can simulate up to 1500 virtual users, depending upon hardware and test configuration. Virtual users simulate the load against the system-under-test. Each virtual user is a separate thread, acting independently of the other virtual users, with its own connection to the system-under-test. Each virtual user tracks its own statistics that includes transaction times and the number of times a transaction executes.
The Agents View (Pane)
The Agents view or pane in the main Benchmark Factory window displays the status of the agents currently running.
- If the Agents pane is not in view, select View | Agent from the main menu.
Add and Manage Agents
- To add agents or to specify default settings for agents, see Agent Settings .
- To install remote agents through the console, see Install Remote Agents.
- To learn about running Benchmark Factory with multiple agents, see Running Benchmark Factory with Multiple Agents.
The Benchmark Factory Agent Component Dialog
To open the Benchmark Factory Agent dialog, go to Program Files\Quest Software\Benchmark Factory <version>\bin and double-click Agent.exe.
The Benchmark Factory Agent dialog provides the follow tabs:
- Agent Test Status Tab
- Agent Virtual Users Tab
- Agent Transaction Tab
- Agent Output Tab

Agent Settings
You can use this page of the Settings dialog to:
- Specify some default settings (error handling and communication timeout) for each agent
- Set up (add) new agents to use in testing
- Specify the defaults agents to use when creating a new job.
- Install remote agents
To specify default Agent settings
- Select Edit | Settings. The Settings dialog opens.
-
Select Agent. Review the following for additional information:
Setup New User Agent Click to setup a new agent. List of agents Specify default settings. Select the agent machines and specify the number of agents. These default settings are used when you create a new job.
If you do not select a default agent, the local agent is automatically selected when you create a new job in the New Job wizard.
Note: When you run a job using one or more local agents, if Agent utilization of resources on the local machine is too high, errors could occur.
Remove Click to remove the selected agent. Verify Selected Agent Verifies that selected agent starts and communicates with console. Error Handling Stop job when agent cannot be started/connected—Cancels job if agent does not start or connection is lost.
Do not select this option if you want to run a job using multiple agents AND you want the job to run even if one or more agents do not start.
Agent communication timeout Specify timeout duration in seconds. Agent refresh interval Specify how often each agent should refresh its status.
To set up or to install an Agent
- Select Edit | Settings | Agent.
- On the Agent settings page, click Setup New User Agent. The Setup User Agent dialog opens.
- Enter the name or IP address of the computer where the agent is installed, or the computer on which you want to install an agent.
- To install an agent on a remote computer, see Install Remote Agents.
- Enter the connection information.
- Specify the number of agents. Click OK.
- Benchmark Factory connects to the computer and then checks if the agent is installed.
- The agent is added to the list.
- To learn more about running multiple agents, see Running Benchmark Factory with Multiple Agents.
Tips:
- You can also modify agents or set up new agents for a job using the New/Edit Job Wizard. Select Agent in the left pane of the wizard to access agent options for the selected job.
- To open the Agent console, go to Program Files\Quest Software\Benchmark Factory <version>\bin and double-click Agent.exe. See About Agents for more information.
Install Remote Agents
You can install agents to remote computers from your Benchmark Factory console. You must be able to connect to the remote machine.
To install remote agents from the console
- Select Edit | Settings | Agent.
- On the Agent Settings page, click Setup New User Agent. The Setup User Agent dialog opens.
-
Enter the connection information for the remote machine. Review the following for additional information:
IP Address / Name Enter the IP address or name of the remote machine. User Name Enter the user name to use to connect.
Note: Only accounts in the Administrators group on the remote machine can install or launch remote Agents. If in a domain, connect using a domain account in the Administrators group.
Password Enter the password to use to connect.
Use Windows session credentials Select to use Windows credentials.
# of Agents Specify the number of agents to deploy on this machine. - Click OK. Benchmark Factory checks the remote machine for an installed agent.
- If no agent is found, Benchmark Factory prompts you to install the agent. Click Yes in the prompt window. The Setup User Agent dialog opens.
-
In the Installer field, browse to and select the Benchmark Factory installer.
Note: The Installer can be located on your local machine or on the remote machine.
-
Click OK. The installer installs the agent component on the remote machine.
Note: If the agent fails to install, you may need to configure the firewall or attempt one of the troubleshooting techniques. See Configure Firewall for Remote Agent Install/Start-Up.
- When the agent is successfully installed, the progress window closes and the new remote agent displays in the list.
- After the remote agent is installed, you can double-click the agent name in the list to modify agent options.
Configure Firewall
In order to install remote agents and allow communication with remote agents after installation, you may need to configure the firewall on the console machine and on each agent machine. See Configure Firewall for Remote Agent Install/Start-Up to learn more.
If you configure the firewall and then encounter an error when attempting to install a remote agent, find some troubleshooting techniques here: Troubleshooting.
Run Benchmark Factory with Multiple Agents
You can install agents on multiple agent machines in order to run tests using multiple agents. To configure Benchmark Factory with multiple agents you must:
- Load the proper client libraries (i.e. Oracle, SQL server, etc.) on the Benchmark Factory Console and Agent Machine.
- Install Benchmark Factory on the local and agent machines.
Install Multiple Agents
For best results, install remote agents through your Benchmark Factory console. You can install remote agents from the Settings dialog (Edit | Settings | Agent) or from the Agent page of the New/Edit Job Wizard. See Install Remote Agents for more information.
You can also install agents manually on the agent machine. If you do, you must configure the agent on the agent machine (see below). Then, in your local Benchmark Factory, you must set up the agent to register it with the console. See Agent Settings for more information.
Configure Agent Machine
If you set up an agent machine by installing Benchmark Factory manually, you must configure the agent on the agent machine.
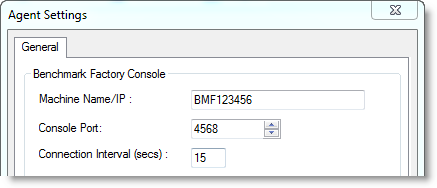
Each Benchmark Factory Agent must be configured with the address of the Benchmark Factory Console. Each Agent sends load testing results back to the Benchmark Factory Console.
If you use only the agent installed locally on the console machine, make sure your local agent is configured with the IP address (name) of your local machine.
To configure Benchmark Factory Agents
- On each agent machine, go to Program Files\Quest Software\Benchmark Factory <version>\bin and double-click Agent.exe to open the Agent dialog.
- Select Options | Settings.
-
In Machine Name/IP field, enter the address of the Benchmark Factory console machine. In the Console Port field, enter the port for the Benchmark Factory console.
- Click OK.
- Repeat this procedure for each Agent machine
Set Up the Agents
To run a job using multiple agent machines, after the agents are installed and configured, you must set up (or add) each remote agent to the Benchmark Factory console.
- If the agent was installed manually, you can set up the agent in Edit | Settings | Agent. See Agent Settings for more information.
- If the agent was installed remotely through the Benchmark Factory console, the agent is automatically set up.
Running a Job With Multiple Agents
To run a job with multiple agents
- Open the New Job Wizard and create a workload.
- Click Agent in the left panel of the New Job Wizard.
- For an existing job, open the job in the Edit Job Wizard and click Agent in the left pane.
- From the list, select the agents to use. The list displays agents you have previously set up in Benchmark Factory.
- To add an agent, click Setup New User Agent. See Agent Settings for more information.
- As the job runs, all connected Agents will display in the Agent view/pane of the Benchmark Factory console.
Note: When you run a job using one or more local agents, if Agent utilization of resources on the local machine is too high, errors could occur.
View Agents from Benchmark Factory Console
When you run multiple Agents for load testing, you can view the Agents results as they run from the Benchmark Factory Console.
To view the Agents from the Benchmark Factory Console
- From the Benchmark Factory main menu, select View | Agent. The Agent view displays. Statistics from All Agents connected to the Benchmark Factory Console and running are displayed here.

