Working with On Demand Recovery
This section provides step-by-step instructions on how to use On Demand Recovery.
|

|
Note:
- For Microsoft 365 tenants: On Demand Recovery can backup and restore Microsoft 365 users, Microsoft 365 groups and security groups. Group membership and ownership is restored for both types of groups. The product does not restore any resources associated with Microsoft 365 groups and Microsoft Teams, such as conversations, Planner tasks and plans.
- Email notifications about failed backups can be enabled. Click here for more information.
|
|

|
Caution: Due to Microsoft Entra ID being a dynamic and rapidly evolving platform, its' associated APIs could be subject to updates or changes with limited notice, which may occasionally impact On Demand Recovery features. Quest will provide timely notification to customers in the event of any such impact. Please refer to Microsoft's official documentation and Microsoft Graph API changelog for any updates related to Entra ID APIs |
- Go to Quest On Demand and sign up for Quest On Demand. For more details, refer to Sign up for Quest On Demand.
- Add your Microsoft Entra tenant as described in the Tenant Management section in the On Demand Global Settings User Guide.
- After the tenant is added, make sure that the permissions required to work with Microsoft Entra tenant are granted. To grant the required permissions, click Go on the tenant tile and check that the Recovery module has the Granted status. For details, please see the Admin Consent Status section in the On Demand Global Settings User Guide. For a list of permissions that need to be granted consent for On Demand Recovery, refer to Consent permissions.
|
|
Note: Microsoft admin consent status is "expired" after 90 days and the Recovery module status is changed to "Not Granted". Once expired, you must grant admin consent again to continue using the module. |
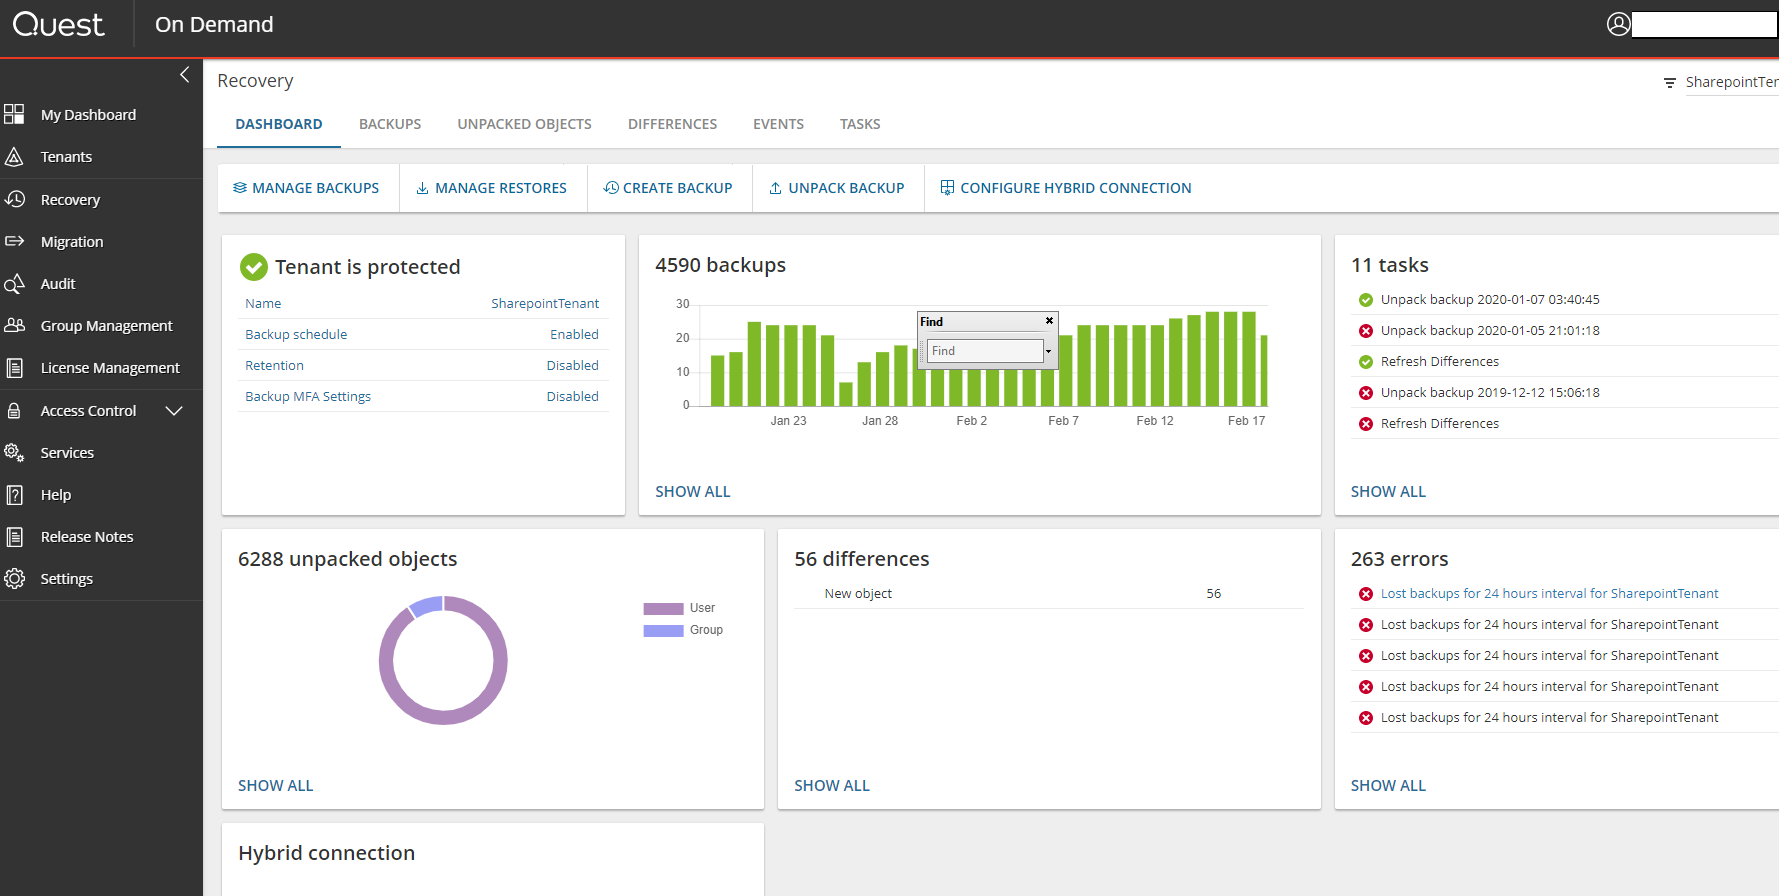
- To launch On Demand Recovery, click Recovery on the left pane. The Dashboard screen opens.
- To configure a hybrid connection with on-premises Active Directory, see Integration with Recovery Manager for Active Directory.
- To configure the backup settings, perform the following steps:
- Click Manage backups on the Dashboard screen.
- Select the tenant from the list and click Edit. The Configure backup dialog opens.

- To enable the backup creation, select Enabled next to the Schedule option. On Demand Recovery will attempt up to 4 backups per day. Depending on the completion time required for each, the number of backups may be less.
- Choose to immediately run the backup by selecting the Run backup immediately option. Deselecting this option will allow backups to only run when scheduled.
- Specify the backup retention period using the Retention policy option in days. The backup retention policy is also applied to backups that are started manually. If no policy is set, the default retention policy is five years (1825 days). If the retention period is changed, the new policy will only affect new backups.
- To backup Application Proxy settings, select the Backup Application proxy settings and connector groups option.
- Check the status of the module admin consent.
- If you need to run the backup creation manually, go to the Tasks screen, select the Backup task and click Start.

- To view a list of tenants that have been granted consent to perform restore operations, go to the Manage restores section on the Restoring Objects page.
- To start the backup creation manually, you can use the Create Backup option on the Dashboard screen.
- To unpack a backup:
- Go to the Backups screen. Here, you will find each packed backup, and the properties associated with that backup.
|
|
Note:The Users column reflects the total number of users including guest accounts. The Guest column reflects only guest accounts. |

- From the Tenant drop-down list, select the tenant, then select the backup you want.
- You can specify predefined or custom date ranges to narrow the search results by selecting Custom range.
- Click Unpack in the actions menu.
- If the option Unpack service principals and devices is not selected, the unpack operation will work faster and the Differences report will contain only changes related to users and groups. For more details about this option, see Backup Unpacking.
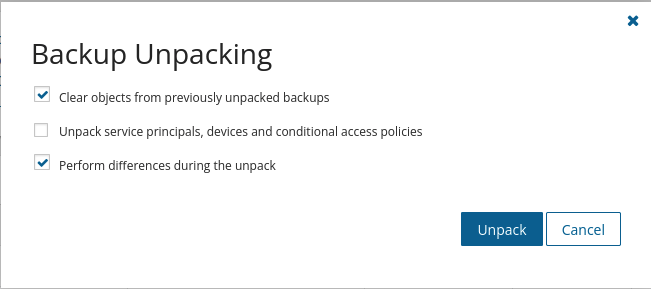
- In the Backup Unpacking dialog, click Unpack.
- When the Unpack backup task is completed, go to the Unpacked Objects screen and select the users and groups that you want to restore and click Restore.
|
|
Note: If you do not unpack a backup, the Unpacked Objects screen will contain no objects or show a list of objects that were extracted from the previously unpacked backup. |
- In the Restore Objects dialog, select the options for restore. See the To restore objects section in the Restoring Objects page for information on each option.
- Also, you can view differences between the selected backup and live Microsoft Entra ID or Microsoft 365 and revert the selected changes using the Differences report tool. For more details, see the Reporting section. You can export the selected report data to the CSV file.
- You can view the status of your Restore objects task on the Tasks screen.

- Open the Events screen to view errors or warnings, if they occur during the restore operation.
- Use the Export option to export the selected log data to the CSV format.
- Use the Acknowledge option to hide events that are not actual anymore. The status of acknowledged events is changed from 'Current' to 'Obsolete'. To view the list of obsolete events, click Obsolete on the left side of the screen.
In the Backup Unpacking dialog, you have the option to Unpack service principals, devices, and conditional access policies. If this option is not selected, the unpack operation will work faster and the Differences report will contain only changes related to users and groups. Otherwise, you will see changes related to users, groups, service principals, devices, and Conditional Access policies. The table below provides the full list of objects and changes that will be shown on the corresponding screens.
If the Unpack service principals, devices, and conditional access policies option is NOT selected, the following items will be shown:
Unpacked Objects view
- Administrative Unit
- Directory Setting
- External Identities Settings
- Group
- Group Lifecycle Policy
- User
- User Authentication Settings
- User Authorization Settings
Differences view
- Administrative Unit
- Directory Setting
- DirectoryLinkChange
- DirectoryRoleLinkChange
- External Identities Settings
- Group
- Group Lifecycle Policy
- User
- User Authentication Settings
- User Authorization Settings
If the Unpack service principals, devices, and conditional access policies option is selected, the following items will be shown:
Unpacked Objects view
- Administrative Unit
- Conditional Access Policy
- Country Named Location
- Device
- Directory Setting
- External Identities Settings
- Group
- Group Lifecycle Policy
- IP Named Location
- Service Principal
- User
- User Authentication Settings
- User Authorization Settings
Differences view
- Administrative Unit
- AdministrativeUnitLinkChange
- ApplicationOwnerLinkChange
- AppRoleAssignment
- CompliantNetworkNamedLocation
- Conditional Access Policy
- Country Named Location
- Device
- Directory Setting
- DirectoryLinkChange
- DirectoryRoleLinkChange
- External Identities Settings
- Group
- Group Lifecycle Policy
- GroupLifecyclePolicyLinkChange
- GroupOwnerLinkChange
- IP Named Location
- OAuth2PermissionGrant
- OwnerLinkChange
- RegisteredOwnerDeviceLinkChange
- RegisteredUserDeviceLinkChange
- ScopedRoleMembership
- Service Principal
- User
- User Authentication Settings
- User Authorization Settings
Perform differences during the unpack is selected by default. The differences operation will automatically begin. If this is not selected, then only the unpack operation will be performed.
After you complete an Unpack backup task, go to the Unpacked Objects tab to select the objects that you want to restore.
|
|
Note: If you do not unpack a backup, the Unpacked Objects tab does not display any objects or shows a list of objects that were extracted from the previously unpacked backup. |
You can choose one of the following views to see the unpacked objects:
- List View - This view lists the unpacked objects from your backup. You can select objects to export to a CSV file or select objects to restore.
- Objects - This view displays the number of unpacked objects by category in graph form. You can use the filters to display specific types of objects.
Manage restore
The Manage Restore list displays a list of tenants that have been granted consent to perform restore operations.

If the desired tenant has not been granted consent:
- Click Grant next to the tenant to be directed to the Office 365 Tenants page.
- Scroll to the Recovery section, and click Grant Consent next to Restore.
To restore objects
- On the Unpacked Objects tab, in List View, click the check boxes next to the objects that you want to restore.
- You can use the Search field to search for specific objects to restore.
- You can use the filters to display specific objects that you want to restore. The following filters are available:
- Tenant - allows you to filter objects by a specified tenant.
- Backup - allows you to filter objects by a specified backup.
- Type - allows you to filter objects by type.
- User Type - allows you to filter objects by type of user.
- Microsoft Entra Connect - allows you to filter by objects synced from a hybrid environment.
- Mail Enabled - allows you to filter by objects that have a mailbox (enabled) or do not have a mailbox (disabled).
|
|
Caution:The Restore button will be disabled when objects from multiple tenants are selected. To display the Restore button, please select a single tenant. |
- Click Restore.
- In the Restore Objects dialog, you can select the following options:
- Restore deleted objects from Recycle Bin - This restores accidentally deleted objects from the Recycle Bin. On Demand Recovery preserves original object identifiers (GUID).
- If a user or group is not found in Recycle Bin, create a new one - This recreates permanently deleted users, groups, and subgroups. This option recreates users and groups with attributes that are required for object identification. If you need to restore all attributes for the object including membership information (links), use this option together with the Restore all attributes option.
- Restore all attributes - This restores all object attributes including membership information (links). If this option is not selected, you can specify specific attributes that you want to restore by clicking Browse.
- Restore specific attributes - see below
- Specify password for the encrypted backup - This allows you to type a password that is used to decrypt the encrypted backup. This is strongly recommended only for hybrid users.
- You may also need to grant/regrant Restore Admin Consent for the On Demand Recovery module. Ensure this has been completed before progressing.

- Click OK.
|
|
Note: Because of Microsoft requirements, hard deleted objects will receive a new Object ID upon restore of these objects. Please consider the implications of having a new Object ID after restoring these objects. |
To restore selected attributes
On Demand Recovery allows you to restore specific attributes for each object, with each object type displaying its own list of attributes to restore. To do this:
- Uncheck the Restore all attributes option, and click Select Attributes.
|
|
Note: Only the attributes for the selected object type will be displayed. |
- Select the required attributes to restore for the object by checking the box(es). and click Save. Your selected attributes will appear in the Restore specific attributes box.
- Click OK when all required options have been selected.


On Demand Recovery can restore the following objects from the Recycle Bin:
- Users (all types of users including B2B, B2C, guests, hybrid)
- Microsoft 365 Groups
- Applications
- Service principals
- Administrative Units
|
|
Note: Links, permissions, and roles cannot be restored from the Recycle Bin. But if an object from the above list is soft deleted and then recovered from the Recycle Bin, all attributes and links including group membership and app role assignments are preserved by Microsoft. |
|
|
Note: Soft-deleted service principals can only be restored from the Objects view tab, under Unpacked Objects. |
Objects that cannot be restored from the Recycle Bin:
- Distribution groups
- Security groups
- Mail-enabled security groups
- All groups synchronized by Microsoft Entra Connect from on-premises Exchange server (hybrid configuration)
- Devices
