Converse agora com nosso suporte
Chat com o suporte

vRanger 7.8.2 - Integration Guide for NetVault SmartDisk

Getting started Understanding NetVault SmartDisk Planning your NetVault SmartDisk deployment Installing vRanger Installing NetVault SmartDisk Configuring NetVault SmartDisk Monitoring NetVault SmartDisk About us

Modifying the data port

Previous Next


Configuring NetVault SmartDisk ports for communication with your software

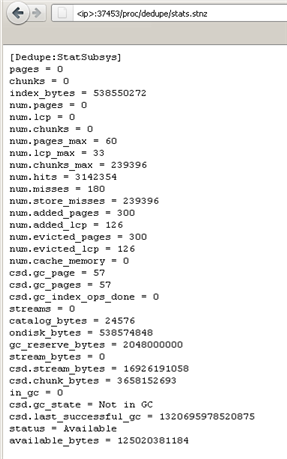
By default, NetVault SmartDisk uses port 37453 to communicate with vRanger instances that are streaming data to the NetVault SmartDisk Device. It also uses port 37451 for Inter Process Communication (IPC) on the loopback interface, but not for remote connections.

Modifying the data port

Previous Next


Configuring NetVault SmartDisk > Modifying the data port > Modifying the data port

Modifying the data port

If you want to use a different port to communicate with the vRanger instances, complete the following steps.

NetVault SmartDisk displays the list of options and parameters that you can use, including the sections for configuring the ports:

config --add|--update --webdav <port> [--block-size <bytes>]
[--preferred-address <address>] [--credentials]

You can use ‑‑block-size to define the block size used to read and write blocks when streaming data to the Staging Store. You can use ‑‑preferred-address to define the primary IP address that clients should use when communicating with the NetVault SmartDisk Device. You can use ‑‑credentials to enable authentication and define the authorized user and password.

Replace <port#> with the port that you want to use.

NetVault SmartDisk displays results similar to the following example:

Block Size = <blockSize>
Credentials = <Name:MaskedPassword>
Port = <NewPort#, NewPort#>

Enabling or updating authentication for WebDAV access

Previous Next


Configuring NetVault SmartDisk > Modifying the data port > Enabling or updating authentication for WebDAV access

Enabling or updating authentication for WebDAV access

If you want to enable authentication for WebDAV access of NetVault SmartDisk for the data port, complete the following steps to specify the credentials. NetVault SmartDisk uses digest-access authentication, specifically RFC 2069. You can also use this same procedure to update existing credentials.

NetVault SmartDisk displays the list of options and parameters that you can use, including the section for configuring authentication:

config --add|--update --webdav <port> [--block-size <bytes>]
[‑‑preferred-address <address>] [--credentials]

Replace <port#> with the port that you are using.

3
When the Username prompt appears, enter the user name that should be used for access, and press Enter.
4
When the Password prompt appears, enter the password associated with the specified user name, press Enter, enter the password again when the Confirm Password prompt appears, and press Enter again.

NetVault SmartDisk displays results similar to the following example:

Verifying that the client ports are open

Previous Next


Configuring NetVault SmartDisk > Modifying the data port > Verifying that the client ports are open

Verifying that the client ports are open

Quest recommends that you verify that the ports are open between the vRanger machine and the NetVault SmartDisk server.

To verify that the ports are open, you can use a web browser or another method of your choice. If the port is open, the command returns the status information for the NetVault SmartDisk server. If the port is not open, you receive a connection error from your browser.

In the following examples, replace <port#> with the applicable port number, and replace <hostName> with the IP address of the machine on which NetVault SmartDisk is installed.

To use a web browser:
http://<localhost>:<port#>/proc/dedupe/stats.stnz
http://<hostName>:<port#>/proc/dedupe/stats.stnz
Documentos relacionados

The document was helpful.

Selecione a classificação

I easily found the information I needed.

Selecione a classificação