Converse agora com nosso suporte
Chat com o suporte

Collaboration Services 3.10.1 - User Guide

Getting started with Collaboration Services Organizing objects for synchronization Resolving synchronization conflicts Managing the synchronization process Transport management Fine-tuning and maintenance Backup, restore, and troubleshooting Appendix A: Customizing the format of synchronized data Appendix B: Collaboration Services events

Using the Packet Queue as interim data storage

Collaboration Services use SMTP as a transport protocol. Though this protocol has many advantages and is a native protocol for Exchange, it introduces one problem; it does not provide guaranteed delivery. For Collaboration Services, this means that synchronization data packets do not necessarily arrive in the order in which they were sent. In fact, sometimes a packet may not arrive at its destination at all, and needs to be sent again.

To deal with this problem, Collaboration Services use a Packet Queue. This is a special location where all received data packets are kept until all the other data required to create a particular object arrive. After all data is received, the service extracts the necessary data from the queue and creates an object.

The Packet Queue is also used to store the value of linked attributes, such as the Manager attribute of a user object. The link cannot be applied until the object it points to is created, so the link is stored in the Packet Queue until then.

In addition to Active Directory data, the Packet Queue stores an object’s free/busy information until the object is created and the free/busy information can be applied.

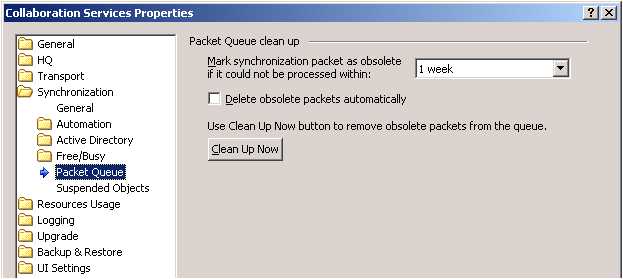
Packet Queue processes are fully automated and do not have to be managed. However, it is possible to fine-tune the packet queue behavior using the Packet Queue page.

On the Packet Queue page, select the time interval for the Mark synchronization packet as obsolete if it could not be processed within: setting. The default is one week and the setting has a range from one hour to one year.

Suspended object storage

Objects excluded from synchronization due to various problems are placed into the Suspended Object Storage. If you notice that some objects are missing from the synchronization, you should first examine the log for errors and fix the problems that led to the objects being excluded from processing.

Once the problems have been fixed, open the Suspended Objects page in the Collaboration Services properties and click the Purge button to empty the Suspended Object Storage. This will add the excluded objects back into the synchronization queue to be processed again.

Re-examine the log for any errors, fix the problems and repeat the purge until the objects have been processed correctly.

Figure 10: Suspended object options

Manual operations

Manual synchronization is recommended when your collaboration partners must get the modifications made to objects in your forest before automatic synchronization is due.

Usually, Collaboration Services automatically synchronizes and updates collection data according to the time intervals specified on the Synchronization page and all sub-pages of the Collaboration Services properties. When you perform manual synchronization, all timeouts are minimized for a short period of time on both the publishing and subscribing forests, so all changes in published objects are synchronized much faster. This mode affects all available collections.

1
Select the Publications node in the management tree.
2
Go to the Action menu and select All Tasks | Synchronize Now.

Re-publication is sending the entire data publication (all of the published objects data) again from the publisher. Re-publication performs exactly the same function as initial synchronization.

For example, you might need to re-publish data when Collaboration Services detects that an unrecoverable failure occurred. In this case, you will be prompted that re-publication is needed. You should not re-publish until you have fixed the cause of the error.

Re-publication should be limited in its use as an initial synchronization is performed. If numerous re-publications are performed, considerable time will pass until the publications are updated and synchronization is complete.

2
Open the Action menu, point to All Tasks.
3
Point to Re-publish, and choose what data you want to republish:
1
Select the Publication node in the management tree.
2
Open the Action menu, point to All Tasks.
3
Point to Re-publish, and choose what data you want to republish:

Synchronization

Manual synchronization is recommended when your collaboration partners must get the modifications made to objects in your forest before automatic synchronization is due.

Usually, Collaboration Services automatically synchronizes and updates collection data according to the time intervals specified on the Synchronization page and all sub-pages of the Collaboration Services properties. When you perform manual synchronization, all timeouts are minimized for a short period of time on both the publishing and subscribing forests, so all changes in published objects are synchronized much faster. This mode affects all available collections.

1
Select the Publications node in the management tree.
2
Go to the Action menu and select All Tasks | Synchronize Now.

Re-publication is sending the entire data publication (all of the published objects data) again from the publisher. Re-publication performs exactly the same function as initial synchronization.

For example, you might need to re-publish data when Collaboration Services detects that an unrecoverable failure occurred. In this case, you will be prompted that re-publication is needed. You should not re-publish until you have fixed the cause of the error.

Re-publication should be limited in its use as an initial synchronization is performed. If numerous re-publications are performed, considerable time will pass until the publications are updated and synchronization is complete.

2
Open the Action menu, point to All Tasks.
3
Point to Re-publish, and choose what data you want to republish:
1
Select the Publication node in the management tree.
2
Open the Action menu, point to All Tasks.
3
Point to Re-publish, and choose what data you want to republish:
Documentos relacionados

The document was helpful.

Selecione a classificação

I easily found the information I needed.

Selecione a classificação