|
1 |
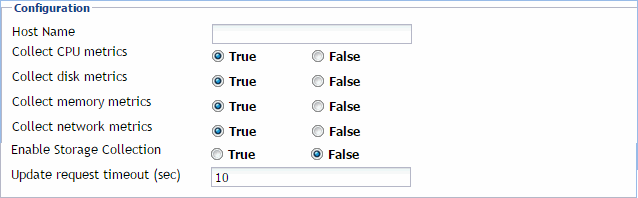
Locate the Hyper-V Agent’s Configuration properties. |
|
2 |
Set the Configuration properties as follows: |
|
• |
Host Name: Type the fully qualified host name of the machine on which the monitored Hyper-V Server is running. |
|
• |
Collect CPU metrics: Select this option if you want to collect CPU metrics from the monitored Hyper-V environment. |
|
• |
Collect disk metrics: Select this option if you want to collect disk metrics from the monitored Hyper-V environment. |
|
• |
Collect memory metrics: Select this option if you want to collect memory metrics from the monitored Hyper-V environment. |
|
• |
Collect network metrics: Select this option if you want to collect network metrics from the monitored Hyper-V environment. |
|
• |
Enable Storage Collection: Select this option if you want to collect virtual disk metrics from the monitored Hyper-V environment. |
|
• |
Update request timeout (sec): Type the number of seconds after a collection times out. |
|
1 |
Locate the SCVMM Agent’s Configuration properties. |
|
2 |
In the Configuration area, in the SCVMM Host Name box, type the name of the machine on which the Virtual Machine Manager is running. |
|
1 |
Locate the Hyper-V or SCVMM Agent Data Collection Scheduler properties. |
|
If you want to clone a list and associate it with the agent instance whose properties you are editing, select it and click Clone. When prompted, enter a name for the cloned list. For more information on cloning, see the Administration and Configuration Help. |
|
a |
|
• |
Collector Name: Contains the name of the default collector, Data Collection. |
|
• |
Default Collection Interval: Contains the length of the default collection interval. |
|
• |
Time Unit: Contains the time unit for measuring the default collection interval: milliseconds, seconds, minutes, hours, or days. |
|
• |
Fast-Mode Collection Interval: Contains the length of the collection interval when the agent is running in fast mode. |
|
• |
Fast-Mode Time Unit: Contains the length of the collection interval when the agent is running in fast mode. |
|
• |
Fast-Mode Max Count: Contains the maximum count of entries when the agent is running in fast mode. |
|
d |
Save your changes to the list by clicking Save Changes in the dialog box. |
|
4 |
|
1 |
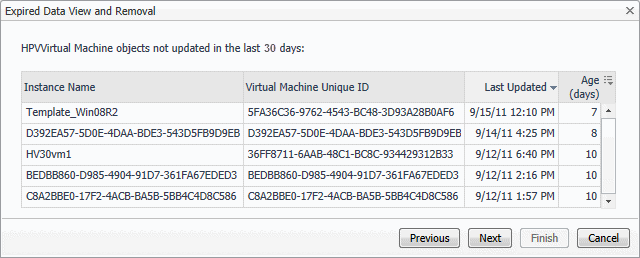
On the Hyper-V Environment dashboard, open the Administration tab. |
|
2 |

|
3 |
In the Expired Data View and Removal dialog box, select a category of object type that you want to review, and type the number of days during which the object instances were not updated. |
|
4 |
Click Next. |
|
• |
If you want to modify your search, click Previous, make your changes, and observe your results again. For example, to show fewer instances, click Previous, and increase the time period. When satisfied, click Next. |
|
7 |
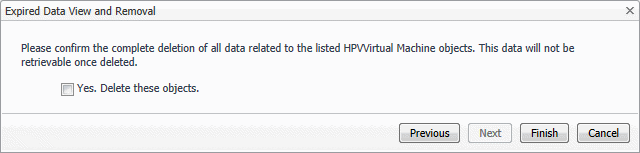
Click Finish. |
