A migration project contains the full set of migration features and provides a summary of all the migration activities in the project dashboard. You can work with a single migration project for small migrations or you can set up multiple migration projects to split larger migration plans into manageable projects.
In this topic:
Creating a new migration project
- Sign in to Quest On Demand.
- From the navigation pane, click Migrate > Projects to open the Migration projects view.
- To use the new project management user interface, turn on the Try the new project wizard toggle.
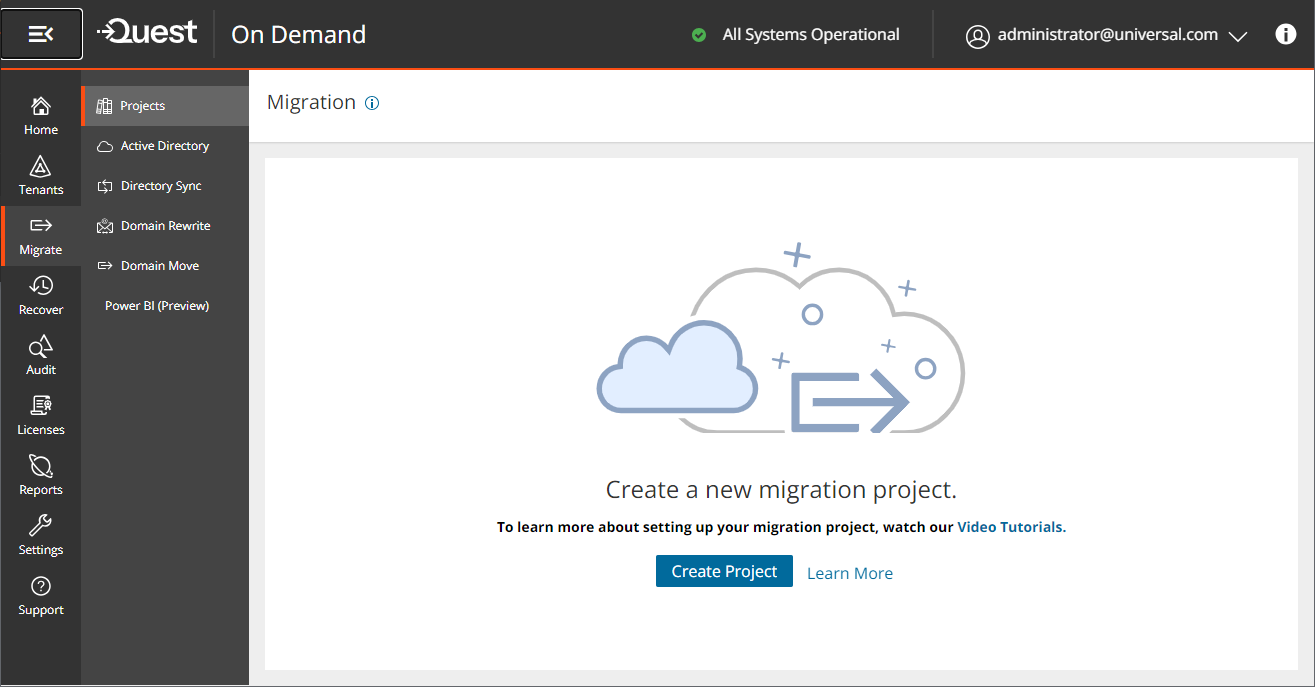
- Click Create Project.
-or-
If you have already created one or more projects, click Create Project as shown below.
- The New Project wizard starts. Each step is described below:
- Project Detail
Enter the information in the fields as described below:
- Title - Specify a meaningful name for the project. Maximum number of characters is 128.
- Description - Enter a description about the project. Maximum number of characters is 200.
- Source Tenant - Select a source tenant from the dropdown list.
- Target Tenant - Select a target tenant from the dropdown list.
- Click Save and Continue.

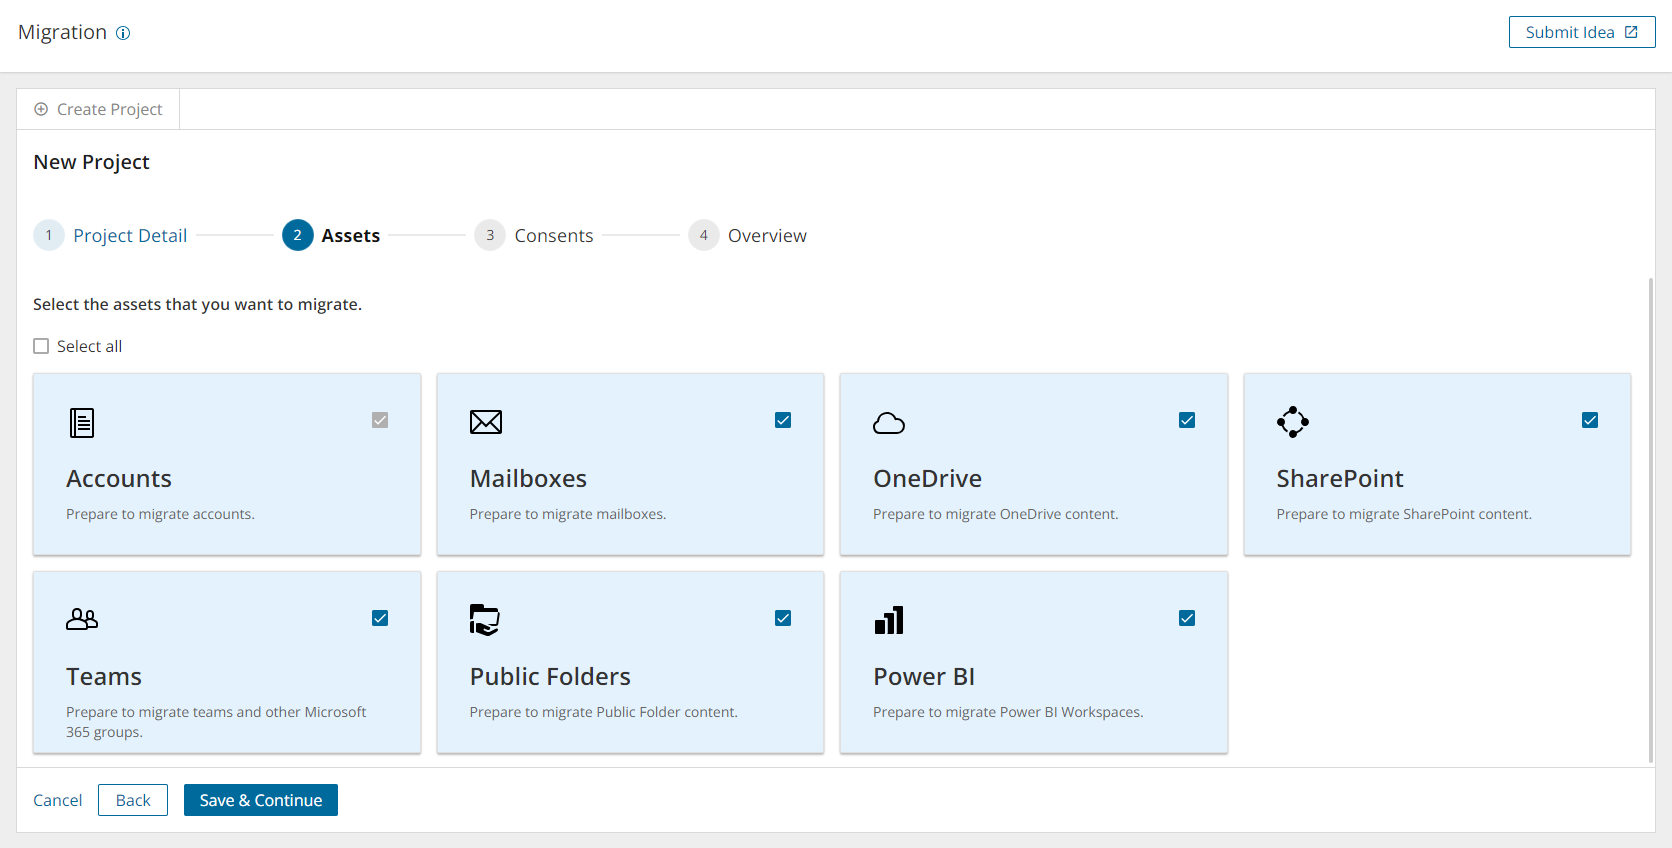
- Assets
Select one or more assets from the set of information assets that you want to migrate. The Account asset is mandatory because all other assets are directly or indirectly linked to active directory accounts in your source and target tenants.
Each asset is treated as an application for migration purposes and automatically assigned a service principal.
- Consents
Most Microsoft 365 objects can be migrated when the service principals for each asset have been granted the consent. See Consents and permissions for more information.
To grant consent the service principals:
- Click Grant Consent to grant the consents to the service principal if the tenant consents were not granted when you added the tenants.
-or-
Click Regrant Consent to refresh the consents granted to the service principals. It is recommended that you regrant consent to ensure that the consent to the service principals are refreshed.
- Migration of some Microsoft 365 objects require a user principal with the Global Administrator or other specific roles and you must provide additional authorization. Typically, the tenant administrator credentials are provided. You can provide the credentials for authorization in the Features step.
Select Yes. Proceed to activate the Features step. Select No. Skip to ignore the Features step.
- Click Save and Continue.

- Features
|

|
NOTE: This step is available if you select Yes. Proceed in the previous step. |
To grant additional authorization with a source and target user principal:
- Enter the email address of the target user accounts.
- Enter the password of the target user accounts.
- Click Save Credentials. The verification must succeed to proceed.
- Click Save and Continue, or click Skip this page to avoid entering and verifying user principal accounts.

- Overview
- Verify the information you have provided for each step. Click Edit to return to the step and revise the information as needed.
- Select Open Project to open the project dashboard.
- Click Finish to activate the project.
- Click Open Project to open the project workspace.
Viewing migration projects
- Sign in to Quest On Demand.
- From the navigation pane, click Migrate > Projects to open the Migration projects view.
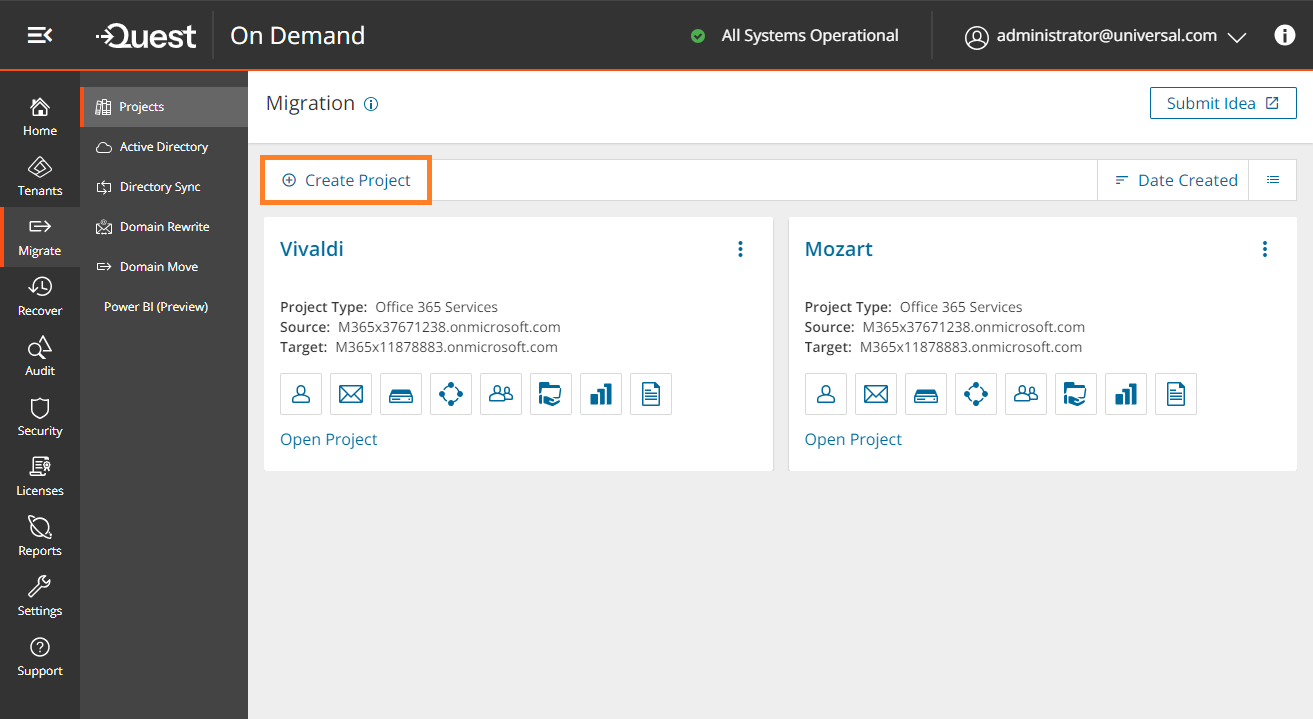
- You can view the projects in two formats:
- Tile view
- This view presents each project as a tile. Click
 from the view selector in the actions menu to select this view.
- It is the default view and contains links to the migration workspaces from the set of icons in the tile.
- You can sort the tiles by Date Created or Alphabetical from the sort criteria dropdown in the actions menu.
- List View
- This view displays the projects as a list. Click
 from the view selector in the actions menu to select this view.
- This view is useful when you have a large number of projects. Click on a column header to sort the list by its column values.
Renaming a migration project
- Sign in to Quest On Demand.
- From the navigation pane, click Migrate > Projects to open the Migration projects view.
- From the top right-hand corner of the project panel, click the More icon (3 dots). Then click Edit.
- Revise the project name or description as needed.
- Click Save to save the changes and close the dialog.
Deleting a migration project
- Sign in to Quest On Demand.
- From the navigation pane, click Migrate > Projects to open the Migration projects view.
- From the top right-hand corner of the project panel, click the More icon (3 dots). Then click Delete.
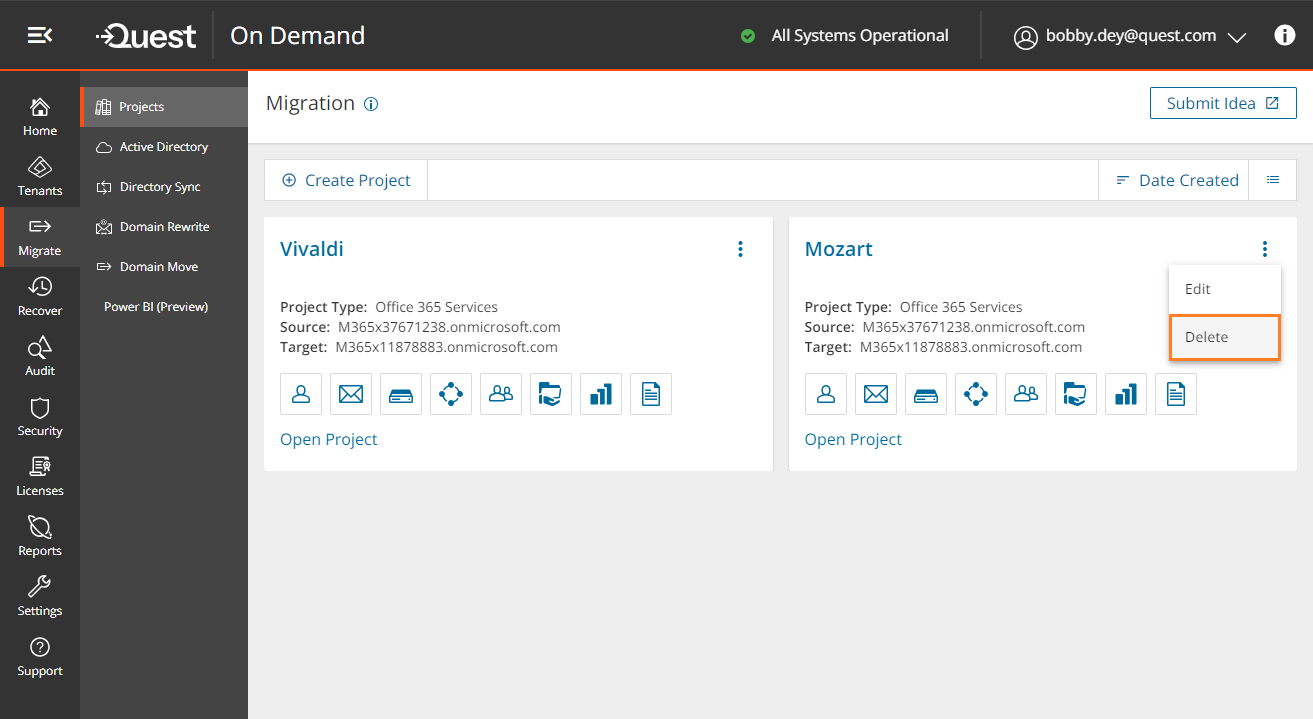
- You can also delete projects from the list view when you select one or more projects and click Delete.
- In the confirmation dialog that opens, click OK to confirm the deletion.
On Demand Migration Workspaces
Click Open Project in the tile view or click a project name in the list view, to open its project workspace. The project workspace displays important information about your project and associated reports. The project workspace contains the following tabs:
In each project, On Demand Migration also creates migration workspaces for each asset class selected for migration. These migration workspaces are logical collections of migration tools for the Office 365 assets and information about the assets in the source and target tenants.
You can go directly to the migration workspace of any asset by clicking the asset icon in the project tile. The icons you see will depend on your role, licenses and the assets selected when the project was created. You can hover over an icon to see the name of the asset type.

Information about the migration project is summarized on the project dashboard. The tiles that you can see and the features that you can access through the project dashboard depend on your subscription. For information about subscriptions, see On Demand Global Settings Current User Guide.
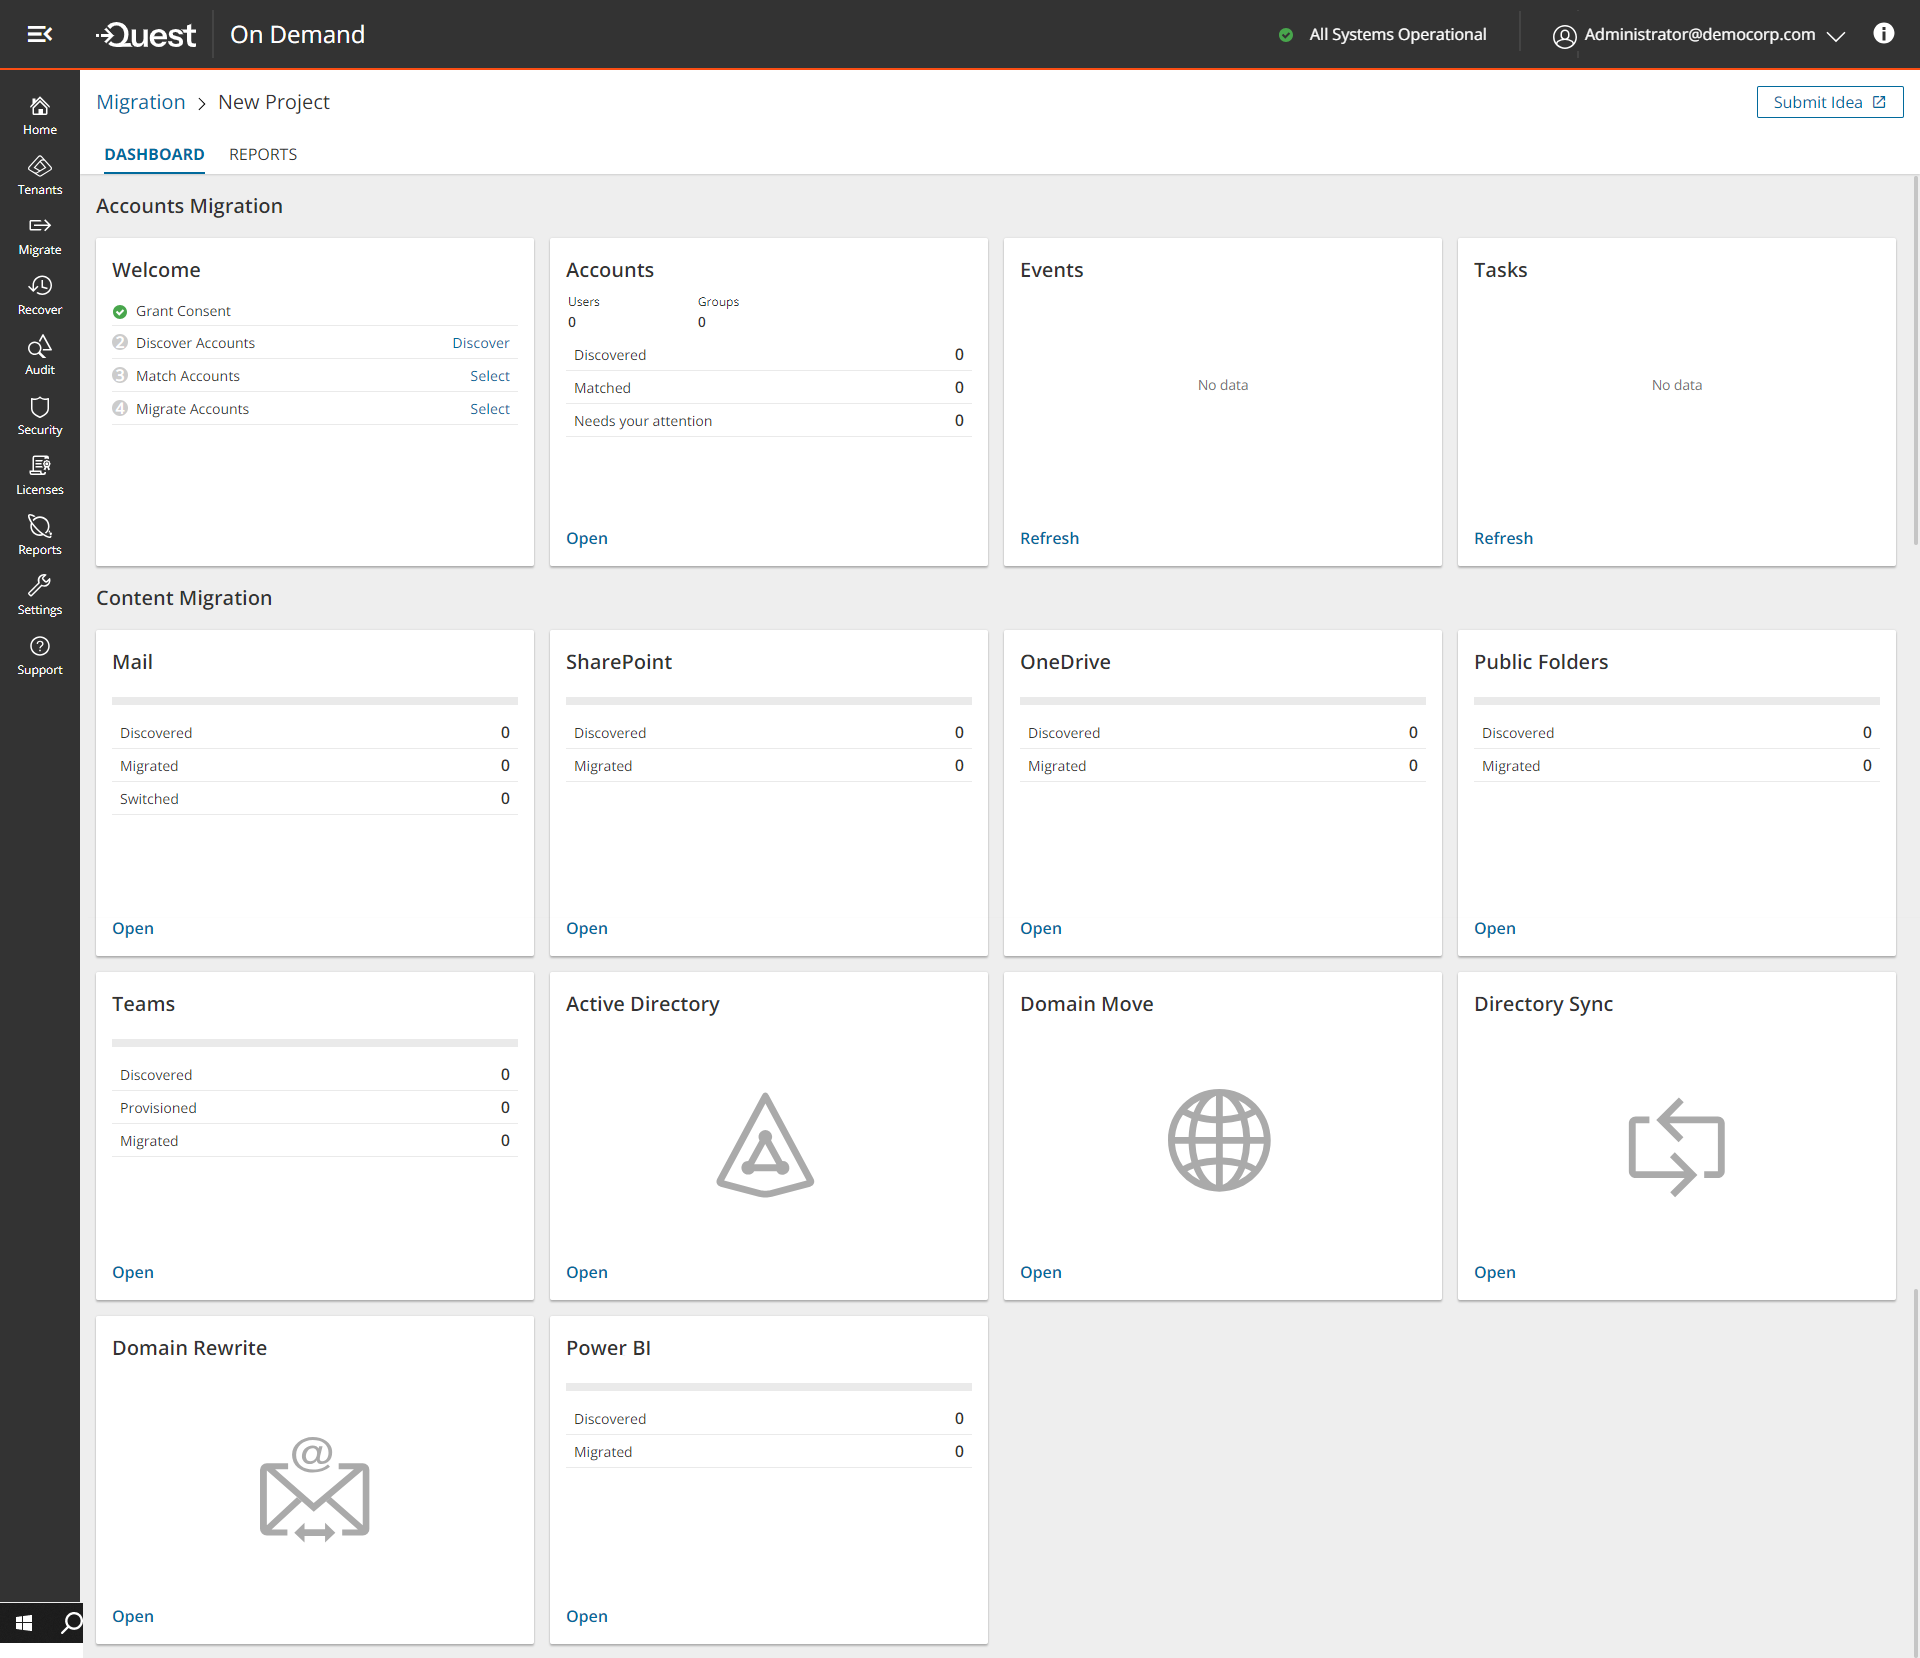
Each tile on this dashboard presents a summary of the migration activities and lets you navigate to the respective migration service dashboards or list views as described below:
Welcome
Quick start your migration activities from this tile. The following activities can be performed here:
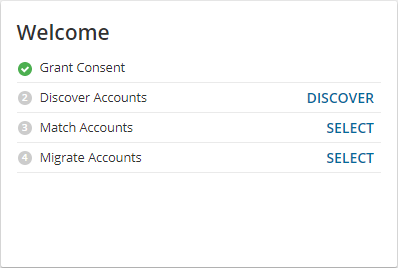
Grant Consent - If you see a green icon, you have granted the necessary consents to the source and target tenants associated with this project. Otherwise the Grant link is displayed and you can click the link to complete the authorization process for the source or target tenants.
Discover Accounts - If you see a green icon, you have already discovered one or more accounts in the source tenant. Otherwise, click Discover to open the Accounts List view and start a discovery process.
Match Accounts - If you see a green icon, you have matched one or more accounts between the source and target tenants. Otherwise, click Select to open the Accounts List view and start a matching process. You must discover one or more accounts before you can start the matching process.
Migrate Accounts - If you see a green icon, you have migrated one or more accounts from the source to the target tenant. Otherwise, click Select to open the Accounts List view and start a migration process. You must match one or more accounts before you can start the migration process.
Accounts, Mail, OneDrive and Teams
These tiles present information about the objects that were discovered or migrated in addition to other pertinent information. These objects are managed through the Account and User Data migration workspace and share a common dashboard. Click Open from the Accounts, Mail, OneDrive, and Teams tiles to access the common dashboard.
Public Folders
Displays information about the discovered and migrated public folders. Click Open to access the dashboard in the Public folder migration workspace.
SharePoint
This tile presents information about the discovered and migrated SharePoint objects. Click Open to access the dashboard in the SharePoint migration workspace.
Active Directory, Domain Move, Domain Rewrite and Directory Sync
Click Open from the respective tiles to access the Active Directory migration workspace, Microsoft 365 domain move and rewrite services, or directory synchronization services for Microsoft Active Directory and Microsoft Entra ID. For more information see the Active Directory User Guide.
Power BI
This tile presents information about discovered and migrated Power BI objects. Click Open to access the dashboard in the Power BI migration workspace.
Tasks
Displays the five most recent tasks that were completed in the Accounts and User Data migration workspace. Click Show All to open the Tasks List view in the Accounts and User Data migration workspace.
Events
Displays the five most recent events that were completed in the Accounts and User Data migration workspace. Click Show All to open the Events List view in the Accounts and User Data migration workspace.
On Demand Migration offers two types of reports:
Activating Premigration and Comparison reports
Premigration reports are protected by Role-based Access Control (RBAC). To activate the premigration reports dashboard, follow the steps below:
- From the On Demand navigation pane, go to Settings > Access Control > Roles.
- Edit a custom role or create a new role. You cannot edit a predefined On Demand role.
- Scroll down to the Migration section and select the View reporting dashboard check box. Granting this permission exposes a Reports tab in the project workspace
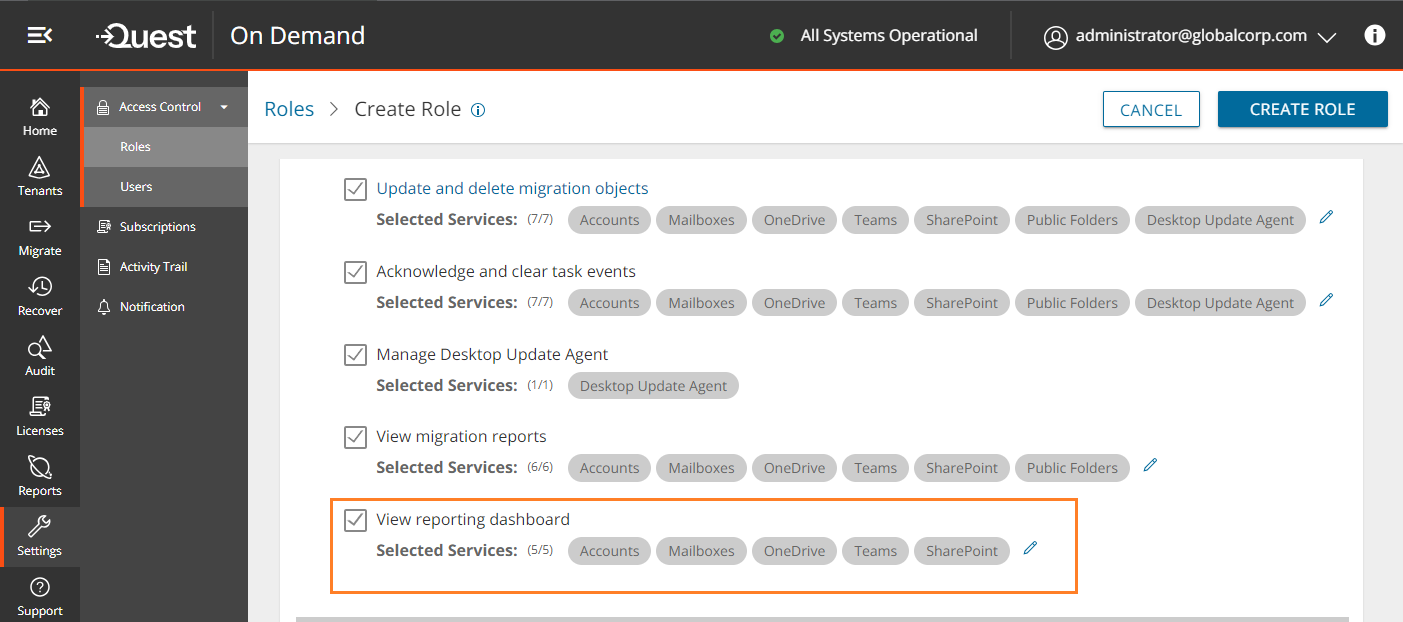
- By default, all asset types are included with the permission. You can remove one or more asset types to restrict access those reports.
- Click Create Role to save the settings for a new role or click Save to save the settings for an existing role. Users who are assigned this role can see the Reports tab in the project workspace and access the reports for the permitted asset types.
Premigration Reports
Premigration reports provide detailed information about discovery tasks which get information about the various assets in the source tenant which you plan to migrate to the target tenant. These reports can be downloaded as Microsoft Excel files for offline inspection and migration planning.
Premigration reports are generated every time you run a discovery task for an Office 365 asset. The following is a list of discovery task commands that support report generation:
|
Accounts
Mailbox
OneDrive
SharePoint
|
Teams
M365 Groups
|
These reports are accessible from two places:
- Task detail pane

To download a premigration report from the task detail pane:
- Select any discovery task that is completed.
- From the task detail pane, click Download premigration report.
- Reports tab in the project workspace
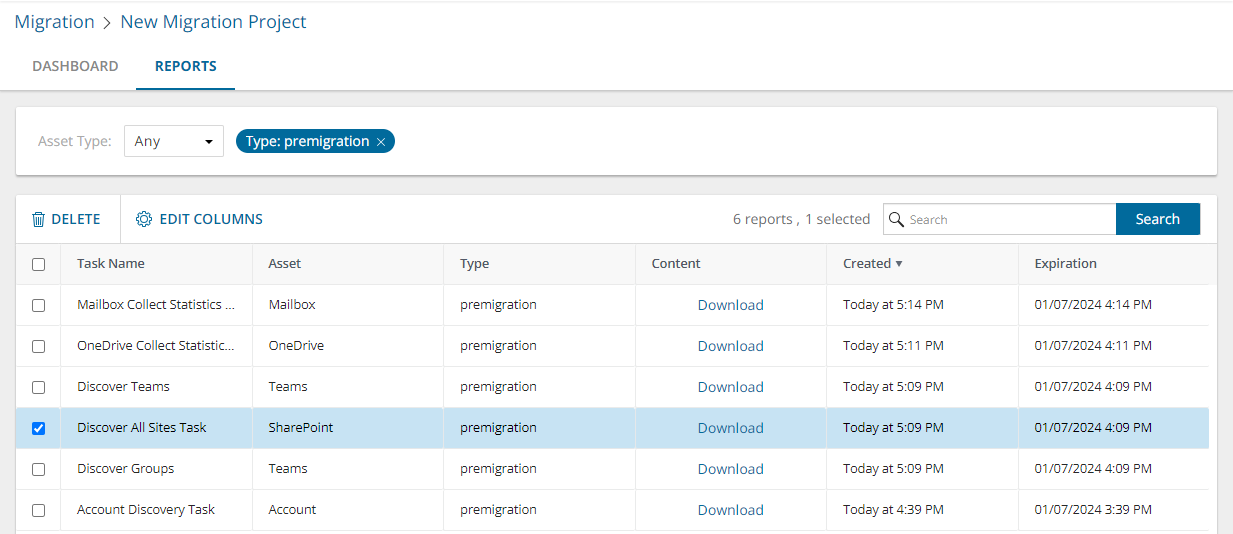
The Reports list view has the following columns:
- Task Name - name of the discovery task. The names indicated here are default names and may be different from task names that you have specified.
- Asset - name of the Microsoft 365 asset that is discovered in the source tenant.
- Type - type of report. This value should be premigration.
- Content - link to the Microsoft Excel file that will be downloaded when you click the link.
- Created - date and time when the report is created.
- Expiration - date and time when the report will expire and the download link will be deactivated. Reports are retained for 90 days.
To download a premigration report from the project workspace:
- Filter the list using the predefined filters: Asset Type and Report Type.
- Set Report Type = premigration
- Set Asset Type = Asset you want to get the report, or select 'Any'. The Asset Type filter dropdown also indicates the number of reports in the list for each asset type.
- From the Content column click Download.
Analyzing premigration reports
Reports are downloaded as a compressed ZIP file. You must extract the Microsoft Excel report.
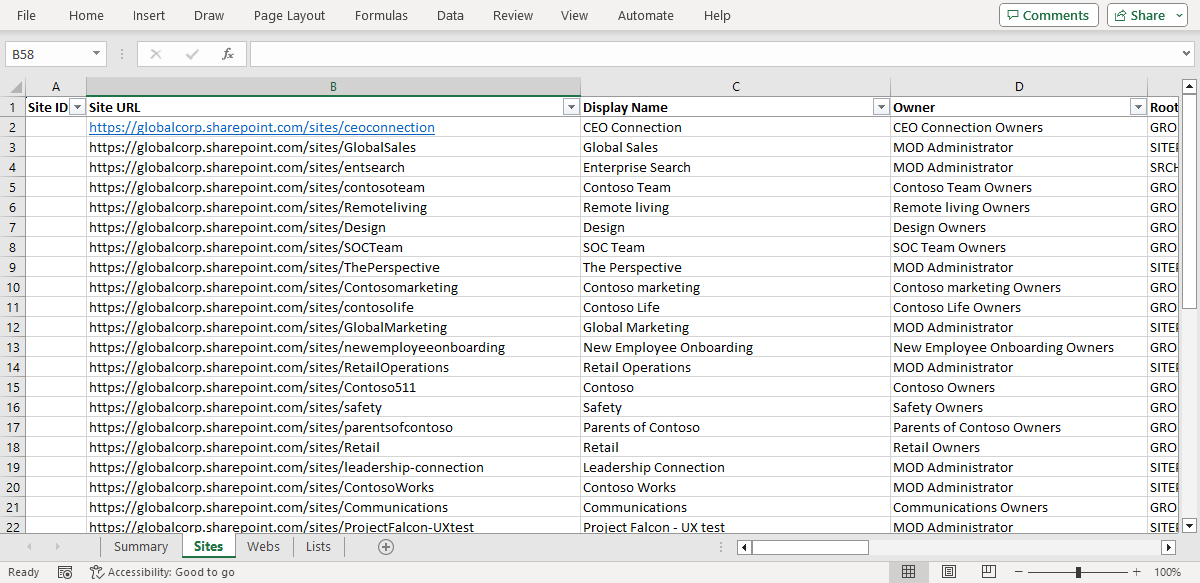
Each report has a Summary worksheet. Helpful information about the objects discovered by the discovery task are presented in this worksheet.
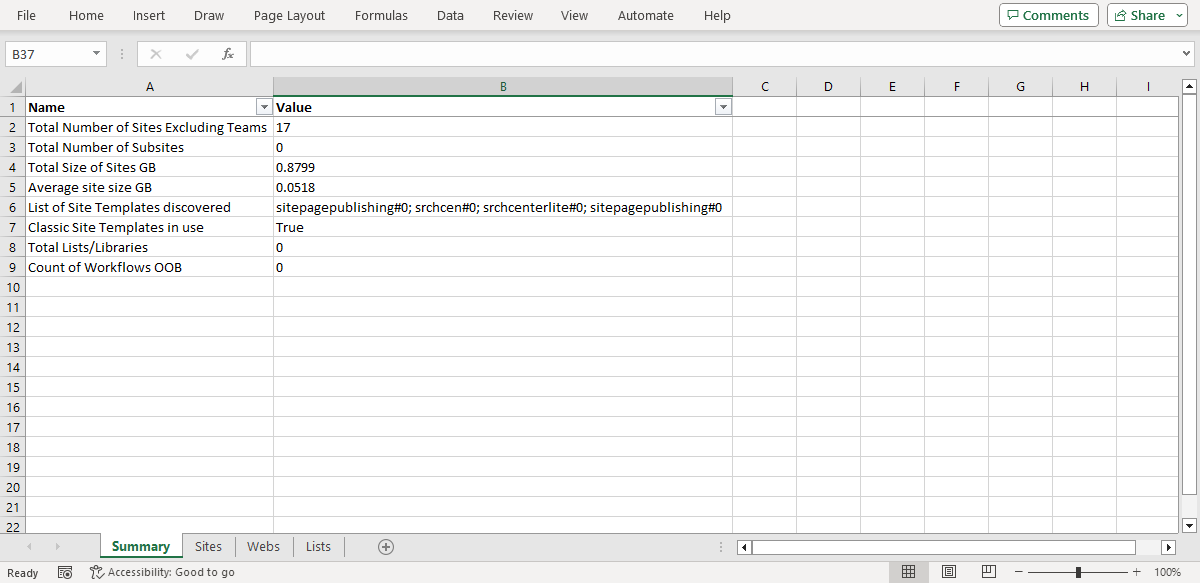
If the asset type has related objects associated with each item, then more worksheets are added. For example, a SharePoint site discovery report will have additional worksheets like Webs and Lists. You may have to run additional discovery tasks to access information about related objects.
Comparison Reports
Comparison reports provide detailed information about various assets in the source and target tenants. These reports can be downloaded as Microsoft Excel files for offline inspection, migration planning and verification.
Comparison reports are generated every time you run a Collect Statistics task on a target tenant for an Office 365 asset. The following is a list of task commands that support comparison report generation. Generating comparison reports requires the selection of a specific option in the task wizard. See the topic about the collect statistics task wizard from the links provided in the list below.
|
Accounts
Mailbox
OneDrive
|
SharePoint
Teams
M365 Groups
|
These reports are accessible from two places:
- Task Details pane
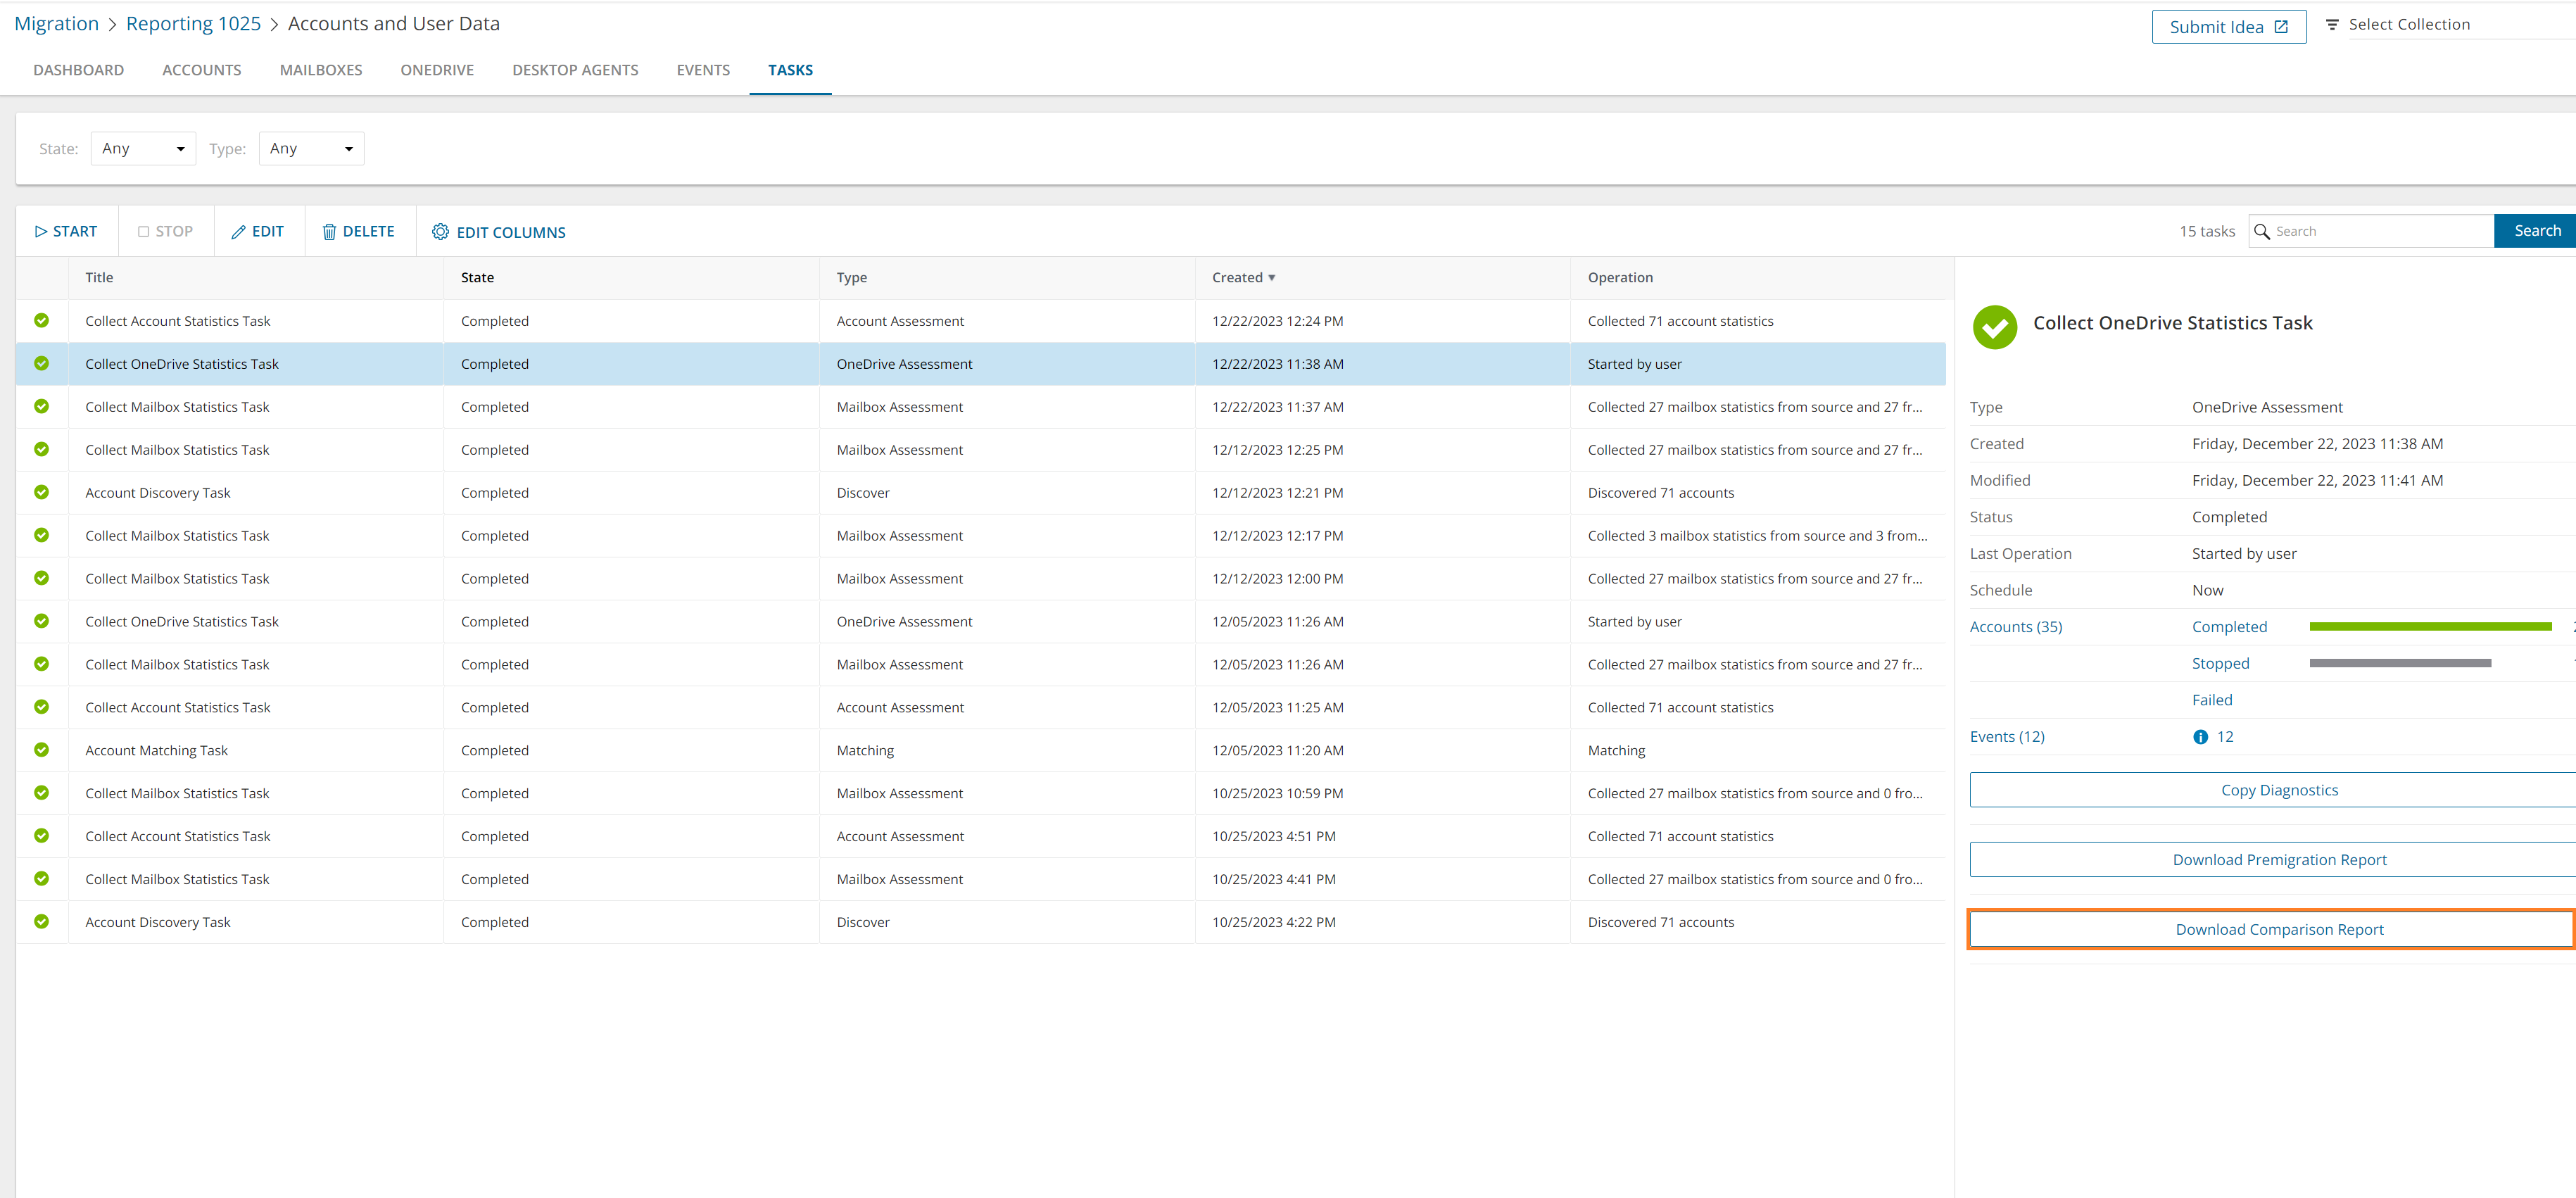
To download a comparison report from the task detail pane:
- Select any discovery task that is completed.
- From the task detail pane, click Download comparison report.
- Reports tab in the project workspace
The Reports list view has the following columns:
- Task Name - name of the discovery task. The names indicated here are default names and may be different from task names that you have specified.
- Asset - name of the Microsoft 365 asset that is discovered in the source tenant.
- Type - type of report. Valid value are comparison and premigration. Select comparison in the filter for premigration reports.
- Content - link to the Microsoft Excel file that will be downloaded when you click the link.
- Created - date and time when the report is created.
- Expiration - date and time when the report will expire and the download link will be deactivated. Reports are retained for 90 days.
To download a comparison report from the project workspace:
- Filter the list using the predefined filters: Asset Type and Report Type.
- Set Report Type = comparison.
- Set Asset Type = Asset for which you want to get the report, or select 'Any'. The Asset Type filter dropdown also indicates the number of reports in the list for each asset type.
- From the Content column click Download.
Analyzing comparison reports
Reports are downloaded as a compressed ZIP file. You must extract the Microsoft Excel report. If the asset type has related objects associated with each item, then more worksheets are added. For example, a SharePoint site discovery report will have additional worksheets like Webs and Lists.
Notice that there are column pairs: one for the source and another for the target tenant. Discrepancies in the statistics between source and target are highlighted in red.

Migration Reports
Migration Reports display error reports about migration tasks. Additionally, each migration workspace has its own Reports tab.

About Migration Reports
- The error report for a migration job is a CSV file with one or more rows. The maximum number of rows in the CSV file is 50K. You can download a report by clicking the Download link in the Error Log column. If there are no migration errors, a download link is not available.
- Error reports are retained for 30 days. You cannot modify this global setting. After 30 days the download link is replaced with the label Expired and you can no longer download the report.
- You can select one or more reports and delete them with the Delete action. If the reports are active when they are deleted, the row in the table will be removed and the report will be automatically purged after 30 days.
- Access to reports are secured with Role Based Access Control (RBAC). For example, if you have access to only Mail migration, the OneDrive reports are not visible.
- If a migration project is deleted, all associated data will be deleted, and any active reports will be purged after 30 days.
The columns in the reports list are as described bellow:
- Start Time - the date and time the migration task was started.
- Completed Time - the date and time the migration task completed.
- Source Name - name of the source tenant.
- Target Name - name of the target tenant.
- Object Type - name of the asset that is migrated.
- Object State - the state of the migration. Values are: Migrated, Partially Migrated, Migrated with Issues, Migration Failed and Migration Stopped.
- Processed Items - the number of asset items from the source tenant that were included in the migrattion.
- Failed Items - the number of asset items that could not be migrated successfully.
- Error Log - link to the report if available. If there are no migration errors, a download link is not available. After 30 days the download link is replaced with the label Expired.
- Expiry Date - date and time when the report will expire.
Exporting Reports
- You can download a single report by clicking the Download link in the Error Log column. If there are no migration errors, a download link is not available.
- You can select multiple rows and download the reports as a ZIP file when you click Error Log Export.
- You can select multiple rows and download the reports list when you click Export. Only rows are exported but not the report CSVs.
Filtering the Reports List
You can use the following predefined filters to retrieve a subset of the reports:
- Object Type - name of the asset that is migrated.
- Object State - the state of the migration. Values are: Any, Migrated, Partially Migrated, Migrated with Issues, Migration Failed and Migration Stopped.
- Has Failed Items: whether or not the migration has any failed items. Values are Yes or No. If there are one or more items that match a Yes or No value, the number of items are indicated as well.
Details of assets discovered, their migration states and other pertinent details are displayed in lists.
Each list has multiple columns that display properties of the list items. The first column in the list is the list selector. All lists have this column and cannot be hidden.
The list header contains the list selector and column headers.
To select the columns to display
- Click Edit Columns.
- From the drop-down, select the columns you want to display, or clear the check boxes of columns you want to hide. The list will be automatically updated to reflect your choices.
To configure the number of list items displayed on a page
Large lists can be better managed with paging. A long list is divided into smaller subsets called pages. Each page contains a fixed number of items or records. Only one page of data is displayed at a time, with navigation controls allowing users to move between pages.

At the bottom of lists, the count of items displayed in a page is indicated on the left-hand side, and page controls are available on the right-hand side.
- Click the Show dropdown. Then select the predefined number of items (25, 50 or 100) to display one page.
- Use the navigation controls to move between pages. The current page number is displayed as you scroll through the pages.
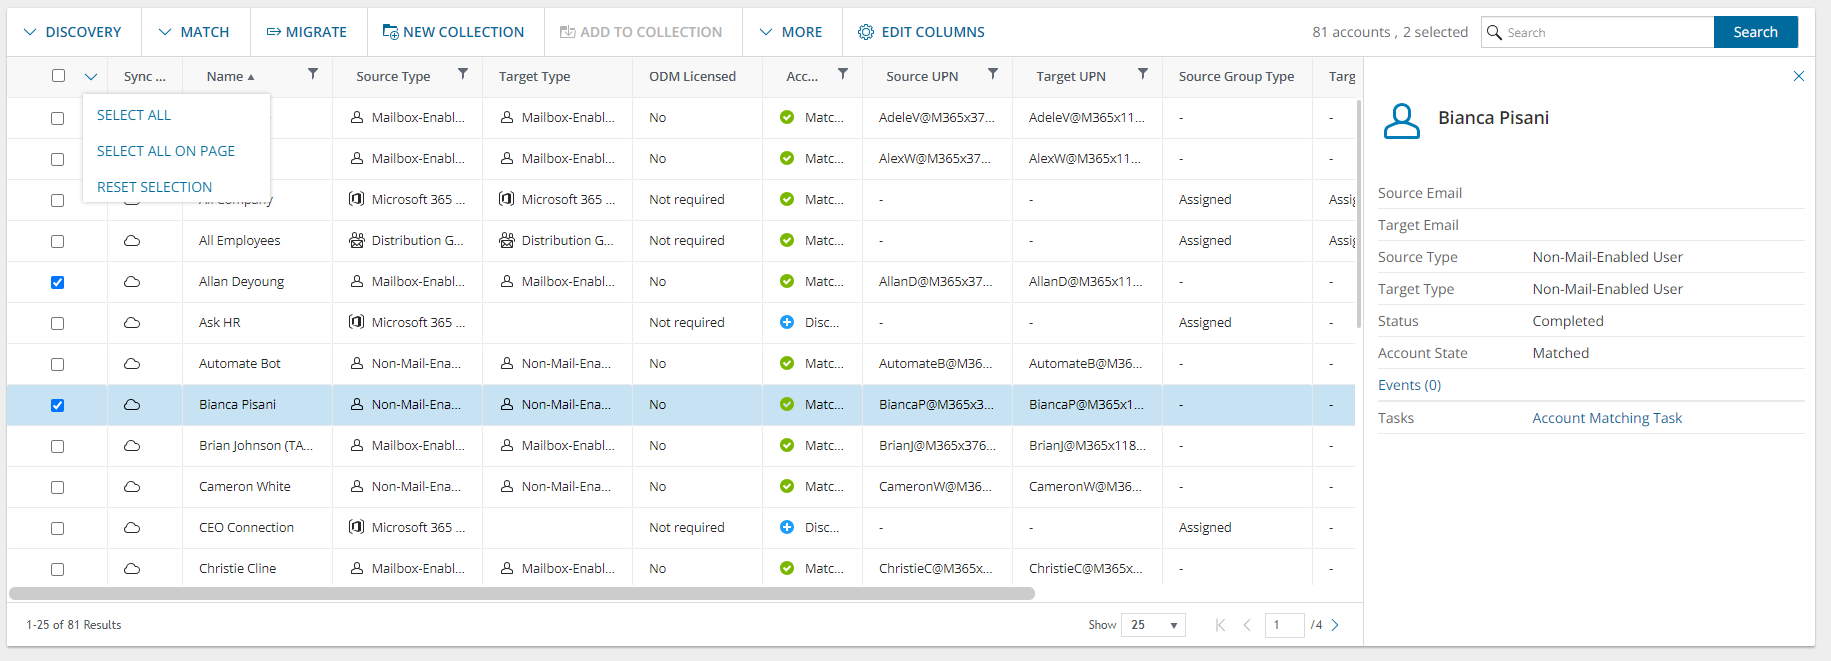
To select or deselect specific list items
When you want to perform an action on one or more list items, you must select the items.
- Select the corresponding check box in the list selector column of each list item that you want to select, or clear the check box to deselect the list item. Details of the most recently selected list item is displayed in the detail pane that opens.
- Click anywhere in a specific list item to view the details of the item. Although you can view the list item details, the item is not considered as selected unless you select the check box in the corresponding list selector column.
To select or deselect multiple list items automatically
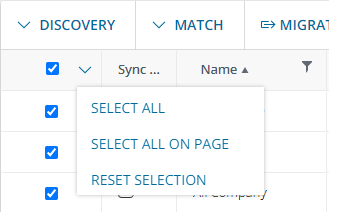
- Select the check box in the list selector column header. All list items across all pages are selected. Alternatively, click the drop down icon in the list selector column header, and then click Select All.
- Click the drop down icon in the list selector column header. Then click Select All on Page to select all list items on the current page.
- Click Reset Selection to clear all previously selected list items across all pages.
