|

|
NOTE: The Power BI migration workspace is a On Demand Migration project workspace, and should not be confused with Power BI Workspaces that are objects of the Power BI asset type. |
In this topic:
Dashboard

The dashboard in the Power BI migration workspace presents a summary of the Power BI migration activities and links to important actions. The components of the dashboard are as described below:
Notification panel - presents relevant information and shortcuts to migration activities. Appears when a notification is available.
Dashboard menu - contains the following links to common activities in the migration process.
- Connect to Power BI - starts the New Test Power BI Connection Task wizard that verifies the security requirements to connect to the Power BI application in the source and target tenants. See Connecting to Power BI for more information.
- Configure Project - starts the Edit Project wizard for configuring migration defaults like the administrator for Power BI objects migrated to the target tenant, Security Group names and settings for collision handling. For more information see Configuring the Project.
- Discover All Contents - Starts the New Discover All Contents Task wizard to discover all Workspaces, Gateways and Connections in the source tenant. For more information see Discovering Content.
- Collect Statistics - Starts the New Collect Statistics Task wizard to collect information needed for detailed premigration report which includes Power BI Reports, Users and Object Roles in addition to Power BI content. For more information, see Collecting Statistics.
Dashboard Tiles
- Getting Started - displays quick start links and instructions about various actions for preparing and migrating Power BI Connections and Workspaces.
- Workspaces with Status - displays a summary of the Power BI Workspaces in various migration states. The title displays the total number of workspaces with status. Click Show All to open the Workspaces List view to inspect the Workspaces.
- Gateways - displays a summary of the Power BI Gateways in various migration states. The title displays the total number of Gateways. Click Show All to open the Gateways List view to inspect the Gateways.
- Connections - displays a summary of the Power BI Connections with pre-migration connection profiles: Assigned or Unassigned. A connection profile is a named set of credentials that is assigned to discovered Connections before they can be migrated. The title displays the total number of connections. Click Show All to open the Connections List view to inspect the Connections.
- Connections with Status - displays a summary of the Power BI Connections in various migration states. The title displays the total number of connection. Click Show All to open the Connections List view to inspect the Connections.
- Tasks - displays the five most recent tasks that were completed in the Power BI migration workspace. The title displays the total number of tasks. Click Show All to open the Tasks List view.
- Events - Displays the five most recent events that were completed in the Power BI migration workspace. The title displays the total number of error events. Click Show All to open the Events List view.
Workspaces List View
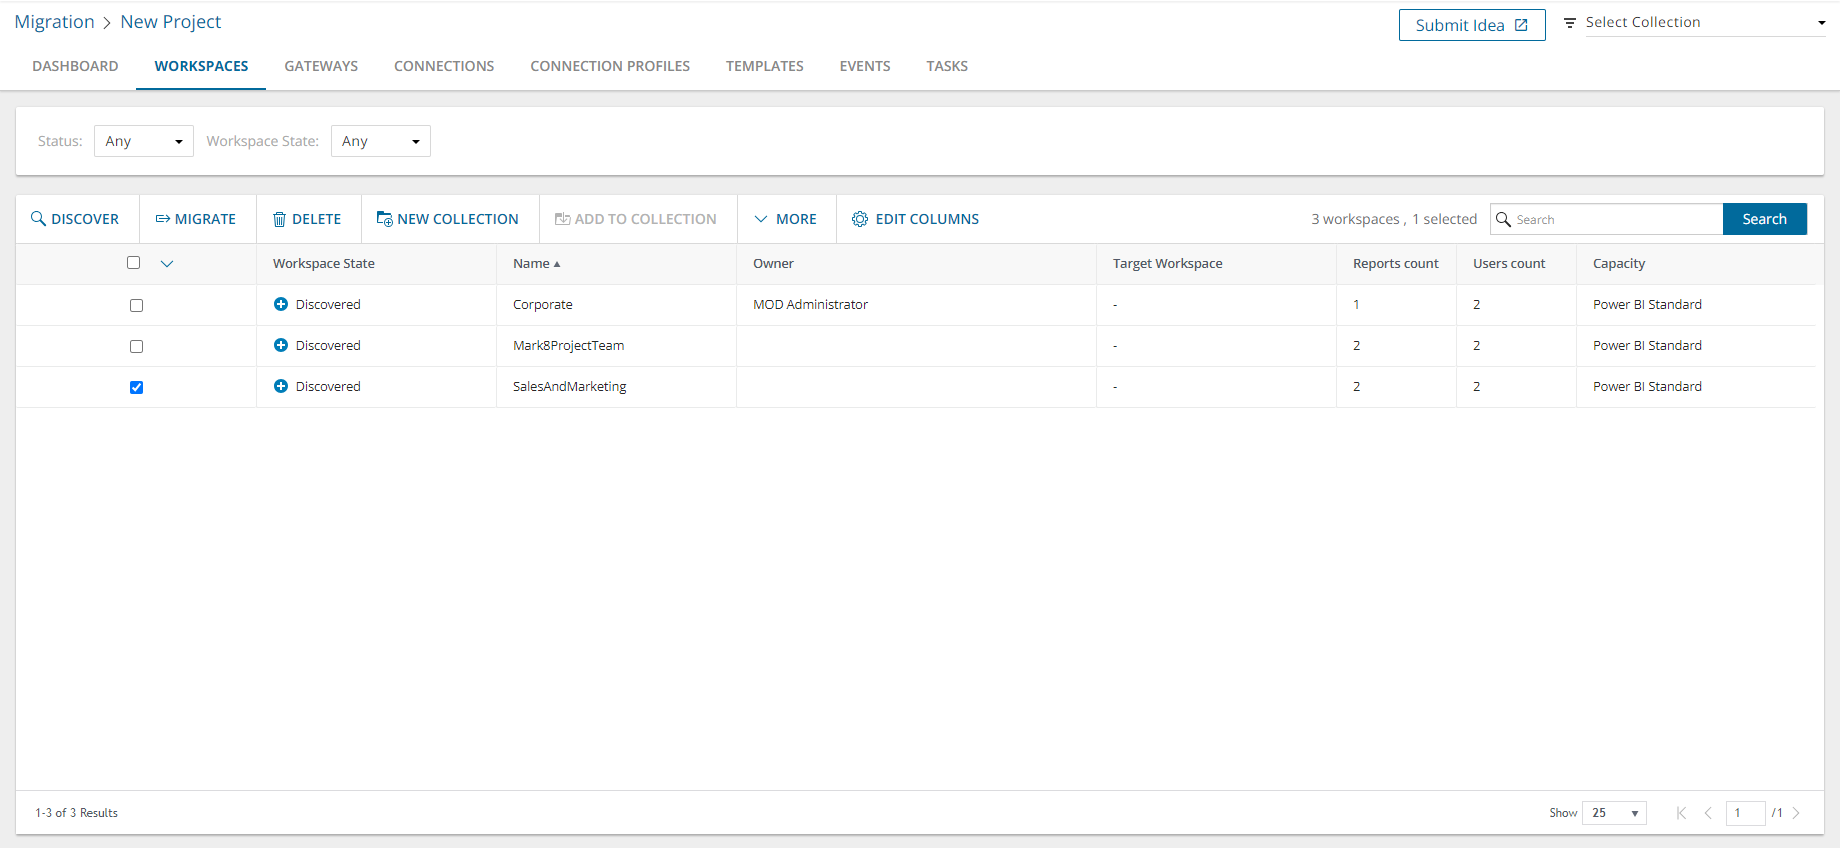
The Workspaces List View is comprised of the following components:
Notification panel - presents relevant information and shortcuts to migration activities.
Filter panel - consists of predefined filters for the Workspaces List view. See Filtering for more information about working with filters. The predefined filters are:
- Status - returns a list of Workspaces based on the selected status of the most recent task that was run for the Workspace. Valid values are New, Stopped, In Progress, Failed, Completed and Completed with Issues.
- Workspace State - returns a list of Workspaces in the selected migration state. See the Migration State column description below for filter values.
List View Actions Menu - contains links to Workspace actions and the search box. Each action is explained in greater detail in subsequent topics. See Searching for more information about working with the search box.
- Discover - starts the New Discover Workspaces Task wizard to discover Connections in the source tenant. See Discovering Workspaces for more information.
- Migrate - starts the New Migrate Workspaces Task wizard. See Migrating Workspaces for more information.
- Delete - deletes one or more selected Workspaces.
- Collections - see Managing Power BI objects with Collections for more information.
- More - additional actions as described below:
- Map from File - starts the New Mapping from File Task wizard to map specific Workspaces from the source to a Workspace that may or may not exist in the target tenant. See Mapping Workspaces for more information.
- Export - exports one or more selected Workstation details to a CSV file.
- Reset Workspace - Resets the source workspace to the discovered state when you delete a workspace in the target environment to recreate, rename, or simply start over again. See Resetting Workspaces for more information.
- Import Collections - Add Power BI objects from a CSV file to a new or existing collection. See Adding Power BI objects to Collections for more information.
- Refresh Permissions - ensures that service principal permissions for Workspaces and Connections in the source tenant are refreshed and fully updated. See Refreshing Permissions for more information.
- Edit Columns - displays or hides columns in the list.
List View - displays information about Workspaces in the source tenant. Use Edit Columns to show or hide columns in the list. The columns are as described below:
- Workspace State - state of the task in the migration process. Values are as listed below:
- Discovered - Workspace discovered in the source tenant.
- Exists in Target - Source Workspace also exists in the target tenant. See Discovering Target Workspaces for more details.
- Queued - waiting for service resources to be available. For more information, see How Queuing Works.
- Migrating - Workspace migration in progress.
- Migrated - Workspace migrated successfully to the target tenant.
- Migrated with Issues - Workspace migration completed but there were issues during migration.
- Migration Failed - Workspace could not be migrated.
- Provisioned - Workspace provisioned successfully to the target tenant.
- Mapped - Workspace has been successfully mapped to a target Workspace.
- Provisioned with Issues - Workspace provisioning completed but there were issues during migration.
- Provision Failed - Workspace could not be provisioned.
- Stopped - Workspace migration has been halted.
- Name - name of the Workspace in the source tenant.
- Owner - the username of the owners of the source tenant workspace.
- Target Workspace - displays the target workspace name when you map a source workspace to a target workspace with a different name.
- Reports Count - number of reports in the source tenant Workspace.
- Users Count - total number of users who have access to the source tenant Workspace.
- Capacity - capacity level of the Power BI. valid values are Power BI Standard and Power BI Premium. Help you plan that the capacity in the target tenant.
- Priority - indicates the precedence level of this object if it is included in a migration task where the priority is set in the Schedule step of the migration wizard. Values are: Highest, High, Medium, Low and Lowest. The default priority is Medium. If the system is busy, the objects are queued. When the system accepts new migration work, objects are taken from the queue based on the assigned priority and age in the queue.
- Migration access - green icon indicates the workspaces the workspaces are secured by a Microsoft Entra security group, and the access level is set to Administrator. Red icon indicates that there are access issues that may prevent migration.
- Rebind supported - Indicates True if the migration of the workspace reports occurs without using the Skip rebind option. Indicates False if all or some of the workspace reports cannot be migrated without choosing a Skip rebind option.
- Collections - indicates the most recent collection where the corresponding Workspace is added and the number of additional collections that also contain this object.
Workspace Details
When you select a Power BI Workspace from the List View, the Workspace Detail pane opens. The information in the pane is described below:
- Description - name of the Workspace in the source tenant.
- Events - count of the events that occurred during one or more tasks.
- Tasks - list of tasks invoked for the selected Workspace .
- Collections - list of collections that contain the selected Workspace.
Gateways List View
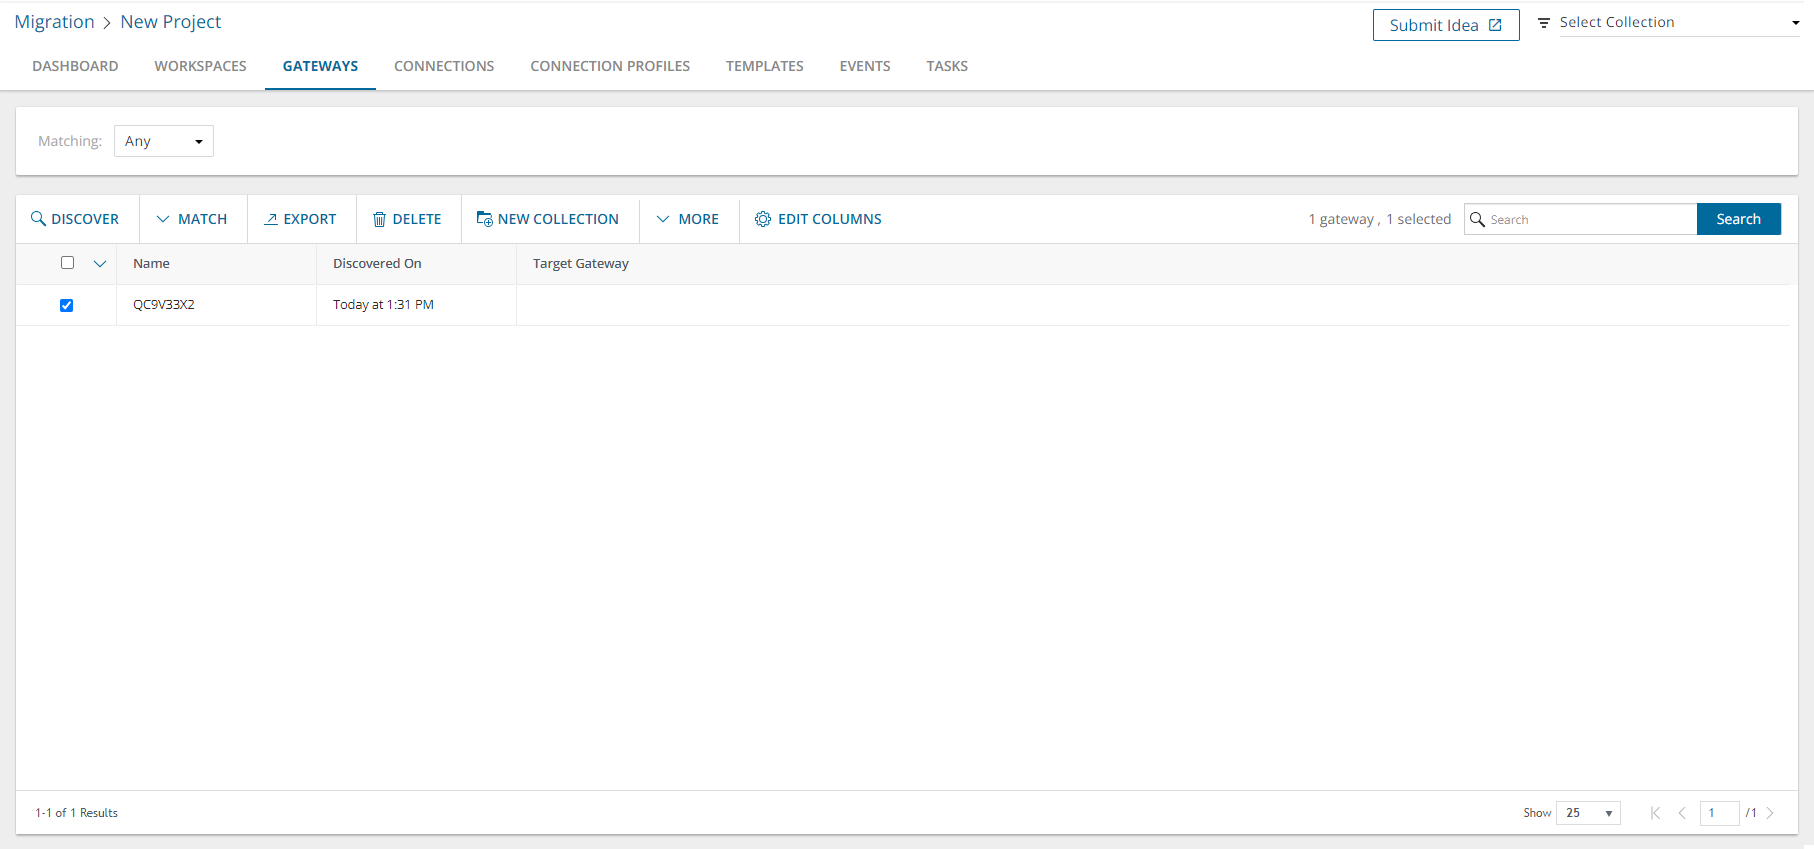
The Gateways List View is comprised of the following components:
Notification panel - presents relevant information and shortcuts to migration activities.
Filter panel - consists of predefined filters for the Gateways List view. See Filtering for more information about working with filters. The predefined filter is:
- Matching - returns a list of Gateways in the selected matching state. Valid values are Matched and Unmatched.
List View Actions Menu - contains links to gateway actions and the search box. Each action is explained in greater detail in subsequent topics. See Searching for more information about working with the search box.
- Discover - starts the New Discover Gateways Task wizard to discover Connections in the source tenant. See Discovering Gateways for more information.
- Match - starts the New Match Gateways Task wizard. See Matching and Mapping Gateways for more information.
- Export - exports one or more selected Gateway details to a CSV file.
- Delete - deletes one or more selected Workspaces.
- Collections - see Managing Power BI objects with Collections for more information.
- Edit Columns - displays or hides columns in the list.
List View - displays information about Gateways in the source tenant. Use Edit Columns to show or hide columns in the list. The columns are as described below:
- Name - name of the source tenant gateway.
- Discovered On - date and time the source tenant gateway was discovered by a discovery task.
- Target Gateway - name of the target tenant gateway.
- Collections - indicates the most recent collection where the corresponding Gateway is added and the number of additional collections that also contain this object.
Gateway Details
When you select a Power BI Gateway from the List View, the Gateway Detail pane opens. The information in the pane is described below:
- Description - name of the Gateway in the source tenant.
- Events - count of the events that occurred during one or more tasks.
- Tasks - list of tasks invoked for the selected Gateway.
- Collections - list of collections that contain the selected Gateway.
Connections List View

The Connections List View is comprised of the following components:
Notification panel - presents relevant information and shortcuts to migration activities.
Filter panel - consists of predefined filters for the Connections List view. See Filtering for more information about working with filters. The predefined filters are:
- Status - returns a list of Connections based on the selected status of the most recent task that was run for this account. Valid values are New, Stopped, In Progress, Failed, Completed and Completed with Issues.
- Connection State - returns a list of Connections in the selected migration state. See the Connection State column description below for filter values.
- Type - see the Type column description below for filter values.
- Profile - returns a list of Connections that either assigned or not assigned to a connection profile. Valid values are Assigned and Not Assigned.
- Target Binding - valid values are Supported and Unsupported.
- Gateway Name - returns a list of Connections for the selected Gateway.
List View Actions Menu - contains links to Connection actions and the search box. Each action is explained in greater detail in subsequent topics. See Searching for more information about working with the search box.
- Discover - starts the New Discover Connections Task wizard to discover Connections in the source tenant. See Discovering Connections for more information.
- Assign Connection Profile - starts the Create New Connection Profile Task wizard to assign a Connection Profile to a discovered Connection before it can be migrated. See Creating and Assigning Connection Profiles for more information.
- Migrate - starts the New Migrate Connections Task wizard. See Migrating Connections for more information.
- Delete - deletes one or more selected connections.
- Collections - see Managing Power BI objects with Collections for more information.
- More - additional actions as described below:
- Reset Connections - resets the selected Connection.
- Export - exports details about one or more selected Connections to a CSV file.
- Delete - removes Connections from the list view.
- Edit Columns - displays or hides columns in the list.
List View - displays information about Connections in the source tenant. Use Edit Columns to show or hide columns in the list. The columns are as described below:
- Name - name of the source tenant connections.
- Connection State - state of the task in the migration process. Values are as listed below:
- Discovered - Connections discovered in the source tenant.
- Queued - waiting for service resources to be available. For more information, see How Queuing Works.
- Migrating - Connections migration in progress.
- Migrated - Connections migrated successfully to the target tenant.
- Migrated with Issues - Connections migration completed but there were issues during migration.
- Migration Failed - Connections could not be migrated.
- Stopped - Connections migration has been halted.
- Type - the type of connection to a data repository. Valid values are File (any file that contains data like Microsoft Excel) and Sql (includes both Azure and on-premise SQL servers)
- Users - displays all users who have owner right for the connection.
- Discovered On - date and time the source tenant connection was discovered by a discovery task.
- Gateway Name - name of the gateway that is used by the connection.
- Assigned Connection Profile - name of the Profile when it is assigned to the Connection.
- Target Binding - Valid values are Supported and Unsupported.
- Collections - indicates the most recent collection where the corresponding Connection is added and the number of additional collections that also contain this object.
Connection Details
When you select a Power BI Connection from the List View, the Connection Detail pane opens. The information in the pane is described below:
- Description - name of the Connection in the source tenant.
- Events - count of the events that occurred during one or more tasks.
- Tasks - list of tasks invoked for the selected Connection.
- Collections - list of collections that contain the selected Connection.
Connection Profiles List View
The Connection Profiles List View is comprised of the following components:
Notification panel - presents relevant information and shortcuts to migration activities.
List View Actions Menu - contains links to Connection Profile actions and the search box. Each action is explained in greater detail in subsequent topics. See Searching for more information about working with the search box.
- Create - creates a new connection profile with user name, password and profile name for scenarios when you need to assign the same connection profile for multiple connections. Otherwise, use the Assign Connection Profile task from Connections tab to create and assign a connection profile to a specific connection.
- Edit - updates the user name and password for an existing connection profile.
- Delete - deletes one or more selected connection profiles.
- Collections - see Managing Power BI objects with Collections for more information.
- Edit Columns - displays or hides columns in the list.
List View - displays information about Connection Profiles in the source tenant. Use Edit Columns to show or hide columns in the list. The columns are as described below:
- Name - name of the connection profile.
- Collections - indicates the most recent collection where the corresponding Connection Profile is added and the number of additional collections that also contain this object.
Connection Profile Details
When you select a Power BI Connection Profile from the List View, the Connection Profile Detail pane opens. The information in the pane is described below:
- Description - name of the Connection Profile in the source tenant.
- Events - count of the events that occurred during one or more tasks.
- Tasks - list of tasks invoked for the selected Connection Profile.
- Collections - list of collections that contain the selected Connection Profile.
The consents and permissions required to connect, access and migrate the Power BI application and data in the source and target tenants, requires a two-part manual setup process. See Consents and permissions for more information about manual setup steps.
This topic describes the steps to run a task to verify whether or not the Quest On Demand - Migration - Power BI enterprise application service principal is granted the necessary permissions to work with the Power BI application in the source and target tenants.
Starting the Test Power BI Connection Task
- Log in to Quest On Demand and choose an organization if you have multiple organizations.
- From the navigation pane, click Migrate > Projects to open the My Projects list.
- Create a new project or open an existing project.
- Click the Power BI tile, or click Open from the Power BI tile to open the Power BI migration workspace.
- Open the Dashboard tab. Then click Connect to Power BI to start the Connect to Power BI Task wizard. Each step is described below:
- Prerequisite Setup
This is an information step that tells you to verify that you have manually completed the setup steps described in the Consents and permissions topic. If you have not competed the manual setup steps, you must do it now.
- Schedule
- Choose from one of three options to schedule the task. The scheduler will be activated only after you complete the task wizard.
- Run now - task runs immediately.
- Run later - task must be started manually.
- Schedule - task will be started at a future date and time entered in the corresponding calendar field.
- Click Next.
- Summary
- Verify the task specifications as described below:
- Name - name of the task. You can specify a custom name. Default name is Test Power BI Connection.
- Scheduled start - date and time when the task will start. Now indicates that the task will start immediately.
- Click Back to revise or review a previous step or click Finish to complete the task wizard and start the task as scheduled.
You can track its progress in the Tasks tab, view the summary on the Dashboard or monitor alerts and notifications in the Events tab.
Reviewing the Test Power BI Connection Task
- Open the Tasks tab.
- Select the Power BI task that you want to review.
- In the task details pane that opens, the information presented is as described below:
- Task Status - Status of the task.
- Type - Type of the task. The type is TestPowerBIConnection.
- Created - Date and time when the task was created.
- Modified - Date and time when the task was last updated.
- Last Operation - The action that was most recently performed in this task.
- Schedule - Date and time when the task started. Now indicates that the task started immediately after the task was created.
- Events (number) - Number indicates the count of events that the task encountered. The values indicate the type of the events and the event count for each type.
Reviewing the Test Power BI Connection Task Events
- Open the Tasks tab.
- Select the Test Power BI Connection task for which you want to review the events.
- In the task details pane that opens, click Events (number). The Events tab opens with a filtered list of events for the selected task.
- Select an event that you want to review. In the task details pane that opens, the information presented is as described below:
- Object - name of the Power BI object if applicable.
- Task - name of the task.
- Time - date and time when the event occurred.
This topic describes the various ways you can discover Power BI content.
In this topic:
Prerequisites
- The Test Power BI Connection task must be run before Discover All Contents can be processed.
- The Test Power BI Connection task must successfully connect to the source tenant to process Discover All Contents.
- The Test Power BI Connection task must successfully connect to both the source and target tenant to process migrations.
Considerations
We strongly recommend that you run only one discovery task at a time to avoid scheduling delays.
Discovering all contents
This is a unified approach which uses the Discover All Contents task to inspect the source tenant and discover all Power BI instances of Workspaces, Gateways and Connections.
|
|
NOTE: Discovering all contents is recommended as the first of all discovery tasks. This task will collect data for Workspaces, Gateways and Connections. This information will be indicated in the pre-migration report. To complete the pre-migration report, you must also run the Collect Statistics task.
Workspaces, Gateways and Connections can also be discovered separately using dedicated discovery tasks that are usually recommended for the discovery of newer Power BI objects, such as a refresh from the source tenant. |
- Log in to Quest On Demand and choose an organization if you have set up multiple organizations.
- From the navigation pane, click Migrate > Projects to open the My Projects list.
- Create a new project or open an existing project.
- From the Power BI tile on the project dashboard click Open. Then select the Dashboard tab.
- Click Discover All Contents in the Dashboard menu. The New Discover All Contents Task wizard starts. Each step is described below:
- Discovery Options
- Refresh permissions - select this option to ensure that service principal permissions are up to date. Permissions can be refreshed once per hour. When service principal permissions are updated in Power BI, they may not be immediately available to API calls. This option ensures that service principal permissions are refreshed and fully updated.
- Continue From Last Discovery - select this option to continue the discovery of Power BI objects from the last discovery task if the task did not complete successfully. Selecting this option will help you save discovery time because the task can skip the objects already discovered.
- Click Next.
- Schedule
- Choose from one of three options to schedule the task. The scheduler will be activated after you complete the task wizard.
- Run now - task runs immediately.
- Run later - task must be started manually.
- Schedule - task will be started at a future date and time entered in the corresponding calendar field.
- Click Next.
- Summary
- Verify the task specifications as described below:
- Name - name of the task. The default name is Discover All Contents. You can specify a custom name.
- Refresh permissions - indicates whether or not the Refresh permissions option has been selected.
- Scheduled start - date and time when the task will start. Now indicates that the task will start immediately.
- Click Back to revise or review a previous step or click Finish to complete the task wizard and start the task as scheduled.
- When the task completes, the Workspaces, Gateways and Connections lists are updated.
Discovering Source Workspaces
This section describes the steps to discover Power BI Workspaces in the source tenant.
- Log in to Quest On Demand and choose an organization if you have set up multiple organizations.
- From the navigation pane, click Migrate > Projects to open the My Projects list.
- Create a new project or open an existing project.
- From the Power BI tile on the project dashboard click Open. Then select the Workspaces tab.
- Click Discover in the List View menu. The New Discover Source Workspaces Task wizard starts.
- Discovery Options
- Refresh permissions - select this option to ensure that service principal permissions are up to date. Permissions can be refreshed once per hour. When service principal permissions are updated in Power BI, they may not be immediately available to API calls. This option ensures that service principal permissions are refreshed and fully updated. When you select this option, the task also validates whether the workspaces are secured by the Microsoft Entra security group, and the access level is set to Administrator.
- Continue From Last Discovery - select this option to continue the discovery of Power BI objects from the last discovery task if the task did not complete successfully. Selecting this option will help you save discovery time because the task can skip the objects already discovered.
- Click Next.
- Schedule
- Choose from one of three options to schedule the task. The scheduler will be activated after you complete the task wizard.
- Run now - task runs immediately.
- Run later - task must be started manually.
- Schedule - task will be started at a future date and time entered in the corresponding calendar field.
- Click Next.
- Summary
- Verify the task specifications as described below:
- Name - name of the task. The default name is Discover Source Workspaces. You can specify a custom name.
- Refresh permissions - indicates whether or not the Refresh permissions option has been selected.
- Scheduled start - date and time when the task will start. Now indicates that the task will start immediately.
- Click Back to revise or review a previous step or click Finish to complete the task wizard and start the task as scheduled.
- When the task completes, the Workspaces list is updated.
|
|
NOTE: The discovery task discovers all supported and unsupported workspaces in the source tenant. The total number of workspaces discovered is indicated in the events list. However, only supported workspaces are listed in the Workspaces list. |
Discovering Target Workspaces
This section describes the steps to discover Power BI Workspaces in the target tenant. Run this task after you run the Discover Source Workspaces to check whether discovered source workspaces are already present in the target.
- Log in to Quest On Demand and choose an organization if you have set up multiple organizations.
- From the navigation pane, click Migrate > Projects to open the My Projects list.
- Create a new project or open an existing project.
- From the Power BI tile on the project dashboard click Open. Then select the Workspaces tab.
- Click Discover in the List View menu. The New Discover Target Workspaces Task wizard starts.
- Discovery Options
- Refresh permissions - select this option to ensure that service principal permissions are up to date. Permissions can be refreshed once per hour. When service principal permissions are updated in Power BI, they may not be immediately available to API calls. This option ensures that service principal permissions are refreshed and fully updated. When you select this option, the task also validates whether the workspaces are secured by the Microsoft Entra security group, and the access level is set to Administrator.
- Continue From Last Discovery - select this option to continue the discovery of Power BI objects from the last discovery task if the task did not complete successfully. Selecting this option will help you save discovery time because the task can skip the objects already discovered.
- Click Next.
- Schedule
- Choose from one of three options to schedule the task. The scheduler will be activated after you complete the task wizard.
- Run now - task runs immediately.
- Run later - task must be started manually.
- Schedule - task will be started at a future date and time entered in the corresponding calendar field.
- Click Next.
- Summary
- Verify the task specifications as described below:
- Name - name of the task. The default name is Discover Target Workspaces. You can specify a custom name.
- Refresh permissions - indicates whether or not the Refresh permissions option has been selected.
- Scheduled start - date and time when the task will start. Now indicates that the task will start immediately.
- Click Back to revise or review a previous step or click Finish to complete the task wizard and start the task as scheduled.
- When the task completes, the Workspaces list is updated. If a source workspace is found in the target tenant, the Workspace State column will change to Exists in Target.
Resetting Workspaces
If you delete a workspace in the target environment to recreate, rename, or simply start over again, the Reset Workspace action can reset the source workspace to the discovered state. This action removes mappings and all other dependencies to the target workspace. The steps to reset one or more workspaces are described below:
- Log in to Quest On Demand and choose an organization if you have multiple organizations.
- From the navigation pane, click Migrate > Projects to open the My Projects list.
- Create a new project or open an existing project.
- Click Power BI from the project tiles, or click Open from the Power BI tile to open the Power BI migration workspace.
- Click the Workspaces tab and select one or more workspaces to reset.
- From the Actions menu, click More > Reset Workspace. The New Reset Workspace Task wizard starts. Each step is described below:
- Schedule
- Choose from one of three options to schedule the task. The scheduler will be activated after you complete the task wizard.
- Run now - task runs immediately.
- Run later - task must be started manually.
- Schedule - task will be started at a future date and time entered in the corresponding calendar field.
- Click Next.
- Summary
- Verify the task specifications as described below:
- Name - name of the task. The default name is Reset Workspaces. You can specify a custom name.
- Scheduled start - date and time when the task will start. Now indicates that the task will start immediately.
- When the task completes, the workspace is rediscovered, and the Workspace State column value of the selected workspaces in the Workspaces list changes to Discovered
Discovering Gateways
This section describes the steps to discover Power BI Gateways.
- Log in to Quest On Demand and choose an organization if you have set up multiple organizations.
- From the navigation pane, click Migrate > Projects to open the My Projects list.
- Create a new project or open an existing project.
- From the Power BI tile on the project dashboard click Open. Then select the Gateways tab.
- Click Discover in the List View menu. The New Discover Gateways Task wizard starts.
- Discovery Options
- Refresh permissions - select this option to ensure that service principal permissions are up to date. Permissions can be refreshed once per hour.When service principal permissions are updated in Power BI, they may not be immediately available to API calls. This option ensures that service principal permissions are refreshed and fully updated.
- Click Next.
- Schedule
- Choose from one of three options to schedule the task. The scheduler will be activated after you complete the task wizard.
- Run now - task runs immediately.
- Run later - task must be started manually.
- Schedule - task will be started at a future date and time entered in the corresponding calendar field.
- Click Next.
- Summary
- Verify the task specifications as described below:
- Name - name of the task. The default name is Discover Gateways. You can specify a custom name.
- Refresh permissions - indicates whether or not the Refresh permissions option has been selected.
- Scheduled start - date and time when the task will start. Now indicates that the task will start immediately.
- Click Back to revise or review a previous step or click Finish to complete the task wizard and start the task as scheduled.
- When the task completes, the Gateways list is updated.
Discovering Connections
This section describes the steps to discover Power BI Connections.
To start the Discover Connections Task:
- Log in to Quest On Demand and choose an organization if you have set up multiple organizations.
- From the navigation pane, click Migrate > Projects to open the My Projects list.
- Create a new project or open an existing project.
- From the Power BI tile on the project dashboard click Open. Then select the Connections tab.
- Click Discover in the List View menu. The New Discover Connections Task wizard starts.
- Discovery Options
- Refresh permissions - select this option to ensure that service principal permissions are up to date. Permissions can be refreshed once per hour.When service principal permissions are updated in Power BI, they may not be immediately available to API calls. This option ensures that service principal permissions are refreshed and fully updated.
- Click Next.
- Schedule
- Choose from one of three options to schedule the task. The scheduler will be activated after you complete the task wizard.
- Run now - task runs immediately.
- Run later - task must be started manually.
- Schedule - task will be started at a future date and time entered in the corresponding calendar field.
- Click Next.
- Summary
- Verify the task specifications as described below:
- Name - name of the task. The default name is Discover Connections. You can specify a custom name.
- Refresh permissions - indicates whether or not the Refresh permissions option has been selected.
- Scheduled start - date and time when the task will start. Now indicates that the task will start immediately.
- Click Back to revise or review a previous step or click Finish to complete the task wizard and start the task as scheduled.
- When the task completes, the Connections list is updated.
Reviewing Tasks
- Open the Tasks tab.
- Select the discovery task that you want to review.
- In the task details pane that opens, review the information presented
- From the task details pane, click Download Premigration Report. Download and save the ZIP file to a suitable folder, and extract the report.
Reviewing events for a Task
- Open the Tasks tab.
- Select the task that you want to review.
- In the task details pane that opens, click Events (number). The Events tab opens with a filtered list of events for the selected task.
- Select an event that you want to review. In the task details pane that opens, the information presented is as described below:
- Object - name of the Power BI object if applicable.
- Task - name of the task.
- Time - date and time when the event occurred.
