In order to run the Essentials application, you can use a regular user logged into the workstation, or you can run the program as an Administrator.
However, you must run the tool as an Administrator when changing settings in the memory management section of the Profile Manager (located on the Advanced tab of the Profile Manager), or when using the automatic updates feature.
|
|
NOTE: When running the tool as an Administrator, you may not be able to see your network drives or mapped drives in the connections section. This may occur because the connections were set up while in regular user mode, so when the tool is launched as an admin, the admin user does not have access to the connections. |
To resolve the issue in the above note, do one of the following:
1.Do not start the tool as an administrator, and insure that no settings are applied by default.
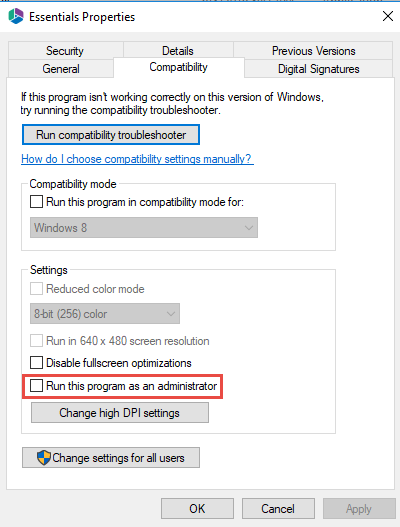
a.Navigate to the Properties for the Essentials.exe
b.Ensure that under the Compatability tab, "Run this program as administrator" isn't selected. 
2.Run the Registry Editor (regedit.exe), and locate the following key:
HKEY_LOCAL_MACHINE/SOFTWARE/Microsoft/Windows/CurrentVersion/Policies/System
Create a new DWORD(32) with the name EnableLinkedConnections and value 1 and reboot.
In the event that the tool only successfully launches when run as an admin, this could be occurring because the non-admin user that is launching the tool does not have permissions for the installation folder, to the run tool components, or to the workspace.
This may be caused as a result of various windows security settings and configurations. To resolve this issue, add the non-admin user, directly to the folder security settings.
1.Navigate to the folder that contains the Essentials Tool installation folder. Right click and select Properties.
2.Navigate to the Security Tab, and select Edit group and usernames.
3.Select Add and add the non-admin user.
üSingle-hop migration to the cloud
üComprehensive migration and content management
üPre-migration analysis
üPost-migration validation
üLifecycle management for Office 365
üActionable reports
üSingle, extensible platform
üIntuitive user interface (UI)
üConsolidate content into Office 365
üAutomate administrative tasks.
üPrevent administrative overload
üReallocate unused licenses.
üMaximize the utility of available Office 365 services.
üSupport Chinese and GCC High Tenants.
Auto-Updates is a feature available within Essentials that allows users to have updates, that are made to the application by our development team, automatically installed on their machines. This feature can be disabled or enabled, as per your personal preference.
When starting up the Essentials program as an administrator, the Product Update Manager will pop up when new updates are available. You can choose to install the update, or decline to do so.
You can also access the auto-update feature through the Help tab within the product by selecting Check for Updates.
|
|
NOTE: The Auto Update feature is not supported for versions below 2.3 |
The auto-update feature can be disabled in the Product Update Manager by selecting the "Disable tool automatic updates".
The auto-update feature can also be disabled in the Profile Manager by doing the following:
1.On the Help tab of Essentials, click Profile Manager.
2.Navigate to the Advnaced section of the Profile Manager, and setting the Enable Automatic Updates feature to "False" to disable, and "True" to enable.