Follow this procedure to view accounts in the Credentials Vault, or to edit, merge, or remove accounts.
- From the Rapid Recovery Core Console, click the
![[More]](/es-es/technical-documents/image/f92ad3ca-7a28-4d58-9161-1095866f59a4) (More) menu, and then select
(More) menu, and then select  Credentials Vault.
The Credentials Vault page appears. For each account, the user name, description, and utilization appears.
- In the User name field, if you want to see when the account information was last modified, click
![[Last Modified]](/es-es/technical-documents/image/513e9173-e72e-4efa-b808-f47792617df2) .
.
- In the Description field, read the descriptive text to help identify which account this record represents.
- In the Utilization field, see how many systems reference this account from the vault.
- To edit any record, do the following:
- From the row for the appropriate account, click (More) and then select Edit.
The Edit Account dialog box appears.
- If you want to change the user name associated with this account, in the User name field, update the information.
- If you want to change the password currently saved for this account, in the Password field, enter the appropriate password.
|

|
NOTE: Since passwords are not viewable, if you have any concerns about the password associated with this account, simply re-enter the appropriate password in the Password field. |
- If you want to update or change the description, enter the updated information in the Description field.
- When satisfied, click OK.
- To merge account records (for example, if you created more than one entry for the same account), do the following:
- From the row for the appropriate account, select
![[Merge]](/es-es/technical-documents/image/4b4c9e91-2ba4-4f96-8b16-e933434dd6cc) Merge to account.
Merge to account.
The Merge to Account dialog box appears.
- From the Target account field, select the other account with which you want to merge this account record.
- Click Merge.
The Merge to Account dialog box closes, the screen refreshes, and the account records are merged.
- To remove an account from the Credentials Vault, from the row for the appropriate account, click (More) and then select
![[Remove]](/es-es/technical-documents/image/b4a87f60-5a64-45ad-9059-21960e1c7112) Remove.
Remove.
Many actions in the Rapid Recovery Core Console require you to enter account credentials.
After accounts have been added to the Credentials Vault, when prompted to authenticate, you can view the list of accounts and select an account with one click, rather than manually entering your account user name and password.
Follow this procedure to use an account from the Credentials Vault.
- From a location on the Rapid Recovery Core Console in which you are asked for credentials, click the downward-facing arrow
 in the User name field to expand the view.
The Credentials Vault drop-down grid appears. Each row shows the user name and description associated with an account held in the vault.
- If necessary, scroll through the list to identify the account for which you want to enter credentials. Then click on the row for the appropriate account.
The grid closes, and the account information is passed to the window or dialog box. Since passwords are hidden, the password field is not shown.
- Complete the function requiring credentials.
This section describes how to configure and manage the replication of protected data from a Rapid Recovery source Core to a Rapid Recovery target Core for disaster recovery.
Topics include:
This section provides conceptual and procedural information to help you understand and configure replication in Rapid Recovery.
Replication is the process of copying recovery points from one Rapid Recovery Core and transmitting them to another Rapid Recovery Core for disaster recovery purposes. The process requires a paired source-target relationship between two or more Cores.
The source Core copies the recovery points of selected protected machines, and then asynchronously and continually transmits that snapshot data to the target Core.
Unless you change the default behavior by setting a replication schedule, the Core starts a replication job immediately after completion of every backup snapshot, checksum check, mountability check, and attachability check. Log truncation of any type also triggers a replication job, as does checking the integrity of recovery points or of an Oracle database. If any of these actions are included in nightly jobs, then completion of nightly jobs also triggers a replication job. For more information, see Scheduling replication.
|
|
NOTE: When you replicate data for a cluster, you must replicate the entire cluster. For example, if you select a node to replicate, the cluster is automatically selected. Likewise, if you select the cluster, all nodes in that cluster are also selected. |
For optimum data security, administrators usually use a target Core at a remote disaster recovery site. You can configure outbound replication to a company-owned data center or remote disaster recovery site (that is, a “self-managed” target Core). Or, you can configure outbound replication to a third-party managed service provider (MSP) or cloud provider that hosts off-site backup and disaster recovery services. When replicating to a third-party target Core, you can use built-in work flows that let you request connections and receive automatic feedback notifications.
Replication is managed on a per-protected-machine basis. Any machine (or all machines) protected or replicated on a source Core can be configured to replicate to a target Core.
Possible scenarios for replication include:
- Replication to a local location. The target Core is located in a local data center or on-site location, and replication is maintained at all times. In this configuration, the loss of the Core would not prevent a recovery.
- Replication to an off-site location. The target Core is located at an off-site disaster recovery facility for recovery in the event of a loss.
- Replication to Microsoft Azure. The target Core is located in an Azure-hosted virtual machine and the repository is located in an Azure Blob Container. For more information, see Azure repositories.
- Mutual replication. Two data centers in two different locations each contain a Core and are protecting machines and serving as the off-site disaster recovery backup for each other. In this scenario, each Core replicates the protected machines to the Core that is located in the other data center. This scenario is also called cross replication.
- Hosted and cloud replication. Rapid Recovery MSP partners maintain multiple target Cores in a data center or a public cloud. On each of these Cores, the MSP partner lets one or more of their customers replicate recovery points from a source Core on the customer’s site to the MSP’s target Core for a fee.
|
|
NOTE: In this scenario, customers only have access to their own data. |
Possible replication configurations include:
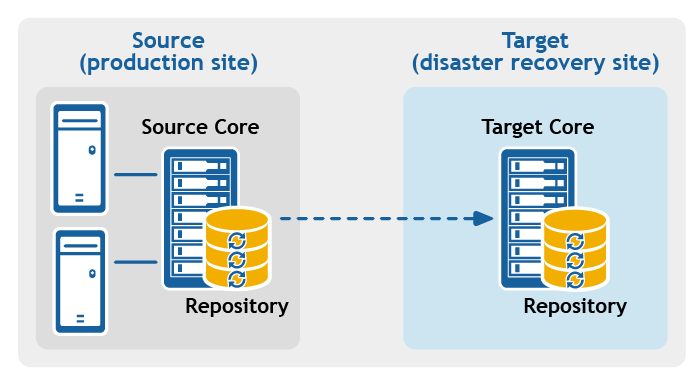
- Point-to-point replication. Replicates one or more protected machines from a single source Core to a single target Core.
Figure 1: Point-to-point replication configuration
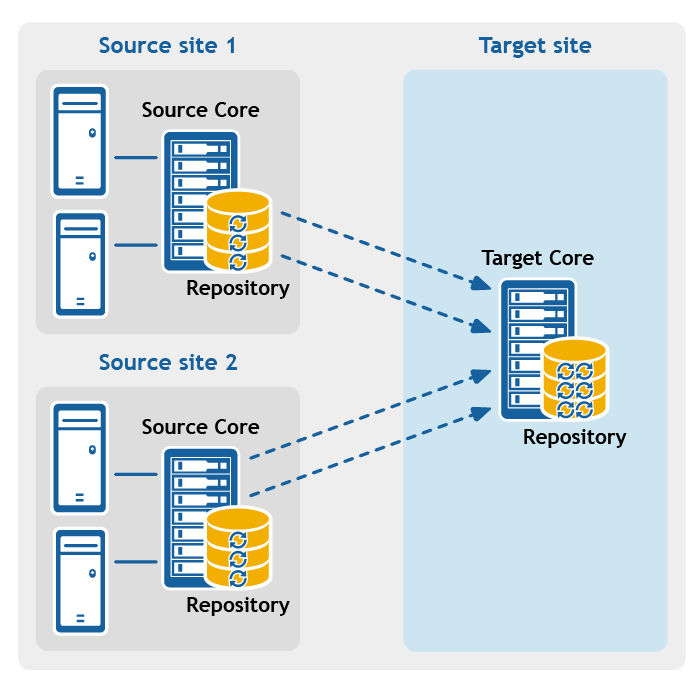
- Multipoint-to-point replication. Replicates protected machines from multiple source Cores to a single target Core.
Figure 2: Multipoint-to-point replication configuration
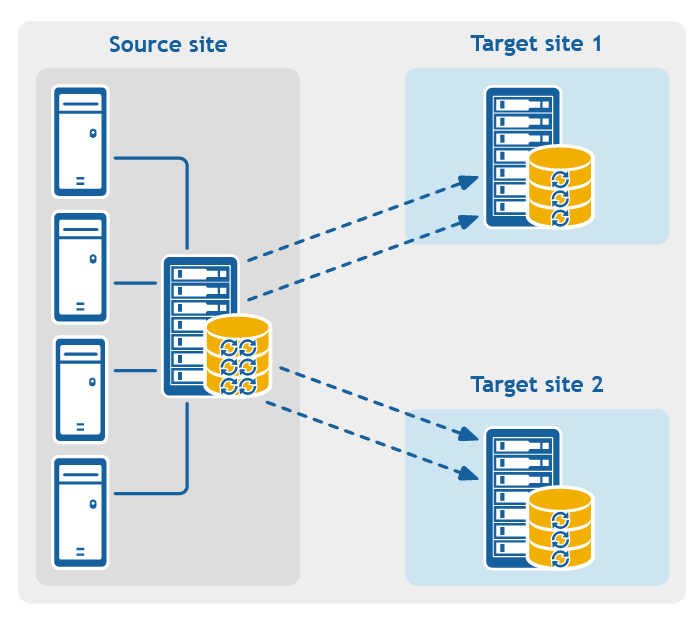
- Point-to-multipoint replication. Replicates one or more protected machines from a single source Core to more than one target Core.
Figure 3: Point-to-multipoint replication configuration
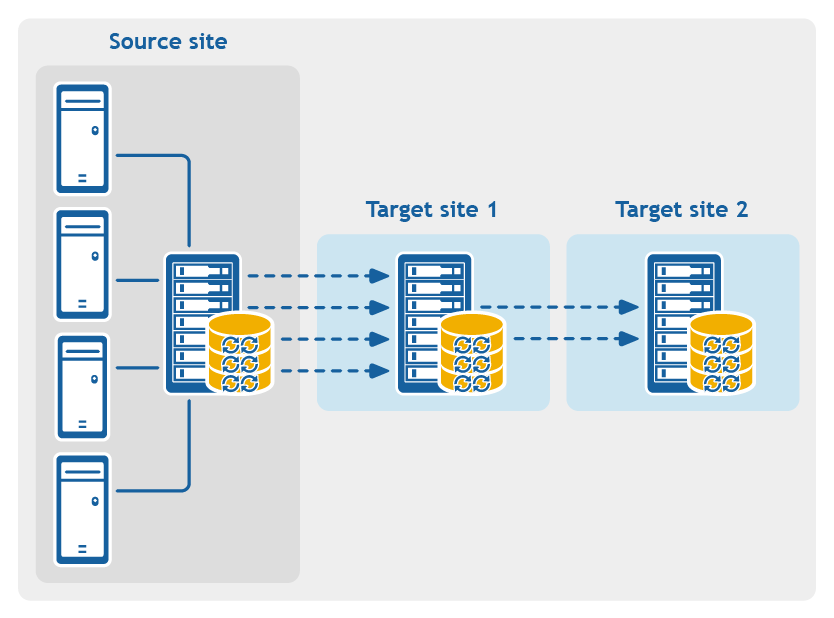
- Multi-hop replication. Replicates one or more protected machines from one target Core to another target Core, producing additional failover or recovery options on the replicated Core.
Figure 4: Multi-hop replication configuration