In the Archive view on the Mailbox tab some items can be displayed with the following icon: 

To create a shortcut for an archived item:
1.In the Archive view click on the Mailboxes tab.
2.Find the mailbox in the left pane. You may use the Look for combo box for that purpose. Double-click it to unfold its subfolders.
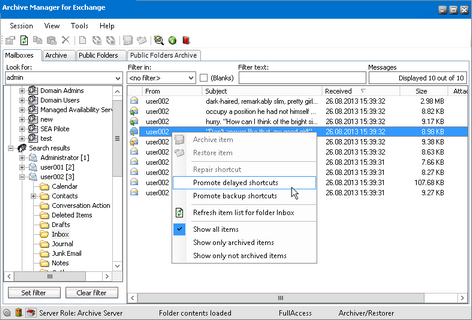
3.Locate the item with delayed shortcut/backup shortcut icon in the right pane. Right-click it and then, in the context menu, click Promote delayed shortcut/Promote backup shortcuts as required.
4.When the processing is over, in the Processing result window click OK.
This tab is generally used
·to restore lost items 
·as a mailbox browser
|
|
NOTE: On the Archive tab the administrator can browse through mailboxes and their folders. For each folder there is a list of all its items displayed in the right pane of the window. Different colors of the icon represent different status of the item. You can open the legend for icons when you right-click an item in the right pane and select Show legend from the context menu or you can click the Show legend icon on the toolbar ( |
Some basic icons:


Users may have deleted the shortcut of an archived item simply by pressing the SHIFT key along with the Delete key on the keyboard or by clicking on the Delete icon on the Outlook toolbar and not by clicking on the Delete archived messages icon and selecting Delete from archive option, which is an Archive Manager Outlook AddIn feature.
In such cases those archived items are lost for the user. They cannot be reached by the user, but they still reside in the HSM store at least until their retention time expires. They can be recovered manually by the administrator only. Such lost items have a blue icon on the Archive tab.
On this tab the administrator can restore:
·one lost item
·all lost items of a folder
·all lost items of a mailbox
·(restoring of lost items for more mailboxes at once can be done on the Mailbox tab see the section "How to restore lost items for several mailboxes)
|
|
NOTE: In all three cases mentioned above the administrator can restore also to a folder or a mailbox different from the original one (see Lost items restoring to a specific folder ). |
To restore one or more lost items:
1.Click View on the Archive Manager for Exchange menu bar. Select Archive. Then switch to the Archive tab.
2.In the left pane find the user whose lost item(s) you want to restore. You can use the Look for combo box where you do not must enter an exact name of the user.
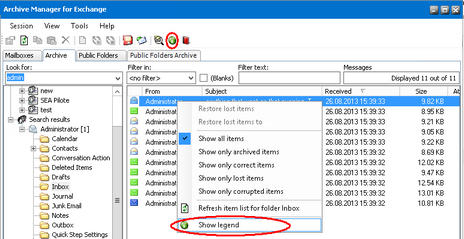
3.To restore ONE LOST ITEM, open the folder in which the shortcut to this item was originally kept. A list of all items of the folder will be displayed in the right pane. Right-click the lost item (blue icon). In the context menu select Restore lost item option.
To restore ALL LOST ITEMS OF A FOLDER right-click that folder in the left pane. In the context menu select Restore lost folder items option.
To restore ALL LOST ITEMS OF A MAILBOX right-click that mailbox in the left pane. In the context menu select Restore lost mailbox items option.
|
|
NOTE: If you want to display lost items only, right-click in the right pane and, in the context menu, click Show only lost items. |
|
Restoring a lost item |
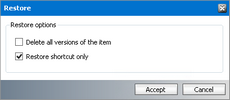
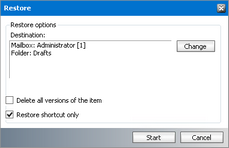
4.In the pop-up Restore options window choose between two options:
a.Delete all versions of the document checkbox all versions of the lost item(s) will be marked for deletion in the archive, just the latest one(s) will be displayed in the users mailbox as non-archived
b.Restore shortcut only checkbox shortcut of the item(s) will be displayed in the users mailbox and all versions will be accessible
|
|
NOTE: If none of the options is checked, email is returned to the users mailbox as non-archived and its versions, if any, are displayed as lost in Archive Manager for Exchange. |
5.Click Accept. The respective archived item will be restored to the folder its shortcut had been deleted from.
6.When restoring is over, in the Processing result window click OK.
Using this option lost items can be restored to a mailbox different from the original one. However, when only shortcut is restored (i.e. not the original message) to a different mailbox, the mailbox user is not the owner of such item. It means that the user will not be able to delete or modify the archived item using that shortcut. The user will be able to restore the shortcut and perform the changes but cannot control the archived counterpart. On the Archive tab such item is displayed with a yellow icon:
To restore lost item(s) to a folder or a mailbox different from the original one:
1.Click View on the Enterprise Manager menu bar. Select Archive. Then switch to the Archive tab.
2.In the left pane find the user whose lost item(s) you want to restore. You can use the Look for combo box where you do not must enter an exact name of the user.
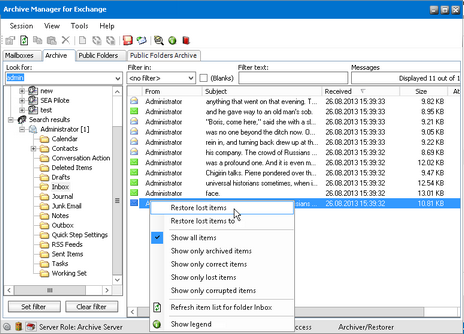
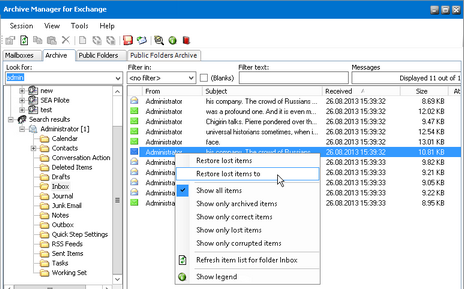
3.To restore ONE LOST ITEM, open the folder in which the shortcut to this item was originally residing. A list of all items of the folder will be displayed in the right pane. Right-click the lost item (blue icon). In the context menu select Restore lost item to option.
To restore ALL LOST ITEMS OF A FOLDER right-click that folder in the left pane. In the context menu select Restore lost folder items to option.
To restore ALL LOST ITEMS OF A MAILBOX right-click that mailbox in the left pane. In the context menu select Restore lost mailbox items to option.
|
|
NOTE: If you want to display lost items only, right-click in the right pane and, in the context menu, click Show only lost items. |
4.In the pop-up Restore lost items window choose between two options:
a.Delete all versions of the document checkbox all versions of the respective lost item(s) will be marked for deletion in the archive, just the latest one(s) will be displayed in the users mailbox as non-archived.
b.Restore shortcut only checkbox shortcut of the respective item(s) will be displayed in the users mailbox and all versions will be accessible.
|
|
NOTE: If none of the options is checked, email is returned to the users mailbox as non-archived and its versions, if any, are displayed as lost in the Enterprise Manager. |
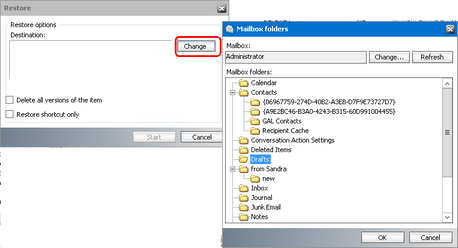
5.Then click the Change button to specify the destination where the item(s) will be restored.
6.In the Mailbox folders pop-up window define a mailbox (using the Change button) and a folder of that mailbox where the lost item(s) must be restored. If the folders are not displayed, click Refresh. Click OK.
7.Back in the Restore lost items window the defined folder is displayed in the Destination field. Click Start. Then OK.


 ). The