9. Migration Schedule View
The Schedule view is read-only and displays mailboxes in all statuses throughout a migration.
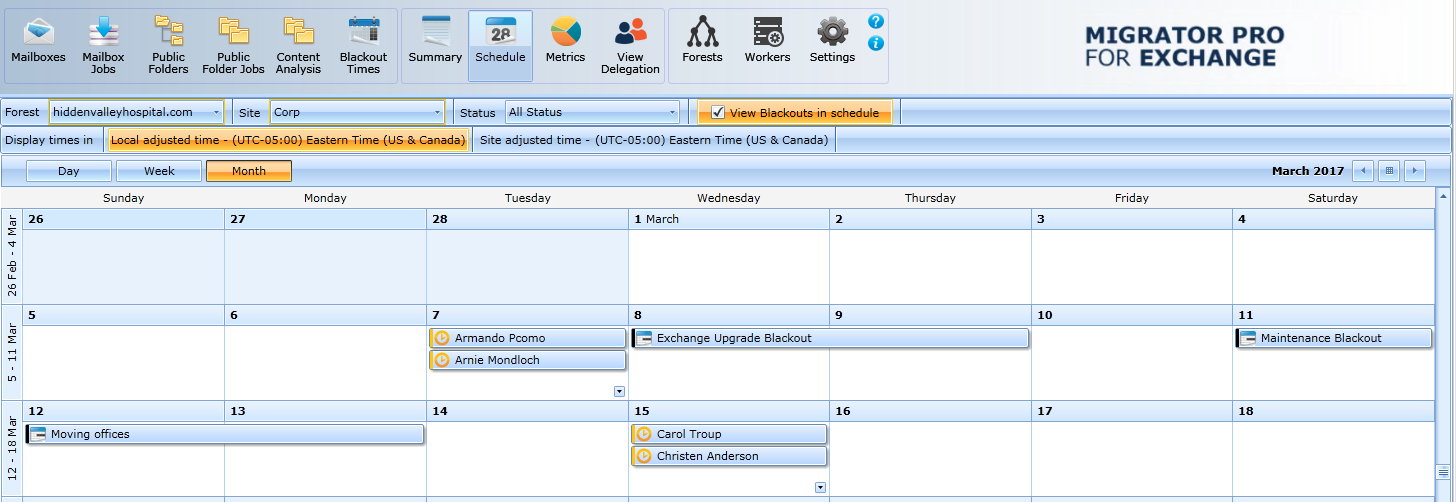
By default, it displays the user mailboxes from the migration site that is currently selected in the Site box. To review the schedule of user mailboxes from another migration site, you must select it in the Site box. Migrator Pro for Exchange uses the Destination site whenever it displays data.
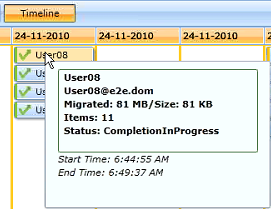
If you hover over a user, it will display information, such as the status, data migrated in bytes, number of items migrated from a mailbox, time the migration started, and time when it ended.
Select the View Blackouts in schedule check box to display the appropriate blackout schedules listed in the Schedule view. Deselect this check box to remove the blackouts from the view.
If you change to the Week view, you can see the same information.
Based on the information you specified when adding mailboxes to the migration queue and the information from previously scheduled mailboxes, this view even anticipates when a user mailbox might be migrated.
10. Migration Metrics View
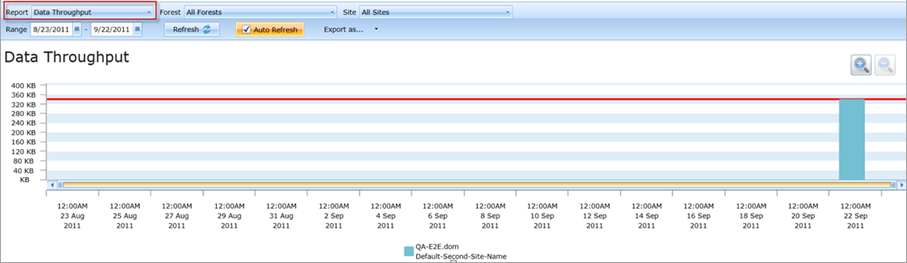
This view lets you depict the amount of data that has been migrated and number of mailboxes that have been migrated during a specific time graphically.
-
In the Report field, click the down-arrow select a report. Four reports are available:
-
Migration Totals
-
Data Throughput
-
Status Summary
-
Mailbox Locations
-
Select a Forest. All forests are selected by default.
-
Select a Site. All sites are selected by default.
-
Select or enter a time range for the report in the Range date selector fields.
-
Once the graph is displayed, you can do the following:
-
Pause on (hover mouse over) a bar (or circle graph sector) to view statistics.
-
Use the zoom icons on bar graphs to increase or decrease the size of the graph.
-
Use the horizontal scroll bar and scroll arrows at the base of bar graphs to view the sections of the graph not visible on the screen.
-
Export the graph to a PNG, BMP, Xlsx, or Xps format file and use it in your report. After you have selected the format, it opens a Save As dialog box for you specify the location for saving the exported graph.
Data Throughput
In the Report field, select the Data Throughput option. Data Throughput is selected by default.
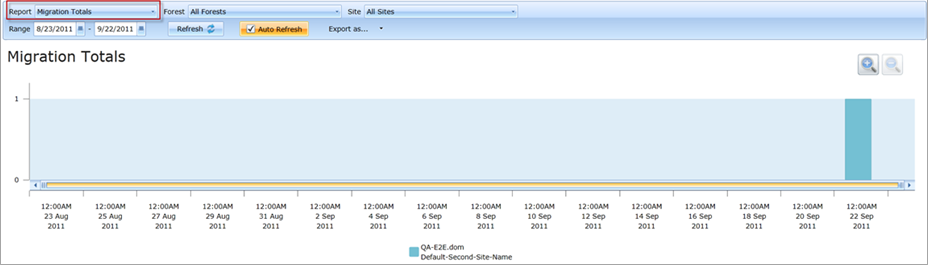
Migration Totals
In the Report field, select the Migration Totals option:
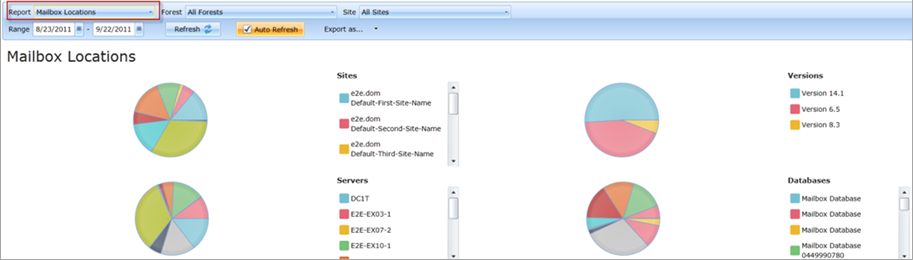
Mailbox Locations
In the Report field, select the Mailbox Locations option:
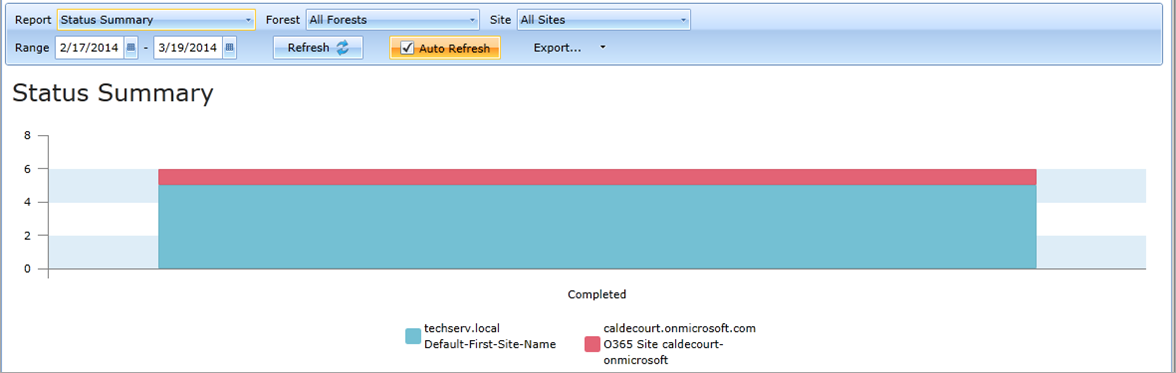
Status Summary
In the Report field, select the Status Summary option:
11. Migrating Delegation Rights
Delegation rights can be migrated intact only if the delegate mailbox is migrated at the same time (in the same migration queue) as the mailbox to which the delegate has been given access. If delegation-linked mailboxes aren't migrated together, delegation fails in the target since the associated delegate mailbox does not yet exist. Migrator Pro for Exchange identifies delegate relationships in the source as part of its forest-discovery process, so you can view delegate associations and choose to migrate delegates together with the mailbox(es) to which they have delegate access.
Migrator Pro for Exchange lets you view delegation associations in its Mailboxes view in the Admin Portal, so you can add associated mailboxes to the same migration job. An Admin Portal toolbar button, View Delegation, lets you review only mailboxes with delegates, and select which mailboxes to add to a migration queue, to be migrated together. Additionally, when adding selected mailboxes to the migration queue, there is a button Show Delegates that allows additional delegate mailboxes to be added to the migration queue. These features are described below.
Forest-Wide Discovery vs. Filtered Group Discovery
The complex interrelationships of delegate rights, crisscrossing from and to multiple users across multiple levels of delegation, is a very large data set for Migrator Pro for Exchange’s forest discovery process to capture—in addition to all the other mailbox data that Migrator Pro for Exchange must collect for its other features and functions. The discovery process can run an hour or more in small and mid-sized organizations, or can run several hours, even a day or longer, in larger enterprises with thousands or tens of thousands of users.
Migrator Pro for Exchange therefore offers a list-filtering feature that lets you define (customize) and view subsets of a forest, to limit the scope of the view. But more than that, Migrator Pro for Exchange's filtering feature lets you refresh delegate data for mailboxes in these filtered subset groups by a separate discovery process whose scope is limited to only the mailboxes in the filtered groups, which is much faster than running another discovery process for the entire forest. This feature lets larger organizations view (and act on) the most up-to-date delegation information in a filtered list very quickly.
This filtering feature is described below, under Viewing and Migrating Delegate-Related Mailboxes from the View Delegation view. The refresh interval, and the number of delegation levels Migrator Pro for Exchange will trace, are configurable in the Activities tab in Settings (see the notes for that tab in the Settings topic).
Viewing and Migrating Delegate-Related Mailboxes from the Mailboxes View
When adding a mailbox to a selection queue by right-clicking it from the Mailboxes view, the Add mailboxes to migration queue dialog box contains a Show Delegates button that lets you add delegate-related mailboxes to the same migration queue.

To view delegates for a particular mailbox, from the Mailboxes view: Click the Mailboxes button in the Admin Portal toolbar, then right-click on a mailbox and select Show Delegates:
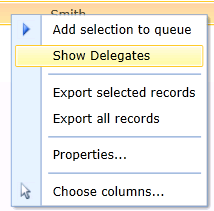
This opens a Delegate Mailboxes window, where the selected mailboxes appear in a new list:

You can also select multiple mailboxes (Ctrl+click) in the Mailboxes view, and then Show Delegates:
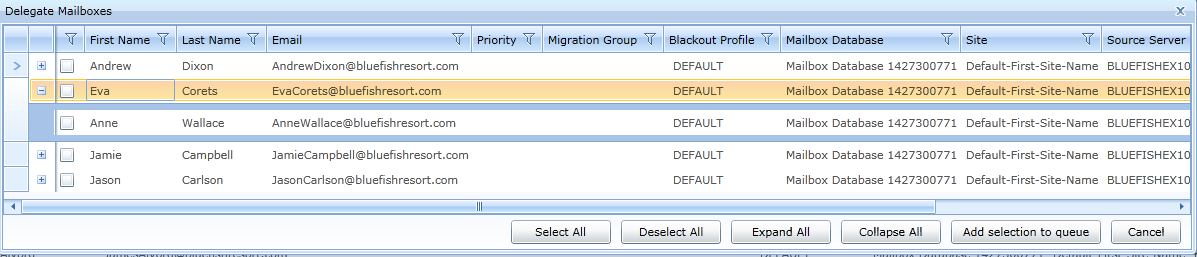
In this Delegate Mailboxes window you can click [+] on any row (or more than one) to expand the list to show that mailbox’s delegates. Then select/deselect any mailbox, or Select All, or select more than one(Ctrl+click), and then Add selection to queue:
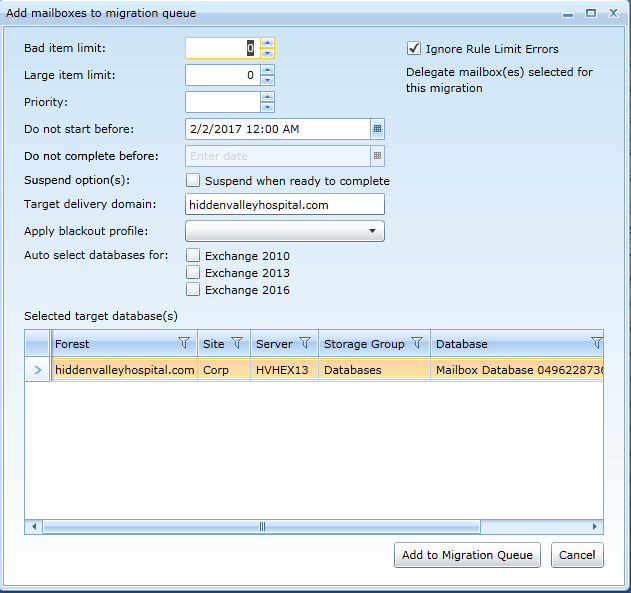
From the Add mailboxes to migration queue dialog box, the procedure is the same as for adding mailboxes to Mailbox Jobs. See Adding Mailboxes to the Mailbox Jobs in the Mailboxes topic for information about this process.
Viewing and Migrating Delegate-Related Mailboxes from the View Delegation View
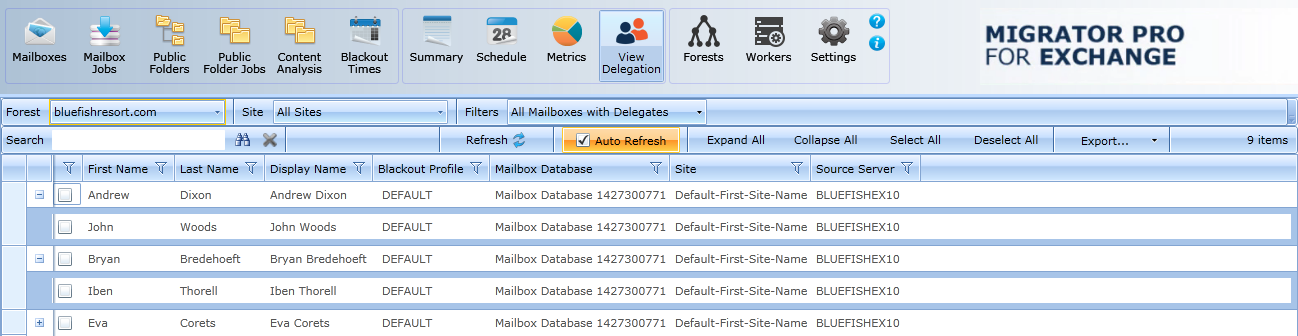
Migrator Pro for Exchange lets you view delegation associations in its Mailboxes view in the Admin Portal, as described above, so you can add delegate-related mailboxes to the same migration job. Another Admin Portal toolbar button, View Delegation, lets you review only mailboxes with delegates, so you can select which mailboxes to add to a migration queue, to be migrated together.
The View Delegation view shows every mailbox in the selected forest that has at least one delegate:
You can add these mailboxes to a migration job the same as you migrate mailboxes from the Mailboxes view: Select the mailbox(es) you want to migrate, then right-click for the context menu, and click Add selection to queue. If necessary, see Adding Mailboxes to the Mailbox Jobs in the Mailboxes topic for information about this process.
From this View Delegation view, you can filter the table by the Filters drop-down list:
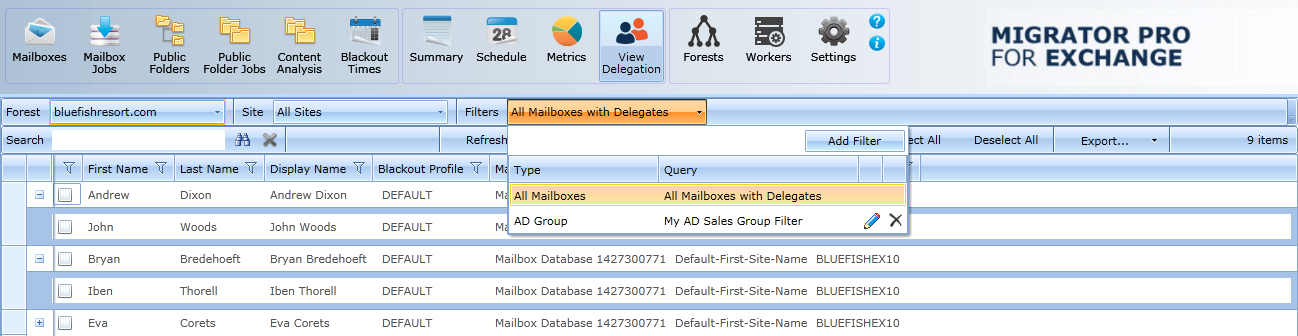
All Mailboxes is the default scope, showing every mailbox in the entire forest that has one or more delegates. But this filtering feature lets you define and view subsets of a forest, to limit the scope of the view. These filters also let you refresh delegate data for mailboxes in these filtered subset groups separately, which is much faster than running another discovery process for the entire forest.
When you apply a filter to this View Delegation view, the list shows only the mailboxes that are members of the selected filter group. Previously defined filters can be selected from the Filters drop-down list, and can be edited (by clicking the pencil icon) or deleted (click the [X]).
Remember that the delegation data refresh interval, and the number of delegation levels Migrator Pro for Exchange will trace, are configurable in the Activities tab in Settings (see the notes for that tab in the Settings topic).
To Define a New Filter
In the Filters drop-down, click the Add Filter button to open a dialog box to define the new filter:
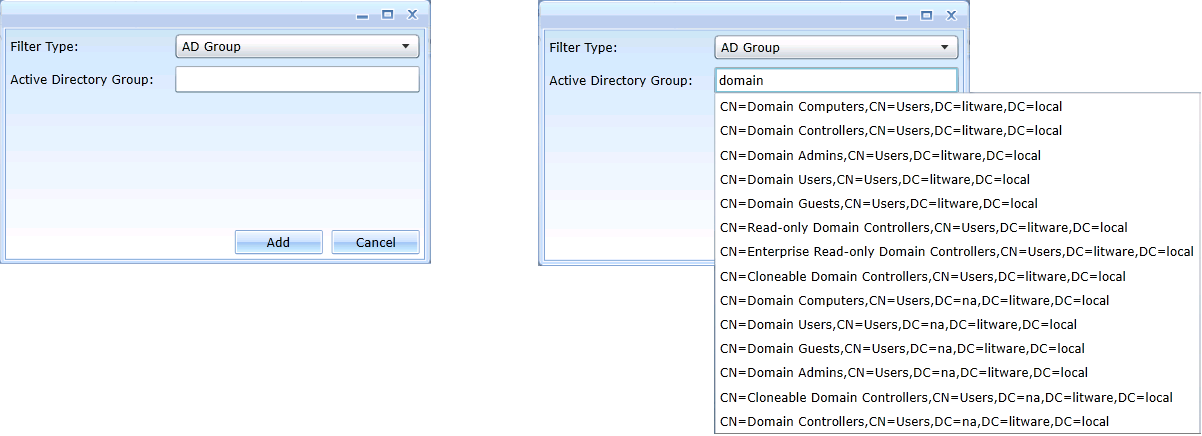
Specify the Filter Type: Custom LDAP Filter, AD Group or Migrator Pro for Exchange Group (an Migrator Pro for Exchange migration group). Then select the query for the group you want from the drop-down list, as shown in the figure above. The new filter will limit the displayed list to contain only mailboxes that satisfy the selected query string.
Finally, click the Add button to add the new Filter to the Filters drop-down list.
12. Public Folders View
Note that migrating public folders to Exchange Online requires the use of a built-in wizard. Refer to the topic Migrating Public Folders to Exchange Online (in the Public Folder Jobs View section) for more information.
|
|
Public folder migration to Exchange 2013 requires Exchange 2013 CU5+. Migrator Pro for Exchange may encounter issues when migrating public folders to Exchange 2013 using bi-directional synchronization if an Outlook Profile is not used. This problem can be resolved by configuring an Outlook Profile for the public folder migration to Exchange 2013. |
|
|
The Global Catalog Server value should not be changed in the Forest Setting during public folder migration to ensure Email Address changes will be detected by Migrator Pro for Exchange |

Adding Public Folders to the Public Folder Jobs
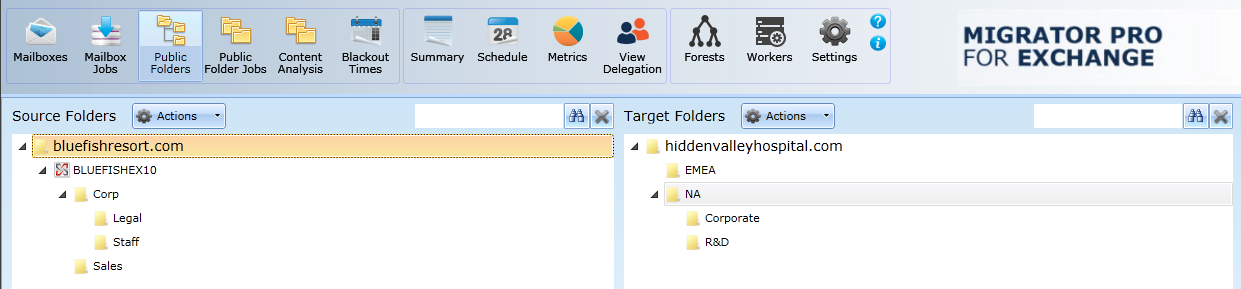
The Public Folders view lists public folders from all sites in the specified domain. In addition, it lets you search and select public folders to add to the Public Folder Jobs.
To add public folders to the Public Folder Jobs:
-
Click Public Folders in the main toolbar. The screen displays Source Folders on the left side and Target Folders on the right. All items in the Source and Target Folders in this view are periodically refreshed automatically. However, you can manually refresh all items in the Source or Target Folders at any time by clicking Refresh under the Actions menu. Individual items are updated after migrations and can be updated at any time by right-clicking on an item and clicking Refresh.
|
|
Exchange 2013 and 2016 public folder hierarchies can be split across multiple servers and mailboxes so the public folders listed under Server and Mailbox are not displayed. For Exchange 2013 and 2016 public folders the Server and Mailbox information is displayed in the “hover over” tool tip. |
|
|
Migrator Pro for Exchange will synchronize Send-As and Receive-As public folder permissions for non-mail-enabled groups. Note, however that Receive-As is not supported by Exchange Online (Office 365). Also, other public folder permissions (e.g. Owner, FolderVisible, and so on) are only supported by Exchange for mail-enabled groups. Anonymous and default permissions are migrated if enabled in the Public Folders settings. |
To support environments that have a large number of folders:
-
The page displays only the top two levels of the folders directory by default and then loads and displays subfolders as they are expanded in the view.
-
The right-click Refresh option updates the displayed folder from the Migrator Pro for Exchange database. The Refresh option no longer rationalizes the folder.
-
Source and Target folders can be searched for by using the search box above the folder lists. However, the Search feature only searches within folders that have been expanded in the view..
Click on the forest, server, and/or folders you want to send to the migration queue and drag them to the Target Folders pane.
The program then opens this Add folders to migration queue screen.
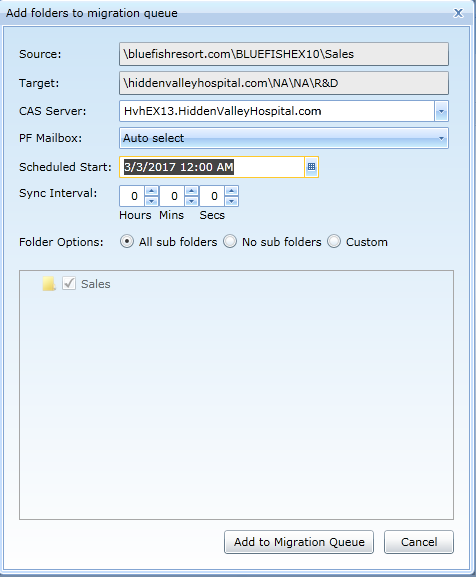
Indicate the settings you want to apply to the job by selecting the options on the screen:
-
Source: The path to the location from which the folders are being migrated.
-
Target: The path to the location to which the folders are being migrated.
-
CAS Server: If the destination server does not include the "Client Access Server"(CAS) role, you must select a CAS that can access the target server. You can select a valid CAS server using the drop down list or type in the logical name of your CAS array. The specified CAS should be in the same Active Directory site as the target public folder server.
-
PF Mailbox (appears for Exchange 2013 and higher targets): The public folder Mailbox to migrate to in the target. The drop-down list includes all public folder mailboxes available in the target. The default is Auto select, which will be the smallest target PF mailbox.
|
|
If PF Mailbox is set to Auto select, and two or more PF mailboxes meet the criteria, Migrator Pro for Exchange selects the PF mailbox with the largest percentage of quota remaining. |
-
Scheduled Start: Select date and time by clicking on the calendar icon. Setting this value instructs the migration engine to NOT submit folders to the Target until after the set time condition is met. Use this to manage when a group of folders are being migrated.
-
Sync Interval: Enter the interval at which you want Migrator Pro for Exchange to copy new or changed folders to the target folders. Valid values are any time interval from 0 seconds to 24 hours. Syncs will not continue if a migration error is encountered during a sync.
-
Folder options: Select one of the following options: All sub folders, No sub folders, or Custom.
Then select the folders you want to copy to the migration queue, and click the Add to Migration Queue button to add the selected folders to the Public Folder Jobs.
When you click Add to Migration Queue, Migrator Pro for Exchange verifies the aggregate size of all public folders to be migrated from the source. The program also verifies that a public folder exists in the target that can accommodate the source folder(s) without exceeding 90% of the available quota configured for the PF mailbox.
|
|
If PF Mailbox is set to Auto select, and two or more PF mailboxes meet the criteria, Migrator Pro for Exchange selects the PF mailbox with the largest percentage of quota remaining.
|
How Rename Conflict Resolution Works
The following public folder migration rules apply when using the Rename Conflict Resolution option. These rules assume that before the initial migration (sync), there is an existing public folder on the Target with the same name as a Source public folder.
During an initial one-way sync:
-
If there are document(s) on the Source and Target with the same name, the source document will be synced to the Target and renamed with the Rename Mask.
-
When the one-way sync is completed, the Target will contain both the renamed source document and the original target document.
During continual one-way syncs after the initial sync:
-
If a source document, that has a corresponding renamed document on the Target, is modified on the Source, the corresponding renamed document on the Target will be updated (overwritten).
-
The renamed document on the Target is never evaluated again in a one-way sync. Any changes made to the target document will be overwritten if the original source document is modified.
New public folder jobs are always completed before re-synchronization jobs are started.
If the Domain Name and SMTP Namespace Are Different
Migrator Pro for Exchange copies Free Busy messages from the source to the target, and renames the subject header so that it matches the Legacy Exchange DN of the target object. In environments where the domain name and the SMTP name space are different, Exchange must be directed to browse the Schedule+ Free Busy folder to discover this information. To do this:
-
Open the Exchange Management Shell on Exchange and execute the following command where “ForestName” is set to the *PrimarySMTP* namespace of the contact objects residing in the target.
Add-AvailabilityAddressSpace –ForestName contoso.com –AccessMethod PublicFolder
As Exchange 2013 no longer supports Schedule+ Free/Busy, the functionality included in Migrator Pro for Exchange is not sufficient to provide cross-forest Free/Busy lookups during this type of migration. To achieve this, you will have to manually configure “Availability Service Sharing” within your environments. If needed, please contact your sales representative about engaging with our consulting services group.
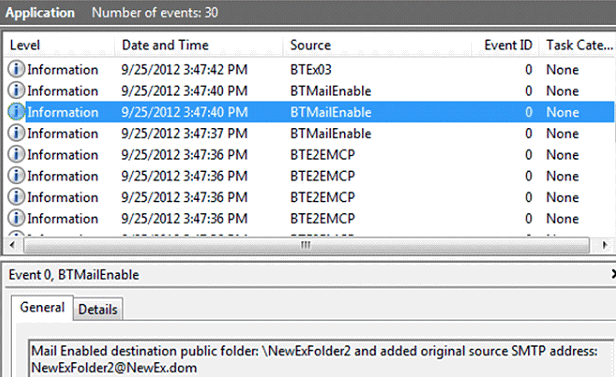
How Public Folder Mail-Enablement Works
BTMailEnableService is a separate service that executes the sequence of calls necessary to mail-enable public folders. In complex Exchange environments, it can take a significant amount of time for information about a new public folder to propagate and for Exchange’s addressing policies to create the initial proxy address structure. The public folder engine offloads this process to the BTMailEnableService and continues with data migration.
BTMailEnableService is started the first time a Mail-Enabled public folder is migrated and writes output to the application log.