
Appendix G: Public Folder Analysis and Job Administration
This appendix provides scripts and information for managing public folder migrations and querying collected data about public folders in Migrator Pro for Exchange.
|
|
To run the SQL scripts in this file, open SQL Server Management Studio and connect to your Migrator Pro for Exchange database. Right-click on the Migrator Pro for Exchange database and select New Query to open the New Query window. Then paste the SQL script into the query window, update the parameter values (if any), and execute the SQL script. |

Public Folder Analysis Scripts
|
|
For many of the public folder analysis scripts to function correctly, you must perform a public folder content analysis on a forest at least once. |
Below is a list of SQL scripts that can be used to query data collected about public folders. The SQL scripts can be downloaded from the FTP folder where the GA Migrator Pro for Exchange install files and documentation are located. Download the file SQL Queries.zip and extract the files to the SQL server being used for Migrator Pro for Exchange public folder migrations. The following scripts are also available in the file PF Analysis Queries.sql. You can either open this file in SQL Server Management Studio or copy and paste the query text below into a query in SQL. Some of these queries need to be modified before executing. A good understanding of SQL is recommended before proceeding.
Find the 10 largest public folders by folder size
To find the 10 largest public folders by folder size, run this SQL command:
SELECT TOP 10
s.[ServerName],
f.[Name],
f.[EntryID],
f.[FolderPath],
f.[MaxPFSizeBytes]
FROM [dbo].[CMTEUP_PublicFolder] f
INNER JOIN [dbo].[CMTEUP_Server] s ON f.ServerID = s.ServerID
ORDER BY f.MaxPFSizeBytes DESC;
Find the 10 largest public folders by item count
To find the 10 largest public folders by item count, run this SQL command:
SELECT TOP 10
s.[ServerName],
f.[Name],
f.[EntryID],
f.[FolderPath],
i.ItemCount
FROM [dbo].[CMTEUP_PublicFolder] f
INNER JOIN [dbo].[CMTEUP_Server] s ON f.ServerID = s.ServerID
INNER JOIN (SELECT PublicFolderID, COUNT(*) AS ItemCount FROM CMTEUP_PublicFolderItem
GROUP BY PublicFolderID) i ON f.PublicFolderID = i.PublicFolderID
ORDER BY i.ItemCount DESC;
Find public folders with more than x items
To find all the public folders with more than x items, run this SQL command (change "10000" to your own limit number):
DECLARE @numItems INT
SET @numItems = 10000
SELECT f.PublicFolderID,
s.[ServerName],
f.[Name],
f.[EntryID],
f.[FolderPath],
i.ItemCount
FROM [dbo].[CMTEUP_PublicFolder] f
INNER JOIN [dbo].[CMTEUP_Server] s ON f.ServerID = s.ServerID
INNER JOIN (SELECT PublicFolderID, COUNT(*) AS ItemCount
FROM CMTEUP_PublicFolderItem
GROUP BY PublicFolderID) i ON f.PublicFolderID = i.PublicFolderID
WHERE i.ItemCount > @numItems
ORDER BY ItemCount DESC;
Find public folders where content has not changed in the last x days
To find all the public folders where content has not changed in the last x days, run this SQL command (change "90" to your own value for "x"):
DECLARE @daysSinceLastContentChange INT
SET @daysSinceLastContentChange = 90
SELECT
s.[ServerName],
f.[Name],
f.[EntryID],
f.[FolderPath],
f.[ContentChangeDate]
FROM [dbo].[CMTEUP_PublicFolder] f
INNER JOIN [dbo].[CMTEUP_Server] s ON f.ServerID = s.ServerID
WHERE f.ContentChangeDate <= GETUTCDATE()-@daysSinceLastContentChange;
Find public folders where attributes have not changed in the last x days
To find all the public folders where attributes (e.g., permissions) have not changed in the last x days, run this SQL command (change "90" to your own value for "x"):
DECLARE @daysSinceLastAttributeChange INT
SET @daysSinceLastAttributeChange = 90
SELECT
s.[ServerName],
f.[Name],
f.[EntryID],
f.[FolderPath],
f.[AttributeChangeDate]
FROM [dbo].[CMTEUP_PublicFolder] f
INNER JOIN [dbo].[CMTEUP_Server] s ON f.ServerID = s.ServerID
WHERE f.ContentChangeDate <= GETUTCDATE()-@daysSinceLastAttributeChange;
Find public folders where a specific user has any permission
To find all the public folders where a specific user has any permission, run this SQL command (change “'2013Throughput@ExchgPro.dom” to the user’s UPN):
DECLARE @userAnyPermission NVARCHAR(2000)
SET @userAnyPermission = '2013Throughput@ExchgPro.dom'
SELECT
s.[ServerName],
f.[Name],
f.[EntryID],
f.[FolderPath],
p.AccessRight
FROM [dbo].[CMTEUP_PublicFolder] f
INNER JOIN [dbo].[CMTEUP_Server] s ON f.ServerID = s.ServerID
INNER JOIN [dbo].[CMTEUP_PublicFolderPermission] p ON f.PublicFolderID = p.PublicFolderID
WHERE p.TrusteeIdentity = @userAnyPermission;
Find public folders where a specific user has a specific permission
To find all the public folders where a specific user has a specific permission or role, run this SQL command (change “2013Throughput@ExchgPro.dom” and “Contributor” to the user's UPN and the permission or role you want to find):
DECLARE @user NVARCHAR(2000)
SET @user = '2013Throughput@ExchgPro.dom'
DECLARE @permission NVARCHAR(100)
SET @permission = 'Contributor'
SELECT
s.[ServerName],
f.[Name],
f.[EntryID],
f.[FolderPath],
p.AccessRight
FROM [dbo].[CMTEUP_PublicFolder] f
INNER JOIN [dbo].[CMTEUP_Server] s ON f.ServerID = s.ServerID
INNER JOIN [dbo].[CMTEUP_PublicFolderPermission] p ON f.PublicFolderID = p.PublicFolderID
WHERE p.TrusteeIdentity = @user AND p.AccessRight = @permission;
Find Public Folders by email address
To retrieve a list of public folders by Email Address, run the following SQL command.
SELECT TOP 10
s.[ServerName],
f.[Name],
f.[EntryID],
f.[FolderPath],
f.[Email]
f.[MaxPFSizeBytes]
FROM [dbo].[CMTEUP_PublicFolder] f
INNER JOIN [dbo].[CMTEUP_Server] s ON f.ServerID = s.ServerID
ORDER BY f.MaxPFSizeBytes DESC;
Find Public Folders that have been processed by Content Analysis
To see a list of public folders that have been processed by Content Analysis, run the following SQL command.
Select f.folderpath,f.email,f.targetaddress, j.starttime as ReportingJobStarted, j.endtime as ReportingJobFinished
FROM cmteup_publicfolderreportjob j
INNER JOIN cmteup_publicfolder f
ON j.publicfolderid = f.publicfolderid
Find the 10 largest public folder items by item size
To the find the 10 largest public folder items by item size, run this SQL command:
SELECT TOP 10
s.[ServerName],
f.[Name],
f.[EntryID],
f.[FolderPath],
i.ItemName,
i.ItemType,
i.ItemSize AS ItemSizeInBytes
FROM [dbo].[CMTEUP_PublicFolder] f
INNER JOIN [dbo].[CMTEUP_Server] s ON f.ServerID = s.ServerID
INNER JOIN [dbo].[CMTEUP_PublicFolderItem] i ON f.PublicFolderID = i.PublicFolderID
ORDER BY i.ItemSize DESC;
Find public folder items larger than x MB
To find all the public folder items larger than x MB, run this SQL command (change "10" to the limit size, in MB):
DECLARE @sizeInMB INT
SET @sizeInMB = 10
SELECT
s.[ServerName],
f.[Name],
f.[EntryID],
f.[FolderPath],
i.ItemName,
i.ItemType,
CONVERT(decimal(10, 3), (i.ItemSize / 1048576.0)) AS ItemSizeInMB
FROM [dbo].[CMTEUP_PublicFolder] f
INNER JOIN [dbo].[CMTEUP_Server] s ON f.ServerID = s.ServerID
INNER JOIN [dbo].[CMTEUP_PublicFolderItem] i ON f.PublicFolderID = i.PublicFolderID
WHERE (i.ItemSize / 1048576.0) > @sizeInMB
ORDER BY i.ItemSize DESC;
Find total number of public folder items by item type
To find the total number of public folder items by item type, run this SQL command:
SELECT
[ItemType],
COUNT(*) As NumberOfItems
FROM [dbo].CMTEUP_PublicFolderItem
GROUP BY [ItemType]
ORDER BY [ItemType];
Find total number of public folder item attachments by type
To find the total number of public folder item attachments by type (extension), run this SQL command:
SELECT
[AttachmentExtension],
COUNT(*) AS NumberOfAttachments
FROM [dbo].CMTEUP_PublicFolderAttachment
GROUP BY [AttachmentExtension]
ORDER BY [AttachmentExtension];
Find total size of public folder item attachments by type
To find the total size of public folder item attachments by type (extension), run this SQL command:
SELECT
[AttachmentExtension],
SUM(AttachmentSize) AS TotalSizeInBytes
FROM [dbo].CMTEUP_PublicFolderAttachment
GROUP BY [AttachmentExtension]
ORDER BY [AttachmentExtension];
Find public folder item attachments larger than x MB
To find all the public folder item attachments larger than x MB, run this SQL command (change "10" to your limit size, in MB):
DECLARE @attachmentSizeInMB INT
SET @attachmentSizeInMB = 10
SELECT
s.[ServerName],
f.[Name],
f.[EntryID],
f.[FolderPath],
a.AttachmentName,
a.AttachmentExtension,
CONVERT(decimal(10, 3),(a.AttachmentSize / 1048576.0)) AS ItemSizeInMB
FROM [dbo].[CMTEUP_PublicFolder] f
INNER JOIN [dbo].[CMTEUP_Server] s ON f.ServerID = s.ServerID
INNER JOIN [dbo].[CMTEUP_PublicFolderAttachment] a ON f.PublicFolderID = a.PublicFolderID
WHERE (a.AttachmentSize / 1048576.0) > @attachmentSizeInMB
ORDER BY a.AttachmentSize DESC;
Public Folder Job Administration Scripts
These PowerShell and SQL scripts can be used to manage public folder migrations. The SQL scripts can be downloaded from the FTP folder where the Migrator Pro for Exchange install files and documentation are located. Download the file SQL Queries.zip and extract the files to the SQL server being used for Migrator Pro for Exchange public folder migrations. The following scripts are also available in the file PF Job Administration Queries.sql. You can either open this file in SQL Server Management Studio or copy and paste the query text below into a query in SQL. Some of these queries must be modified before executing. A good understanding of SQL is recommended before proceeding.
Count folders in Exchange
To count the total number of folders in Exchange for a subtree (e.g. \RootFolder1), run this PowerShell command from the Exchange server (change "\RootFolder1" to your root folder):
Get-PublicFolder –Recurse "\RootFolder1" | Select Name | Measure-Object
Count folders in Migrator Pro for Exchange
To count the number of folders in Migrator Pro for Exchange for a subtree (e.g. “\RootFolder1”), run the following SQL command (change "\RootFolder1" to the desired root folder, and change "ServerID = 1" to the ID of the desired source server as found in CMTEUP_Server):
SELECT COUNT(*) from CMTEUP_PublicFolder
WHERE (FolderPath like '\RootFolders\%' or FolderPath = '\RootFolders')
AND ServerID = 1
Find folder in Exchange
To look up a folder subtree in Exchange, run the following PowerShell command from the Exchange server (change "\RootFolder1" to the desired root folder, and change "Server1" to the desired Exchange Public Folder server name):
Get-PublicFolder –Recurse "\RootFolder1" –Server "Server1"
Compare jobs and folders
To compare the number of folders in a subtree to the number of jobs created, run the following SQL command (change "\2007Folders" to the desired root folder):
SELECT count(1)
FROM CMTEUP_PublicFolder
WHERE FolderPath like '\2007Folders%'
SELECT count(1)
FROM CMTEUP_PublicFolder fs
inner join CMTEUP_PublicFolderjob jt on jt.SourcePublicFolderID = fs.PublicFolderID
WHERE fs.FolderPath like '\2007Folders%'
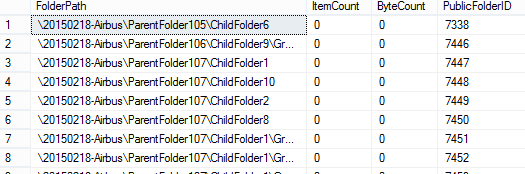
Find all folders in source forest without Jobs
Change “airbus.corp” to the desired forest name:
SELECT f.FolderPath, *
FROM CMTEUP_PublicFolder f
inner join CMTEUP_Server s on s.ServerID = f.ServerID
inner join CMTEUP_Site i on i.SiteID = s.SiteID
inner join CMTEUP_Forest o on o.ForestID = i.ForestID
where o.ForestName = 'airbus.corp'
and f.FolderPath not in
(
SELECT DISTINCT(f.FolderPath)
FROM CMTEUP_PublicFolder f
inner join CMTEUP_PublicFolderJob j on j.SourcePublicFolderID = f.PublicFolderID
inner join CMTEUP_Server s on s.ServerID = f.ServerID
inner join CMTEUP_Site i on i.SiteID = s.SiteID
inner join CMTEUP_Forest o on o.ForestID = i.ForestID
where o.ForestName = 'airbus.corp'
)
Check folder provisioning progress
To check the folder provisioning progress for all jobs, run the following SQL command. See Appendix B for more information on job states.
SELECT count(1) as JobCount, s.JobStatus, j.SyncCount
FROM CMTEUP_PublicFolderJob j
inner join CMTEUP_JobStatus s on j.JobStatusID = s.JobStatusID
WHERE j.SyncCount = 0
GROUP BY s.JobStatus, SyncCount
Sample Output

... which tells us that 8 jobs have been scheduled, but are not yet started, and 1 folder sync job has started (folder creation and attribute sync).
Find empty folders
To find folders (with or without jobs) that don’t have any items, run the following SQL command.
SELECT f.FolderPath, f.ItemCount, f.ByteCount, f.PublicFolderID
from CMTEUP_PublicFolder f
where f.ItemCount = 0
order by f.ItemCount desc
Sample Output
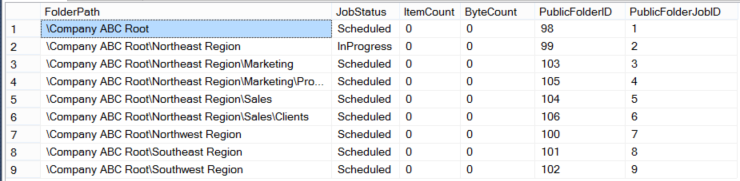
Find empty folders with jobs
To find folders (with jobs) that don’t have any items, run the following SQL command.
SELECT f.FolderPath, s.JobStatus, f.ItemCount, f.ByteCount, f.PublicFolderID, j.PublicFolderJobID
from CMTEUP_PublicFolderJob j
inner join CMTEUP_JobStatus s on j.JobStatusID = s.JobStatusID
inner join CMTEUP_PublicFolder f on j.SourcePublicFolderID = f.PublicFolderID
where f.ItemCount = 0
order by f.ItemCount desc
Sample Output
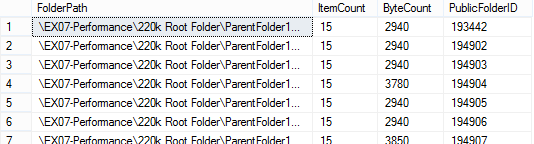
Find Large Folders
To find folders (with or without jobs) that contain a large number of items, run the following SQL command.
-- The max number of folder items
declare @maxItems int = 500
SELECT f.FolderPath, f.ItemCount, f.ByteCount, f.PublicFolderID
from CMTEUP_PublicFolder f
where f.ItemCount > @maxItems
order by f.ItemCount desc
Sample Output
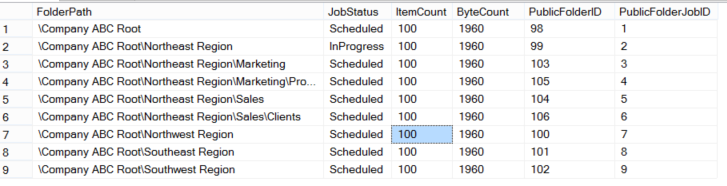
Find large folders with jobs
To find folders (with jobs) that contain a large number of items, run this SQL command:
-- The max number of folder items
declare @maxItems int = 500
SELECT f.FolderPath, s.JobStatus, f.ItemCount, f.ByteCount, f.PublicFolderID, j.PublicFolderJobID
from CMTEUP_PublicFolderJob j
inner join CMTEUP_JobStatus s on j.JobStatusID = s.JobStatusID
inner join CMTEUP_PublicFolder f on j.SourcePublicFolderID = f.PublicFolderID
where f.ItemCount > @maxItems
order by f.ItemCount desc
Sample Output
Reschedule Large Folders
To postpone the processing of large folders, run the following SQL command.
NOTE: if this is run for jobs that have not yet finished provisioning, the provisioning process will also be postponed. See Check Folder Provisioning Progress to determine the state of the desired folders (change “2015-06-22” to the rescheduled date and time):
-- The max number of folder items
declare @maxItems int = 500
-- The desired reschedule date
declare @rescheduleDate datetime2(7) = '2015-06-22'
update CMTEUP_PublicFolderJob
set ScheduledStart = @rescheduleDate
where PublicFolderJobID in
(
SELECT j.PublicFolderJobID
from CMTEUP_PublicFolderJob j
inner join CMTEUP_PublicFolder f on j.SourcePublicFolderID = f.PublicFolderID
where f.ItemCount > @maxItems
)
Find Source Folders with Jobs Not Yet Processed by Change Detection
To find source folders not yet processed by change detection, run the following SQL command:
select j.PublicFolderJobID, j.SourcePublicFolderID, sfs.ServerName AS SourceServerName, sf.Name AS SourceName, sf.FolderPath AS SourceFolderPath, j.LastChangeDetectionDate, sf.ContentChangeDate AS SourceContentChangeDate
FROM CMTEUP_PublicFolderJob j
INNER JOIN CMTEUP_PublicFolder sf
ON j.SourcePublicFolderID = sf.PublicFolderID
INNER JOIN CMTEUP_Server sfs
ON j.SourceServerID = sfs.ServerID
WHERE j.LastChangeDetectionDate IS NULL
Sample Output

Find Target Folders with Jobs Not Yet Processed by Change Detection
To find target folders not yet processed by change detection, run the following SQL command.
|
|
Change detection only checks target folders if bi-directional syncing is enabled. |
-- Change detection only checks target folders if bi-directional syncing is enabled
declare @bidi INT
set @bidi = (select PFCoexistenceMode from CMTEUP_Settings)
select j.PublicFolderJobID, j.TargetPublicFolderID, tfs.ServerName AS TargetServerName, tf.Name AS TargetName, tf.FolderPath AS TargetFolderPath, j.LastChangeDetectionDate, tf.ContentChangeDate AS TargetContentChangeDate
from CMTEUP_PublicFolderJob j
INNER JOIN CMTEUP_PublicFolder tf
ON j.TargetPublicFolderID = tf.PublicFolderID
INNER JOIN CMTEUP_Server tfs
ON j.TargetServerID = tfs.ServerID
where j.LastChangeDetectionDate IS NULL AND @bidi = 1
Table Definitions
Below is a description of the noteworthy columns for the Public Folder and Public Folder Job tables.
CMTEUP_PublicFolder
This table includes all Rationalized public folders from the Source and Target forests:
-
PublicFolderID: Unique public folder ID
-
Name: Name of the public folder
-
FolderPath: Full Folder Path
-
ParentFolderID/ParentPath: These two columns will reference the Parent Folder. If this reference is out of sync, Child folder will not be visible in the UI.
-
AttributeChangeDate/AttributeChanged: Indicate when a folder attribute (proxy address, permissions) has changed.
-
ContentChangeDate/ContentChanged: Indicate when new contents were added to the folder.
-
IsDeleted: This will be set to 1 if the folder was deleted.
CMTEUP_PublicFolderJob
This table includes all the Active public folder jobs. See CMTEUP_PublicFolderJobArchive for all Completed public folder jobs.
-
PublicFolderJobID: Unique Job ID for each job
-
ScheduleStart: This column determines when the job will be submitted by MCP service.
-
SourceServerID/TargetServerID: Identify the source and target Exchange Server
-
SourcePublicFolderID/TargetPublicFolderID: These two columns will reference the respective public folder ID in the CMTEUP_PublicFolder table.
-
BiDirectional: Bi-Directional Setting
-
SyncCopy: True/false flag.
-
SyncCount: Number of times a Sync Copy has completed.
-
Result_ErrorMessage: Last Error message will be recorded here.
-
Result_ErrorCount: Number of Errors observed.
-
JobStatusID: Job Status description can be found in CMTEUP_JobStatus table.
-
LastChangeDetectionDate: The last time the change detection worker processed this job.
Job States
Public Folder Job Status

Public Folder Migration Job flow
-
Scheduled: Job has been scheduled, but not yet started.
-
Started: Folder sync (if necessary, create folder and sync folder attributes and permissions) has started.
-
Provisioned: Folder sync has completed and content sync is ready to start.
-
In Progress: Folder item copy has started.
-
Completed: Folder item copy is done.
Public Folder Migration Engine Folder Handling Notes
If the public folder does not contain any items, the public folder migration engine will skip the folder except when Source to Target Content Deletes are selected to be synced in the Migrator Pro for Exchange Public Folder Settings. If Source to Target Content Deletes are checked then the engine will check for deleted items in source and delete them in target accordingly.
Migrator Pro for Exchange Public Folder Migration Child Job Management
When an administrator creates a public folder migration job using the Migrator Pro for Exchange Admin Portal or the public folder Job Importer utility, Migrator Pro for Exchange will check if a job already exists for the source folder or any child of the source folder. A child folder will belong to the same forest as its parent and reside on the same server (or mailbox in the case of Exchange 2013). If a child folder with an existing migration job is detected (in the case of a drag and drop in the UI, Migrator Pro for Exchange will display a warning dialog asking the user if they want to modify the child jobs) Migrator Pro for Exchange will update the job’s target folder and target server as well as the job’s sync interval and scheduled start fields. Finally, Migrator Pro for Exchange will reset the modified job’s status to Scheduled and its sync count to zero (0).
Appendix H: Mailbox Permissions Migrated
When a mailbox is submitted for migration, the Submit Pending Jobs activity will read the following mailbox permissions:
Exchange Permissions:
ChangePermission
DeleteItem
ReadPermission
ChangeOwner
FullAccess
Send On Behalf
NT Permissions:
Send-As
Receive-As
Mailbox Folder Permissions:
All mailbox folders
All trustees, except Default and Anonymous
All rights including: Owner, PublishingEditor, PublishingAuthor, Editor, Author, NoneditingAuthor, Contributor, Reviewer, CreateItems, DeleteAllItems, DeleteOwnedItems, EditAllItems, EditOwnedItems, FolderContact, FolderOwner, FolderVisible and ReadItems
|
|
Mailbox folder permissions are automatically migrated by Exchange. However, to enable Exchange to do so successfully, the following must be done prior to moving the mailbox:
|
Once the mailbox migration has completed, the permissions found in the CMTEUP_UserMailboxPermissions table are processed. For each permission, the trustee is opened in the Source AD and a matching Target trustee is located using:
Mailbox GUID
Primary SMTP
Common Name
SAM Account Name
If no match is found, the MCP waits and retries applying the permission. This retry process can be configured in the Mailbox Settings with the Mailbox Permissions Retries setting.
Appendix I: How to Process GDPR Requests
What is a GDPR Request?
The General Data Protection Regulations (GDPR) is the new European Union (EU) data protection regulations which go into effect May 25th, 2018. Under the GDPR individuals have certain rights to their personal data. They can make requests to exercise those rights to the data controller, and the controller must respond within 1 month. It is expected that the controller will verify the identity of the requestor.
There are four primary types of GDPR requests:
-
Export – Request for a copy of all personal data about an individual held by this controller and any related processors. Must be in a commonly accepted portable data format.
-
Update – Request to rectify inaccurate personal data.
-
Delete – Request to remove all personal data about an individual from our systems. Can be initiated by an individual or by a revocation of consent process. Includes burden of proof. (Ideally follow a delete with an export to show no remaining data)
-
Hold – Request to halt processing of personal data but not delete that data.
How to handle GDPR Requests for Migrator Pro for Exchange
When Migrator Pro for Exchange is installed, the data associated with the application is hosted locally within the client’s environment. The client has full control over this data. By default, the user and configuration data is stored in the SQL database called, “ExchangePro_<date>”. It is assumed the operator has the proper administrative SQL Permissions to execute the following methods outlined.
SQL Tables containing User data:
-
[ExchangePro_<Date>].[dbo].[CMTEUP_PersonADData]
Unique Key Look-up Columns:
[sAMAccountName]
[userPrincipalName]
-
[ExchangePro_<Date>].[dbo].[CMTEUP_Person]
Unique Key Look-up Columns:
[DistinguishedName]
[Email]
Where does the Migrator Pro for Exchange get its user data?
All user data within Migrator Pro for Exchange is derived from the source Active Directory Forest configured in the product. Therefore, the authoritative source of any user related data stored in Migrator Pro for Exchange is Active Directory. Any remediation required from a GDPR request should first be remediated in Active Directory or the source feeding Active Directory. Once that user data is updated in the source directory, running a new discovery within the product will update those values as well.
The following sections will provide guidance on fulfilling the 4 primary GDPR request types.
-
Exports – Request for a copy of all personal data about an individual held by this controller and any related processors. Must be in a commonly accepted portable data format.
Migrator Pro for Exchange user data can be exported in many ways. The product interface provides export options for any discovered mailbox user. For more information, search the product help for “Exporting data to a CSV file”. There are also methods of exporting data using SQL Server Management Studio wizard.
For the purposes of this document, using PowerShell with the SQLPS Module is the recommended method to refine the results of the output. One may export any SQL Query result to a CSV file. Below is an example script to do so. Replace the variables to conform to your environment.
Import-Module sqlps
$SQLquery='SELECT * FROM [ExchangePro_<Date>].[dbo].[CMTEUP_Person]'
$result=invoke-sqlcmd -query $SQLquery -serverinstance <servername> -database <dbname>
$result |export-csv c:\temp\ExportQueryResults.csv -notypeinformation
-
Updates – Request to rectify inaccurate personal data.
As previously stated, all user data within Migrator Pro for Exchange is derived from the source Active Directory Forest configured in the product. Therefore, the authoritative source of user data is Active Directory. Any remediation required from a GDPR request should first be remediated in Active Directory or the source feeding Active Directory.
If editing the user data within SQL is still required, using any SQL editor such as SQL Server Management Studio, run an update command against one or more columns for one or more records. Below are examples to accomplish this. Note however, that any new discovery will update the values based on the source Active Directory.
Update multiple columns for a single record:
UPDATE [ExchangePro_<Date>].[dbo].[CMTEUP_Person]
SET <Column1 Name> = <New Value1>, <Column2 Name> = <New Value2>
WHERE userPrincipalName='<Unique ID>'
UPDATE [ExchangePro_<Date>].[dbo].[CMTEUP_PersonADData]
SET <Column1 Name> = <New Value1>, <Column2 Name> = <New Value2>
WHERE userPrincipalName='<Unique ID>'
Update multiple columns for multiple records:
UPDATE [ExchangePro_<Date>].[dbo].[CMTEUP_Person]
SET <Column1 Name> = <New Value1>, <Column2 Name> = <New Value2>
WHERE DistinguishedName='<Unique ID>' OR DistinguishedName='<Unique ID>'
UPDATE [ExchangePro_<Date>].[dbo].[CMTEUP_PersonADData]
SET <Column1 Name> = <New Value1>, <Column2 Name> = <New Value2>
WHERE userPrincipalName='<Unique ID>' OR userPrincipalName='<Unique ID>'
Update multiple columns for multiple records using a list:
UPDATE [ExchangePro_<Date>].[dbo].[CMTEUP_Person]
SET <Column1 Name> = <New Value1>, <Column2 Name> = <New Value2>
WHERE DistinguishedName IN ('<Unique ID1>', '<Unique ID2>', '<Unique ID3>')
UPDATE [ExchangePro_<Date>].[dbo].[CMTEUP_PersonADData]
SET <Column1 Name> = <New Value1>, <Column2 Name> = <New Value2>
WHERE userPrincipalName IN ('<Unique ID1>', '<Unique ID2>', '<Unique ID3>')
-
Deletes – Request to remove all personal data about an individual from our systems. Can be initiated by an individual or by a revocation of consent process. Includes burden of proof. (Ideally follow a delete with an export to show no remaining data.)
Using any SQL editor such as SQL Server Management Studio, run a Delete command against one or more records. Below are examples to accomplish this. However, as previously stated, if the user is not deleted in the source Active Directory during any subsequent new discovery the user will be re-populated into SQL. The only way to truly remove the data is to delete the source user or delete the entire SQL database when it is no longer required.
Delete a single record then verify:
DELETE FROM [ExchangePro_<Date>].[dbo].[CMTEUP_Person]
WHERE DistinguishedName='<Unique ID1>'
SELECT * FROM [ExchangePro_<Date>].[dbo].[CMTEUP_Person]
WHERE DistinguishedName='<Unique ID1>'
DELETE FROM [ExchangePro_<Date>].[dbo].[CMTEUP_PersonADData]
WHERE userPrincipalName='<Unique ID1>'
SELECT * FROM [ExchangePro_<Date>].[dbo].[CMTEUP_PersonADData]
WHERE userPrincipalName='<Unique ID1>'
Delete multiple records then verify:
DELETE FROM [ExchangePro_<Date>].[dbo].[CMTEUP_Person]
WHERE DistinguishedName='<Unique ID1>' OR DistinguishedName='<Unique ID2>'
SELECT * FROM [ExchangePro_<Date>].[dbo].[CMTEUP_Person]
WHERE DistinguishedName='<Unique ID1>' OR DistinguishedName='<Unique ID2>'
DELETE FROM [ExchangePro_<Date>].[dbo].[CMTEUP_PersonADData]
WHERE userPrincipalName='<Unique ID1>' OR userPrincipalName='<Unique ID2>'
SELECT * FROM [ExchangePro_<Date>].[dbo].[CMTEUP_PersonADData]
WHERE userPrincipalName='<Unique ID1>' OR userPrincipalName='<Unique ID2>'
Delete multiple records then verify:
DELETE FROM [ExchangePro_<Date>].[dbo].[CMTEUP_Person]
WHERE DistinguishedName IN ('<Unique ID1>', '<Unique ID2>', '<Unique ID3>')
SELECT * FROM [ExchangePro_<Date>].[dbo].[CMTEUP_Person]
WHERE DistinguishedName IN ('<Unique ID1>', '<Unique ID2>', '<Unique ID3>')
DELETE FROM [ExchangePro_<Date>].[dbo].[ CMTEUP_PersonADData]
WHERE userPrincipalName IN ('<Unique ID1>', '<Unique ID2>', '<Unique ID3>')
SELECT * FROM [ExchangePro_<Date>].[dbo].[ CMTEUP_PersonADData]
WHERE userPrincipalName IN ('<Unique ID1>', '<Unique ID2>', '<Unique ID3>')
-
Holds – Request to halt processing of personal data but not delete that data.
As with exporting user data, this can also be accomplished using the product interface. Halting a user from processing within Migrator Pro for Exchange can be achieved using the Blackout Times feature. The process has two steps.
-
Create a New Blackout Profile
-
Assign the Profile to the User(s)
Create a New Blackout Profile
To set blackout times spanning every day, all day:
-
Launch Migrator Pro for Exchange.
-
Click Blackout Times in the main toolbar.
-
Click Add Profile to create additional blackout profiles.
-
Name the Profile “User GDPR Hold” or equivalent. Click OK.
-
Within the Calendar view, double-click on today.
-
An appointment will open. Click the “All day event” checkbox.
-
Populate the Subject and Description Fields.
-
Click the “Edit Recurrence” button.
-
Select the “Daily” recurrence pattern.
-
Select the “No End Date” range of recurrence.
-
Click OK.
-
Click Save & Close.
Assign the Profile to the User(s)
The “default” blackout profile is initially applied to all user mailboxes. To set user mailboxes to a different blackout profile, select one or more mailboxes in the Mailboxes or Mailbox Jobs view and edit the “Properties” in the right-click menu.
To assign the new blackout profile to the desired user, follow these steps.
-
Launch Migrator Pro for Exchange.
-
Select the Forest where the user is located.
-
Locate the user(s).
-
Right-Click on the selected user(s).
-
Select Properties.
-
Place a check in the Blackout Times checkbox.
-
From the drop-down menu, select the new Blackout Profile created previously. The instructions above called it, “User GDPR Hold”.
-
Click OK.
-
The User record will update to display the new Blackout profile assigned.
Please note, manually suspended migrations ignore blackout periods if they are manually resumed, and will begin migrating immediately. For more information, search the product help for “Applying Blackout Times to the Forest”.