
Source Forest Configuration | Sites Tab
To view or edit the Sites tab for source forest configuration: From the Forest view toolbar, select a previously defined source Forest from the drop-down list, and then click the Sites tab. On this tab, all fields are displayed whether or not the Advanced checkbox is marked.
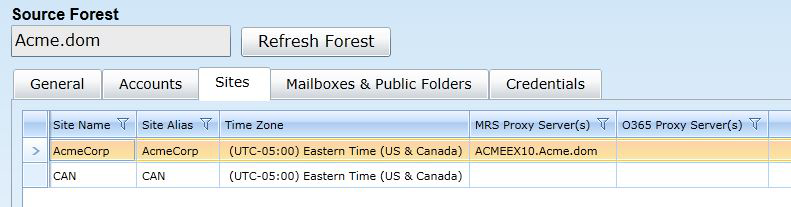
The table in this view displays a list of the AD sites that were found in your environment for the selected forest:
Most of the settings in this table can be edited:
-
Site Name: Displays the name of the migration site.
-
Site Alias: Displays the user-defined name for the migration site. Actual Site Names are often cryptic or otherwise difficult to read, so Migrator Pro for Exchange lets you assign "friendlier" shorthand names ("aliases") to identify the sites within Migrator Pro for Exchange features. This is an optional but popular feature, which can also be useful to differentiate among duplicate or very similar Site Names—as sometimes occurs if you add external forests to your project. To edit the alias value, just click inside the cell and the value becomes editable.
-
Time Zone: Displays the time zone of the migration, which Migrator Pro for Exchange uses to calculate configured blackout periods for a given site. An AD site may span several time zones, but Migrator Pro for Exchange associates each site with a single time zone. To change a time zone setting: Click inside the cell to make the value editable (a small triangle appears), then click the triangle to view a list of available options, and select the time zone you want to assign to this forest.
-
MRS Proxy Server(s): Displays the Exchange Mailbox Replication Service (MRS) proxy servers that Migrator Pro for Exchange has discovered for the site. Server names are separated with commas. You can manually define the publicly addressable names of the MRS proxy servers for the site. Manually entered server names are not overwritten by scheduled or manual forest refreshes.
To manually define MRS Proxy Server(s): Click inside the cell to make the values editable, and enter publicly addressable names for the site's MRS proxy servers, separating multiple names with commas.
|
|
Remember to click Save Forest (in the Forest toolbar above the tabs) to save any changes you make to these settings. |

Source Forest Configuration | Mailboxes & Public Folders Tab
To view or edit the Mailboxes & Public Folders tab for source forest configuration: From the Forest view toolbar, select a previously defined source Forest from the drop-down list, and then click the Mailboxes & Public Folders tab. On this tab, all options are displayed whether or not the Advanced checkbox is marked.
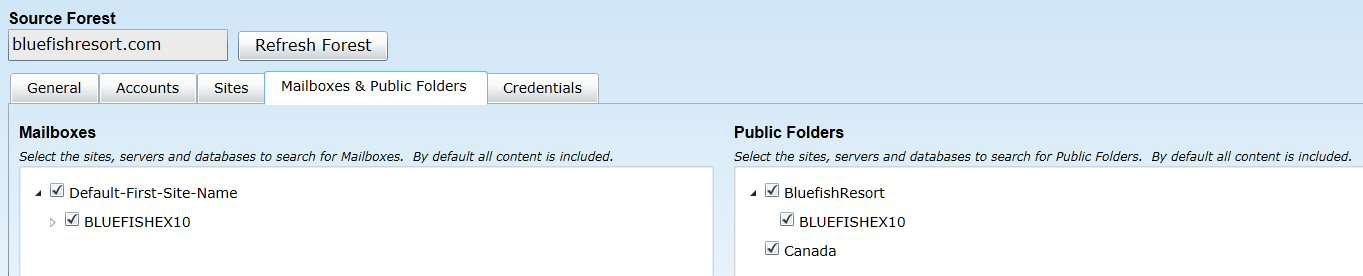
Mailboxes Section
Select the sites, servers and databases you want Migrator Pro for Exchange to search for mailboxes in this forest to migrate. All content is selected by default.
You can right-click in the list area to select options to expand/collapse levels of the tree.
Public Folders Section
Select the sites, servers, and databases you want Migrator Pro for Exchange to search for public folders in this forest to migrate. All content is selected by default.
You can right-click in the list area to select options to expand/collapse levels of the tree.
Source Forest Configuration | Credentials Tab
To view or edit the Credentials tab for source forest configuration: From the Forest view toolbar, select a previously defined source Forest from the drop-down list, and then click the Credentials tab. On this tab, all options are displayed whether or not the Advanced checkbox is marked.
The table in this tab shows the credentials that are available for Migrator Pro for Exchange to use for its public folder Workers in the selected forest. (Source and Target credentials are selected in the Worker’s settings, and the credentials defined here make up the list of selectable credentials for the Workers.)

To define a credential for this forest: Click the Add button (below the table) to open the Forest Credential screen:
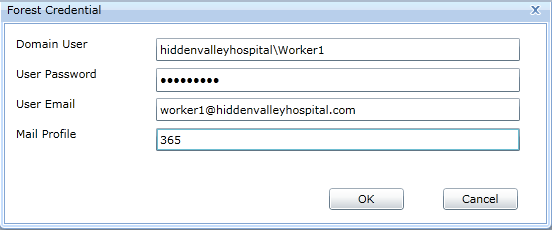
... and enter this information:
-
Domain User: The Domain user (in Domain\Username format).
-
User Password: The password for the user
-
User Email: The email address of the user
-
Mail Profile: The name of the Outlook Profile that has been preconfigured on the Worker machine. A Worker machine without Outlook installed cannot use credentials with Outlook Profiles. This field should remain blank to create a credential for Workers that do not have Outlook installed.
Then click OK to create a new credentials record and dismiss the Forest Credential screen.
You can also Edit or Delete a previously defined credential.
Target Forest Configuration | General Tab
To view or edit the General tab for target forest configuration: From the Forest view toolbar, select the previously defined target Forest from the drop-down list, and then click the General tab. The General tab appears in its default view when the Advanced checkbox option is left unmarked:
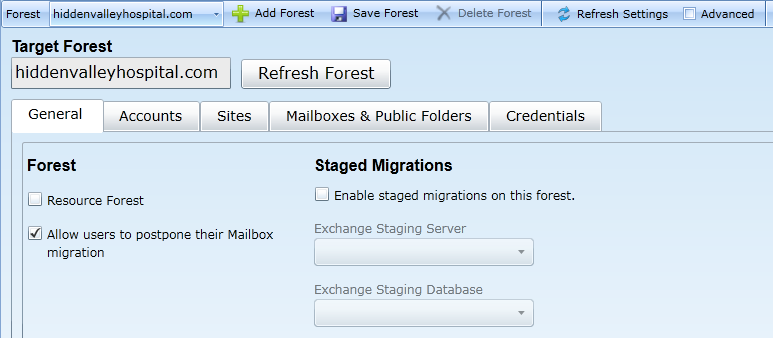
Or you can mark the Advanced checkbox to view additional options, although most admins simply accept the default values for these Advanced settings:
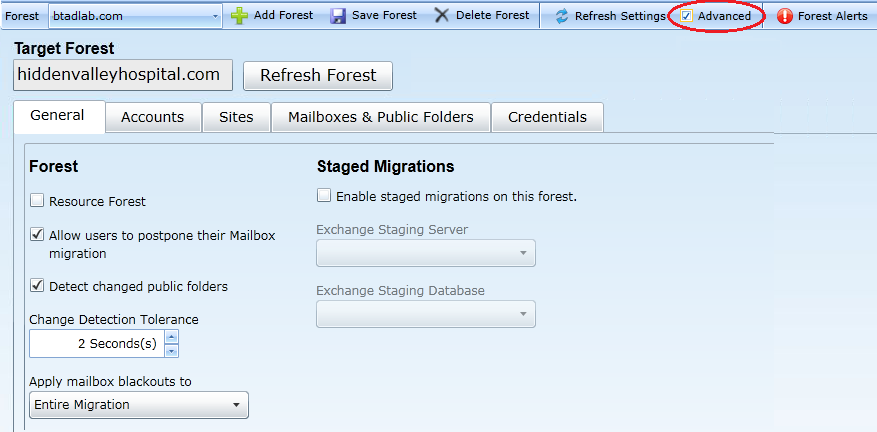
Forest Section
In the default (non-Advanced) view of this tab, the Forest section contains these two settings for the selected forest:
-
Resource Forest: If the target Exchange environment is configured as an Exchange Resource Forest environment, mark the Resource Forest checkbox to create a “Linked User” relationship between the source and target account. This option applies only for Inter-Org migrations; and this checkbox appears only when configuring the Home Forest. (For more information about resource forests, see Microsoft's article http://technet.microsoft.com/en-us/library/aa998031.aspx and other Microsoft resources.)
-
Allow users to postpone their Mailbox migration: Mark this checkbox if you want users to be able to set their own migration blackout periods in Migrator Pro for Exchange's User Portal.
|
|
The E2E_Schedulers group in Active Directory (if it exists) will override this user-postpone option. |

These settings, also in the Forest section, appear only in Advanced mode:
-
Detect changed public folders: Mark this checkbox if you want Migrator Pro for Exchange to monitor public folders in the organization to detect forest-level additions, deletions and moves. The option is enabled by default, and we recommend you leave it enabled. If this feature is turned off, the admin and Migrator Pro for Exchange will not know when public folders have changed after the initial sync. This would be irrelevant if you do not intend to re-sync public folders after their initial sync, but would be necessary to permit future syncs.
-
Change Detection Tolerance: The spinner control lets you set a wait period for Migrator Pro for Exchange's Detect feature (above, if enabled), specifying a number of seconds for Migrator Pro for Exchange to ignore changes to public folders after the time MAPI reports the most recent sync. For example, if set to 5 seconds, any changes detected within 5 seconds of the last sync are ignored. The default (and recommended) value is 2 seconds.
-
Apply mailbox blackouts to: Blackout periods can be defined in Migrator Pro for Exchange's Blackout Times view (see the Blackout Times topic for more information). The drop-down list here lets you specify one of three options for applying blackout times to the forest:
-
Entire Migration (default, and recommended): All Mailbox jobs are affected by blackouts during the entire migration.
-
Initial Migration: Mailbox jobs marked as "Suspend when ready to complete" are affected by blackouts until the migration reaches 95% complete (pre-AutoSuspend). All other mailbox jobs are affected by blackouts during the entire migration. Choose this setting when you want blackouts to be enforced during the pre-staging process, but not for the cutover process.
-
Final Migration\Cutover: Mailbox jobs marked as "Suspend when ready to complete" are affected by blackouts after the migration reaches 95% complete (post-AutoSuspend, cutover). All other mailbox jobs are affected by blackouts during the entire migration. Choose this setting when you want all mailbox jobs to be prevented from Cutover during the blackout period, but you want to allow “Suspend Until Ready to complete” jobs to continue working up to the 95% complete stage (pre-staging).
-