
Tenant Forest (Office 365) Configuration | Credentials Tab
To view or edit the Credentials tab for tenant forest configuration: From the Forest view toolbar, select a previously defined tenant Forest from the drop-down list, and then click the Credentials tab. On this tab, all options are displayed whether or not the Advanced checkbox is marked.
The table in this tab shows the credentials that are available for Migrator Pro for Exchange to use for its public folder Workers in the selected forest. (Source and Target credentials are selected in the Worker’s settings, and the credentials defined here make up the list of selectable credentials for the Workers.)

To define a credential for this forest: Click the Add button (below the table) to open the Forest Credential screen:
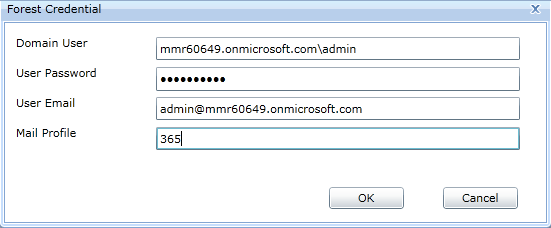
... and enter this information:
-
Domain User: The Domain user (in Domain\Username format).
-
User Password: The password for the user
-
User Email: The email address of the user
-
Mail Profile: The name of the Outlook Profile that has been preconfigured on the Worker machine. A Worker machine without Outlook installed cannot use credentials with Outlook Profiles. This field should remain blank to create a credential for Workers that do not have Outlook installed.
Then click OK to create a new credentials record and dismiss the Forest Credential screen.
You can also Edit or Delete a previously defined credential.
3. Managing Migrator Pro for Exchange Workers
Migrator Pro for Exchange supports configuration of an AWD (Automated Workload Distribution) process for the migration of public folders. The AWD process uses multiple workers assigned different roles (multiple computers working in parallel) in the overall migration process, to scale public folder migration and improve throughput when migrating larger volumes of public folders. Migrator Pro for Exchange's Workers view lists all installed public folder Workers that are configured to point to the Migrator Pro for Exchange SQL database. The Migrator Pro for Exchange server automatically becomes the local master worker when Migrator Pro for Exchange is installed, but additional remote workers can be defined.
The Migrator Pro for Exchange Installation and Configuration Guide documents the installation of Migrator Pro for Exchange public folder Workers.
To open the Workers view in the Migrator Pro for Exchange Admin Portal:
-
Click the Workers button in Migrator Pro for Exchange's main toolbar.
The Migrator Pro for Exchange Workers view features a table showing the current state and processing statistics of each worker, and this information can be sorted and filtered as needed:

Enabling/Disabling Workers
You can enable/disable the processing of public folder jobs by a worker. For example, you may want to temporarily disable a worker to isolate any errors when troubleshooting an issue. To enable/disable the processing of public folder jobs by a worker (beginning in the Workers view):
-
Click on a worker in the table to highlight its row, and then click the Enable or Disable button.
A worker can also be enabled or disabled when viewing the Migrator Pro for Exchange Worker detail dialog.
Viewing and Editing Worker Settings
To edit (or just view) the configuration settings of any individual worker in the Workers table:
-
Double-click on a Worker row in the table (or select a Worker in the table and then click the Modify button) to open the Migrator Pro for Exchange Worker dialog box for the selected Worker:
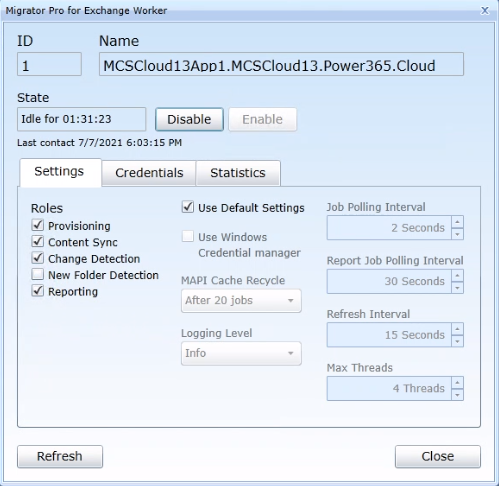
In the dialog box above the tabs, you can view and edit these settings:
-
ID: The worker ID, an arbitrary index number for Migrator Pro for Exchange.
-
Name: The worker name (also the worker's address).
-
State: The current state of the worker.
-
Disable or Enable: Click Disable to disable an enabled worker, or click Enable to enable a disabled worker.
In the Settings tab you can view and edit these settings:
-
Roles: Select the role(s) you want the worker to perform by marking/unmarking these checkbox options:
-
Provisioning: If marked, this worker will create the needed public folders on the target. One or more workers can have this role. We recommend you leave this marked unless you are designating different workers to different tasks. (You may want to create multiple workers to assign different types of roles to different workers—for example, to designate a particular set of workers to handle only the content sync actions.)
-
Content Sync: If marked, this worker will copy public folder contents. There can be one or more workers with this role. We recommend you leave this marked unless you are designating different workers to different tasks. (You may want to create multiple workers to assign different types of roles to different workers—for example, to designate a particular set of workers to handle only the content sync actions.)
-
-
Change Detection: If marked, this worker will check for changes in public folders. One or more workers can have this role. We recommend you leave this marked unless you are designating different workers to different tasks. (You may want to create multiple workers to assign different types of roles to different workers—for example, to designate a particular set of workers to handle only the content sync actions.) Note that if Change Detection is not enabled on any workers, Public Folder Jobs that are created with Sync Interval will not sync again after the initial copy, since no changes will be detected.
-
New Folder Detection: If marked, this worker will check for new public folders. One or more workers can have this role.
-
Reporting: If marked, this worker will collect public folder data for reporting. One or more workers can have this role. Workers assigned this role are the workers that will run the PF Content Analysis job. We recommend you leave this marked unless you are designating different workers to different tasks. (You may want to create multiple workers to assign different types of roles to different workers—for example, to designate a particular set of workers to handle only the content sync actions.)
-
Use Default Settings: If checked, the worker will use the default Worker settings (and General settings for Logging Level) configured in the Settings view instead of the settings on the worker detail dialog.
-
Use Windows Credential Manager: If checked, Worker (MAPI) credentials are cached in Windows Credential Manager, removing the need to use the saved password that was configured for public folder migrations.
-
MAPI Cache Recycle: Number of jobs after which the MAPI cache should be cleared. Larger numbers increase performance, but may cause instability if too large. The practical limit depends on your local environment. The default is After 20 jobs.
-
Logging Level: Determines level of detail in program logging for public folder migrations. Options are:
-
Off: No public folder messages are logged
-
Error: Only public folder error messages are logged
-
Warning: Public folder warnings and error messages are logged
-
Info: Public folder informational, warnings, and error messages are logged
-
Verbose: All public folder messages are logged including debug and trace messages
-
-
Job Polling Interval: How often the worker should poll for new jobs. We recommend you leave this at the default (every 2 seconds) unless this worker is configured for only the Reporting role (see next field below).
-
Report Job Polling Interval: How often the worker should poll for report jobs. We recommend you leave this at the default (every 30 seconds) unless this worker is configured for only the Reporting role.
-
Refresh Interval: How often the worker should look for any changes to its settings in the SQL Worker table. We recommend you leave this at its default (every 15 seconds).
-
Max Threads: The number of items that are processed concurrently for a public folder job. The default is 4 threads. For best performance, this setting should not be lower than the number of cores in the Worker machine, unless the machine will share its resources with other (non-Worker) functions. The setting can be increased to match the number of cores in a dedicated Worker machine (if greater than the default 4).
In the Credentials tab you can view and edit these settings:
-
Exchange (MAPI)
-
Source Credentials: The Exchange credentials to use for the source. Credentials are maintained in the Forest Credentials tab.
-
Target Credentials: The Exchange credentials to use for the target. Credentials are maintained in the Forest Credentials tab.
-
|
|
The selected credentials should not include a Mail Profile (defined in the Forest Credentials tab) if Outlook is not installed on the Worker. |

-
PowerShell
-
Source Credentials: The PowerShell credentials to use for the source. Credentials are maintained in the Forest Credentials tab.
-
Target Credentials: The PowerShell credentials to use for the target. Credentials are maintained in the Forest Credentials tab.
-
The Statistics tab is described in the next subtopic below.
Click the Close button to save any changes and close the Migrator Pro for Exchange Worker dialog box (and return to the Workers table).
Viewing Worker Processing Statistics
To view the processing statistics for an individual worker in the Workers table:
-
Double-click on a Worker row in the table (or select a Worker in the table and then click the Modify button) to open the Migrator Pro for Exchange Worker dialog box for the selected Worker, and then click the Statistics tab in the Migrator Pro for Exchange Worker dialog box.
In the Statistics tab, select a Time Period from the drop-down list to define the scope of the statistics you want to see. The Totals will display the numbers of migrated folders, items, bytes and elapsed time for the selected time period, and the average throughput over the period.
To close the dialog box: Click the Close button.
To view aggregate statistics for all Migrator Pro for Exchange Workers:
-
From the Workers table, click the Statistics button to open the Public Folder Statistics dialog box.
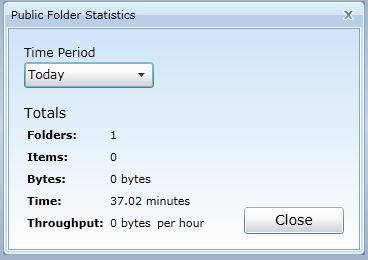
Select a Time Period from the drop-down list to define the scope of the statistics you want to see. The Totals will display the numbers of migrated folders, items, bytes and elapsed time for the selected time period, and the average throughput over the period.
To close the dialog box: Click the Close button.
Viewing the Migrator Pro for Exchange Worker Application
The Migrator Pro for Exchange Worker application is installed on the worker machine and lets you enable/disable the worker and view its migration processing logs.
To open the Migrator Pro for Exchange Worker application:
-
On the machine hosting the worker: Click the Migrator Pro for Exchange Worker desktop shortcut, or right-click on the Migrator Pro for Exchange icon in the system tray and click Open.
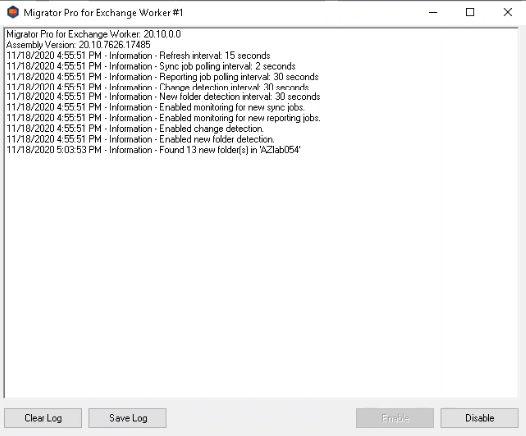
The Migrator Pro for Exchange Worker application then opens the log screen, with four buttons:
-
Clear Log: The displayed log will be cleared.
-
Save Log: A text file of the displayed log will appear and can be saved.
-
Enable: Enables public folder processing for the worker (if disabled). This option is also available by right-clicking on the Migrator Pro for Exchange icon in the system tray and selecting Enable.
-
Disable: Disables public folder processing for the worker (if enabled). This option is also available by right-clicking on the Migrator Pro for Exchange icon in the system tray and selecting Disable.
To view the worker's configuration settings: Right-click on the Migrator Pro for Exchange icon in the system tray, and select Settings.
4. Managing Configuration Settings
Many Migrator Pro for Exchange configuration settings can be entered, viewed and edited in the tabbed panels of the Configuration Settings screen.
Click Settings from the main Admin Portal toolbar to open the Migrator Pro for Exchange Configuration Settings screen, which contains several tabs for different types of settings. The default view of the Settings screen shows only the tabs with settings that are commonly used in many environments:

The default view hides the tabs that contain settings changed by only a few users from their default values, but you can mark the [X] Advanced checkbox (in the toolbar) to show the tabs that contain these Advanced settings:

The settings on these tabs are documented separately under these topic headings:
General Tab (Advanced view only)
Mailboxes Tab (Advanced view only)
Workers Tab (Advanced view only)
Scripts Tab (Advanced view only)
Settings | General Tab
|
|
This tab is available only in Advanced mode. The tab appears only if the Advanced checkbox (in the Settings toolbar) is marked. |

To view or edit Configuration Settings (any tab): From the Admin Portal main toolbar, click Settings to open the Configuration Settings screen. Then click the tab for the settings you want to view or edit.
To view or edit the General configuration settings (from any other tab on the Configuration Settings screen): Make sure the Advanced checkbox is marked, and click the General tab.
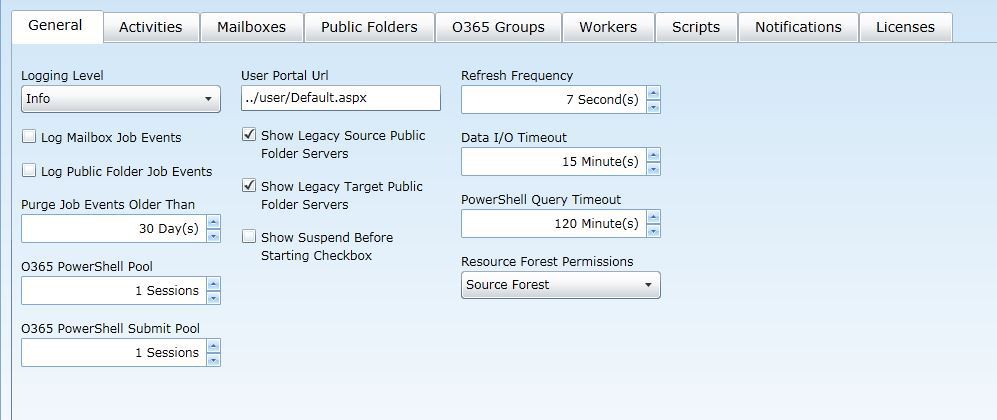
These General settings let you configure options for logging and the user interface:
-
Logging Level: Select one of the options for logging levels within the Migrator Pro for Exchange service for both mailbox and public folder migrations:
-
Off: No messages are logged.
-
Error: Only error messages are logged.
-
Warning: Warnings and error messages are logged.
-
Info: Informational, warnings, and error messages are logged.
-
Verbose: All messages are logged including debug and trace messages.
-
-
Log Mailbox Job Events: If checked, mailbox job events are saved to CMTEUP_JobEvents.
-
Log Public Folder Job Events: If checked, public folder job events are saved to CMTEUP_PublicFolderJobEvents.
-
Purge Job Events Older Than: Number of days after which job event records should be purged from the logging database. We recommend you leave this at its default (30 days), to maintain a month's worth of records in the database but not take up too much space in SQL. A higher setting would generate bloated records in SQL, while a lower setting may leave too few records to be useful in the event you ever need them for troubleshooting.
-
O365 PowerShell Pool: Sets the maximum number of Office 365 PowerShell sessions to establish. The default is 1. We recommend this value be set to match the number of available Office 365 sessions for your tenant.
-
O365 PowerShell Submit Pool: Sets the number of Office 365 sessions to use for PowerShell queries during mailbox migrations. This feature improves overall migration rates by distributing the workload across multiple Office 365 sessions running in parallel. The valid range is 1 to 100, and the default is 1. We recommend a value based on number of available Office 365 sessions for your tenant.
-
User Portal Url: The URL of the Migrator Pro for Exchange portal.
-
Show Legacy Source Public Folder Servers: If checked, Exchange 2003/2007/2010 public folder servers are displayed in the Source folder hierarchy.
-
Show Legacy Target Public Folder Servers: If checked, Exchange 2003/2007/2010 public folder servers are displayed in the Target folder hierarchy.
|
|
Exchange 2013/2016 public folders can be split across multiple servers and mailboxes and will not show in a hierarchy. The public folder server and mailbox information will be displayed in the “hover over” text. The above configuration options allow the Legacy public folders to be displayed in a hierarchy. |
-
Show Suspend Before Starting Checkbox: If checked, mailbox jobs can be suspended before they start.
-
Refresh Frequency: How often to automatically refresh Migrator Pro for Exchange's UI. We recommend you leave this at its default (7 seconds). Changing this to a lower setting poses an increased burden on system resources, while a higher value diminishes the likelihood that any particular view is current. You can always manually refresh the screen whenever desired.
-
Data I/O Timeout: How long Migrator Pro for Exchange should wait for web service calls to complete before timing out. We recommend the default setting of 15 minutes, although you may want to temporarily set this higher to overcome a high rate of timeout errors. A lower setting will unnecessarily generate more timeout errors.
-
PowerShell Query Timeout: How long Migrator Pro for Exchange should wait for an on-premises only PowerShell reply to a query before concluding the query has failed, and giving up. We recommend you leave this at its default 120 minutes. A higher setting usually would not provide any benefit, since the HTTP request will have already timed out, while a lower setting may be too short for a PowerShell query to successfully complete, especially in a large distributed environment.
-
Resource Forest Permissions: Specifies which trustees to use to apply permissions during a Resource Forest migration. The default Source Forest option stamps the permissions from the source environment onto the target mailboxes and public folders. The Target Forest option is typically used only in a non-resource forest scenario, so that trustees from the Target forest are used to apply permissions.
|
|
Migrator Pro for Exchange will always use the target AD user account for GrantSendOnBehalf permissions regardless of this setting for this Resource Forest Permissions. Therefore all user accounts that have been specifically provided the delegated GrantSendOnBehalf permission must be included within the scope of directory synchronization. |
||
|
|
Remember to click Save Settings (in the toolbar above the tabs) to save any changes you make to these settings. | ||