
Settings | Workers Tab
|
|
This tab is available only in Advanced mode. The tab appears only if the Advanced checkbox (in the Settings toolbar) is marked. |
To view or edit Configuration Settings (any tab): From the Admin Portal main toolbar, click Settings to open the Configuration Settings screen. Then click the tab for the settings you want to view or edit.
To view or edit the Workers configuration settings (from any other tab on the Configuration Settings screen): Make sure the Advanced checkbox is marked, and click the Workers tab.
-
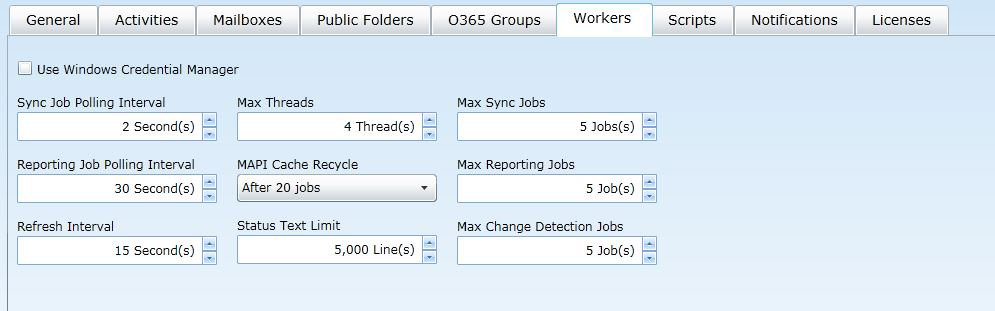
Use Windows Credential Manager: If checked, Worker (MAPI) credentials are cached in Windows Credential Manager.
-
Sync Job Polling Interval: How often Workers should poll for new sync jobs. Default is every 2 seconds.
-
Reporting Job Polling Interval: How often Workers should poll for new reporting jobs. Default is 30 seconds.
-
Refresh Interval: How often Workers should refresh their status. Default is every 15 seconds.
-
Max Threads: Number of items that are processed concurrently for a public folder job. Default is 4 threads.
-
MAPI Cache Recycle: After how many jobs should the MAPI cache be cleared. A larger number will increase performance, but may cause instability if too large. Default is After 20 jobs.
-
Status Text Limit: Maximum number of status text displayed in the Worker UI. Default is 5,000 lines.
-
Max Sync Jobs: Maximum number of sync jobs that should be assigned to each worker. Default is 5 jobs.
-
Max Reporting Jobs: Maximum number of reporting jobs that should be assigned to each worker at a time. Default is 5 jobs.
-
Max Change Detection Jobs: Maximum number of change detection jobs that should be assigned to each worker at a time. Default is 5 jobs.
|
|
Remember to click Save Settings (in the toolbar above the tabs) to save any changes you make to these settings. |
Settings | Scripts Tab
|
|
This tab is available only in Advanced mode. The tab appears only if the Advanced checkbox (in the Settings toolbar) is marked. |
To view or edit Configuration Settings (any tab): From the Admin Portal main toolbar, click Settings to open the Configuration Settings screen. Then click the tab for the settings you want to view or edit.
To view or edit the Scripts configuration settings (from any other tab on the Configuration Settings screen): Make sure the Advanced checkbox is marked, and click the Scripts tab.

-
Enable External Scripts: If checked, external scripts are enabled and the following options are available:
-
Scripts Folder: The scripts folder location (e.g. c:\contoso\scripts\ps\ )
-
Enable Prepare Move Request Script: If checked, enables external CrossForestPrep (to execute Prepare-MoveRequest.ps1). The name of the prepare move request script can be configured (e.g., Prepare-MoveRequest.ps1).
-
Enable Prepare Move Request Retry On Failure: If checked, enables retry behavior in cross-forest preparation, instead of failure.
-
Schedule Migration Script: Name of the script for scheduled migrations, e.g., Confirm-ScheduleMigration.ps1.
-
Begin Migration Script: Name of the script for started migrations, e.g., Confirm-BeginMigration.ps1.
-
End Migration Script: Name of the script for completed migrations, e.g., Confirm-EndMigration.ps1.
-
Failed Migration Script: Name of the script for failed migrations, e.g., Confirm-FailedMigration.ps1.
|
|
Remember to click Save Settings (in the toolbar above the tabs) to save any changes you make to these settings. |
Settings | Notifications Tab
Migrator Pro for Exchange helps facilitate sending notification emails to end users, to inform them of the status of their migration as it progresses through different stages. The program can use email notification templates to generate "form letters" to end users, with variables that Migrator Pro for Exchange will fill with information such as the recipient's email address, any cc recipients, the message Subject, and so forth. Other template attributes let you control the message format and event triggers and so forth. Notifications can be configured in four languages, English, French, German and Spanish, and any additional languages in the source Exchange environment. By default, the message sent to an end user is matched to the Culture value present on their mailbox object. If a value cannot be determined, English is used as the default language. Users can change their notification language by changing the preference on the End User Portal page.
The Notification templates are configured in this Notifications tab, and in a dialog box accessible from this tab. On this tab, all options are displayed whether or not the Advanced checkbox is marked.
To view or edit the Notifications configuration settings (from any other tab on the Configuration Settings screen): Click the Notifications tab.
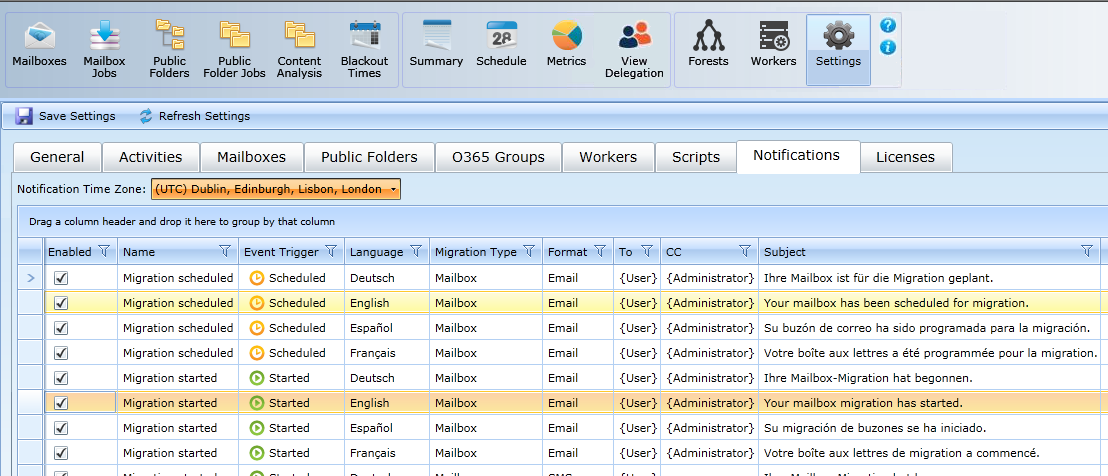
Select the Notification Time Zone from the drop-down list between the tabs and the table. This is the reporting time zone when date fields such as ScheduledStart are used in the notification message template body.
The table displays a list of available notification templates together with these attributes:
-
Enabled: Displays whether the template is enabled or disabled by the administrator. By default, Scheduled notification templates are always enabled.
-
Name: A descriptive identifying name to distinguish each template from the others in the list.
-
Event Trigger: Displays the status of the template, such as Scheduled or Completed.
-
Language: The language of the template. A full list of standard Language/Culture ID mappings is available in this Knowledge Base article.
-
Migration Type: The migration type of the template.
-
Format: Displays the type of media included in the template that goes out to users, such as Email or SMS.
-
To: The recipient of the notification.
-
CC: Any "carbon copy" (CC) recipient(s) of the notification.
-
Subject: The message Subject of this notification.
Migrator Pro for Exchange ships with five standard notification templates (Scheduled, Started, Completed, Error, and Migration automatically suspended). You can customize these with the Edit Template feature.
For any selected template (selected row in the table), the buttons across the bottom of the table let you Edit Template or Copy Template(s) or Delete Template(s). You can also Add Template.
The Add Template and Edit Template buttons open Migrator Pro for Exchange's Notification Template dialog box:
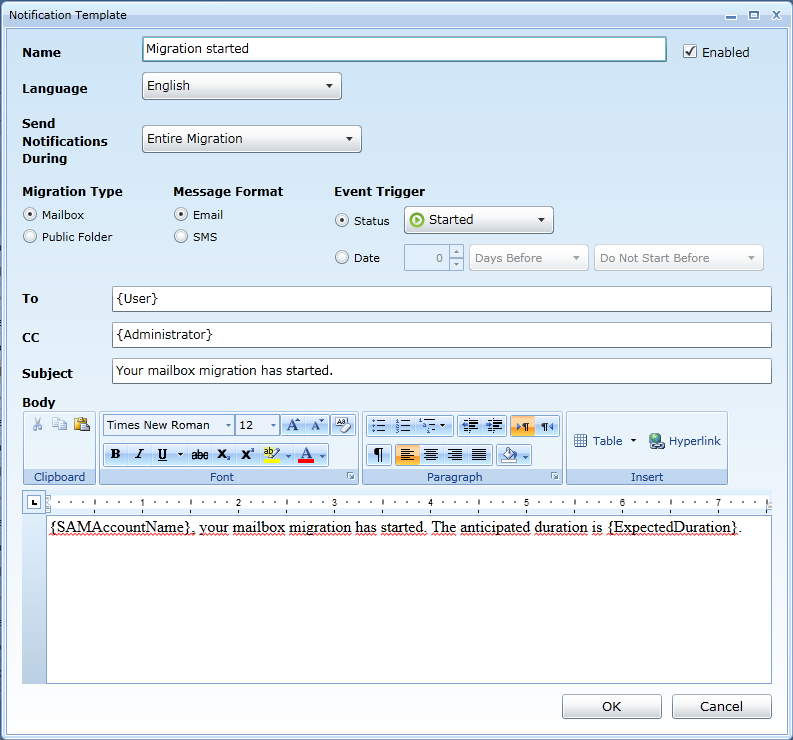
Enter or edit the settings in this dialog box:
-
Name: The name of the template, as it will appear in the Notifications table and other Migrator Pro for Exchange features.
-
Enabled (checkbox): Mark or unmark to make this template available (or unavailable) for Migrator Pro for Exchange to run.
-
Language (drop-down list): Specify the language for this template. Options are: English, French, German, Spanish, and any additional languages collected from the source mailbox properties.
-
Send Notifications During: Select an option from the drop-down list to specify the portion of the migration to which this notification applies. Options are: Entire Migration, Initial Migration, and Final Migration\Cutover.
|
|
Migrations scheduled using the Suspend when ready to complete option can have notifications defined for the Entire Migration, the Initial Migration or the Final Migration/Cutover. If a migration is scheduled without the Suspend when ready to complete option, the notifications will apply to the Entire Migration. |
-
Migration Type: Specify whether this notification is for a Mailbox or Public Folder migration.
-
Message Format: Specify whether this notification should be formatted as Email (sent as HTML messages) or SMS (sent as plain text messages). Switching from Email to SMS will erase any body text that may have already been entered.
-
Event Trigger: Select one of the two options to specify when this notification will be sent:
-
Status: If you select Status, then also specify (from the drop-down list) the condition that will trigger this notification:
-
Scheduled: Notification is sent to the user when the mailbox’s migration schedule is set.
-
Started: Notification is sent to the user when the migration begins.
-
Completed: Notification is sent to the user when the migration completes.
-
Error: Notification is sent to the user when the migration halts or errors.
-
-
Date: Use the controls here to specify a time condition that will trigger sending the emails generated from this template. You can specify a certain number of hours or days before the start or completion of the migration:
-
[spinner control]: The number (of hours or days).
-
[drop-down list]: Indicate whether the number specifies Days Before or Hours Before.
-
[drop-down list]: Indicate whether the trigger is relative to the start (Do Not Start Before) or end (Do Not Complete Before) of the migration.
-
-
-
To: Specify the message recipient(s), either as an SMTP address, or as the variable {User} or {Administrator} (including the curly brackets). You can specify multiple values here, separated by commas or semicolons or spaces.
-
CC: Specify anyone who should receive a copy of this notification, either as an SMTP address, or as the variable {User} or {Administrator} (including the curly brackets). You can specify multiple values here, separated by commas or semicolons or spaces.
-
Subject: Type the Subject of the email.
-
Body: The body contents of the email. This will be some combination of template text and one or more variables, as shown in the example below. If the Message Format (above) is set to Email, Migrator Pro for Exchange provides a rich-text editing bar (also shown in this example) that lets you further customize the appearance of the body text.
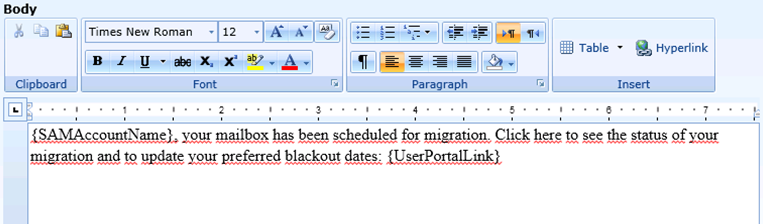
Within the template Body you can use these variables as you compose the text of your message:
|
Macro (Variable) |
Description |
Example |
|
{FullName} {Title} {FirstName} {LastName} {UserPortalLink} {SAMAccountName} {ExpectedDuration} {ScheduledStart} {ScheduledEnd} {DoNotCompleteBefore} {DoNotStartBefore} {ActualStart} {ActualEnd} {ErrorCount} {ErrorMessage} |
User’s First and Last Name User’s Title User’s First Name User’s Last Name Link to user portal page User’s Alias Expected duration of migration Scheduled time to start Scheduled time to end Do not complete migration before time Do not start migration before time Time migration started Time migration ended Number of errors during migration Error message during migration |
Scott Pepper Sergeant Scott Pepper
scott.pepper 01:04:38.4379257 Tuesday, April 12, 2016 3:30:44 PM (GMT) Tuesday, April 12, 2016 4:35:48 PM (GMT) Tuesday, April 12, 2016 3:30:44 PM (GMT) Tuesday, April 12, 2016 4:35:48 PM (GMT) Tuesday, April 12, 2016 3:30:44 PM Tuesday, April 12, 2016 4:35:48 PM 1 Mailbox is full |
|
|
If using any of the date variables in the template body, the time zone can be changed using the Notification Time Zone field on the Notifications tab. |
|
|
Remember to click the OK button at the bottom of this dialog box to save these notification template settings. And remember to click Save Settings (in the toolbar above the tabs) to save any changes you have made to other settings in the Notifications tab. |
Settings | Licenses Tab
The Licenses tab is where Migrator Pro for Exchange license keys are registered with the program. On this tab, all options are displayed whether or not the Advanced checkbox is marked.
To view or edit Configuration Settings (any tab): From the Admin Portal main toolbar, click Settings to open the Configuration Settings screen. Then click the tab for the settings you want to view or edit.
To view or edit the Licenses configuration settings (from any other tab on the Configuration Settings screen): Click the Licenses tab.
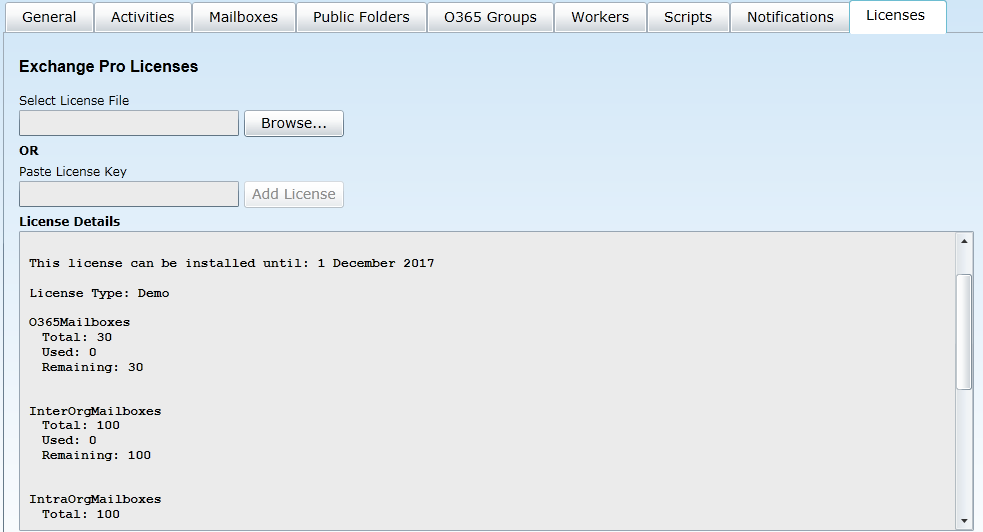
You can register a license by either of two methods:
-
Use the Browse... button to find and select the license file from some location on your local computer; or
-
Copy and paste the license key into the Paste License Key text box, and then click the Add License button.
|
|
Remember to click Save Settings (in the toolbar above the tabs) to save any changes you make to these settings. |