
13. Public Folder Jobs View
The Public Folder Jobs view lets you manage the sequence of migration requests for the selected migration destination.
|
|
Migrator Pro for Exchange logs an error message if a source folder is moved to a new location and the associated target folder already exists. For example, if \folderB is moved to \folderA\folderB in the target, and a different \folderA\folderB already exists: Failed to move folder '\folderB' to '\folderA\folderB' on server 'MyTargetServer1' System.Runtime.InteropServices.COMException (0x80040604): Error in IMAPIFolder.CopyFolder(FOLDER_MOVE): MAPI_E_COLLISION |

-
Click Public Folder Jobs in the main toolbar. The screen displays a list of folders ready for migration:

-
This view provides a number of details about the public folders being migrated.
-
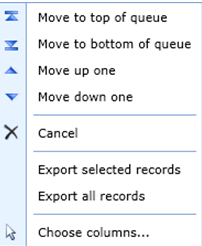
If you want to move one of the public folder migration jobs to the top/bottom of the migration queue, right-click on the selected public folder migration job, then click the Move to top of queue or Move to bottom of queue option, as desired.
-
If you want to move one of the public folder migration jobs by one, click Move up one or Move down one, as needed.
|
|
The above options have no effect on Active or In-Progress migration jobs. |
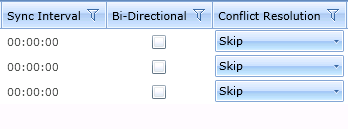
The Sync Interval, Bi-Directional, and Conflict Resolution settings for a job can be changed in the table:
You can also choose to Cancel selected jobs, Export information about selected jobs to a CSV file and change the columns in the view.
Public Folder Jobs History
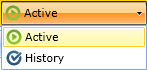
The default view is set to Active; however, when you select the History tab on the Public Folder Jobs screen, the view displays different information as well as migrations that have already completed and are not Submitted, Scheduled or In Progress.
Migrating Public Folders to Exchange Online
Migrator Pro for Exchange can migrate public folders to Exchange Online using either PowerShell or MAPI. The PowerShell option or MAPI option is selected from the Public Folders Migration Mode drop-down list on the General tab of the Office 365 Forest Configuration Settings screen.
To Migrate Public Folders to Exchange Online Using PowerShell
-
Click Public Folders in the main toolbar. The screen displays Source Folders on the left side and Target Folders on the right.
-
Click on the folders you want to send to the migration queue and drag them to the Target Folders pane.
-
The Migrate Public Folders wizard appears. Follow the instructions on the first screen to ensure that routing to the Exchange Online domain is configured correctly. When finished, click Next.

-
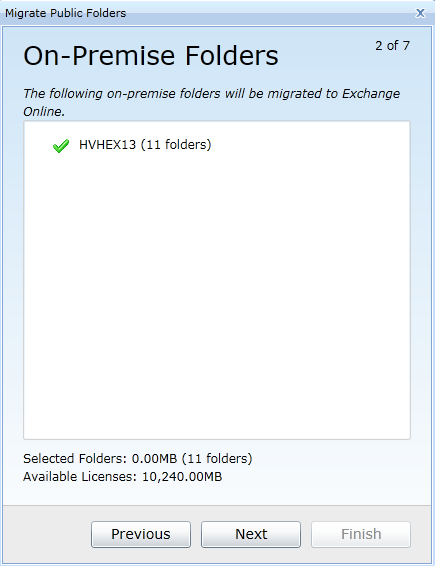
The On-Premise Folders screen appears. Select the folders to migrate and then click Next.
-
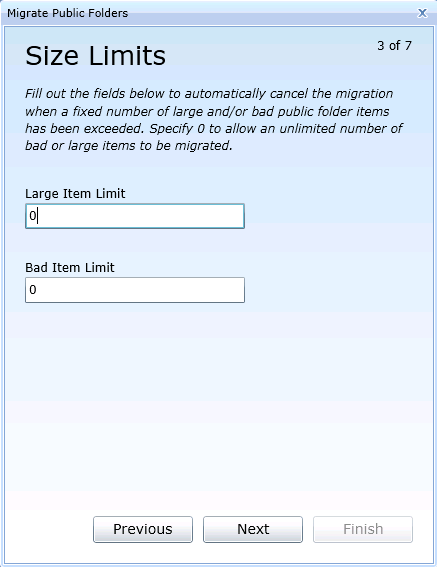
The Size Limits screen appears. Enter a Large Item Limit and Bad Item Limit. You may enter 0 to allow an unlimited number of large or bad items. Click Next.
-
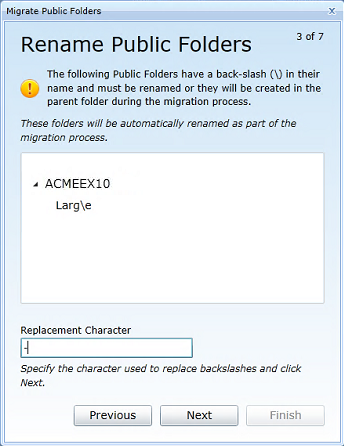
[Conditional Step.] If a backslash character occurs in the filename of any folder to be migrated, this Rename Public Folders screen appears so that the folder(s) can be renamed. Enter a character that Migrator Pro for Exchange should use to replace the backslash character when renaming the folder(s), and click Next.
-
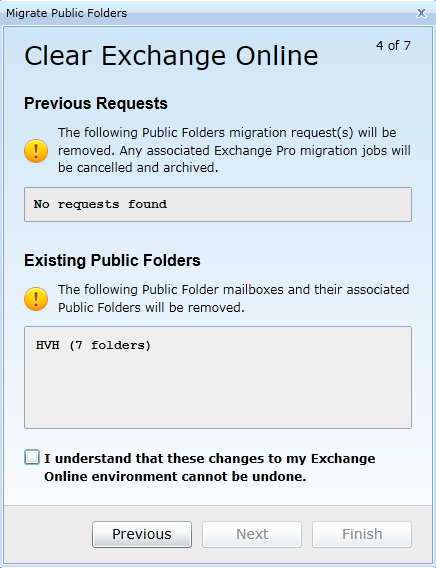
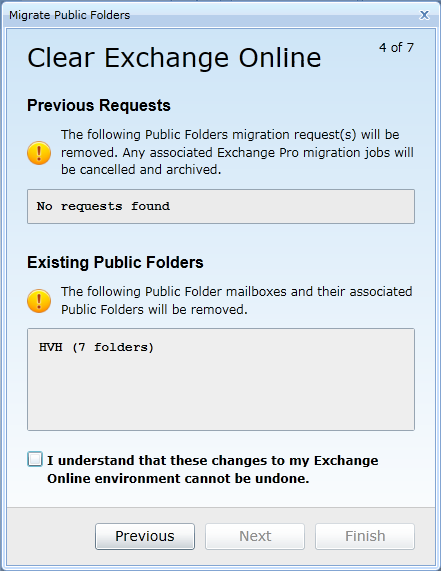
The Clear Exchange Online screen appears. Review the changes and select the I understand checkbox to confirm that you understand the changes to the Exchange Online environment cannot be undone. Click Next.
-
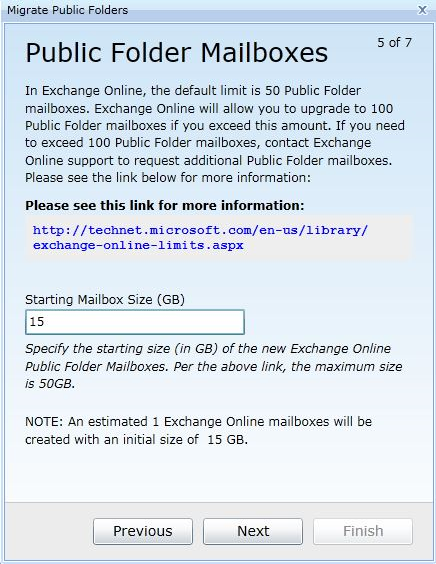
The Public Folder Mailboxes screen appears. Specify the Starting Mailbox Size for the public folder Mailboxes and click Next.
-
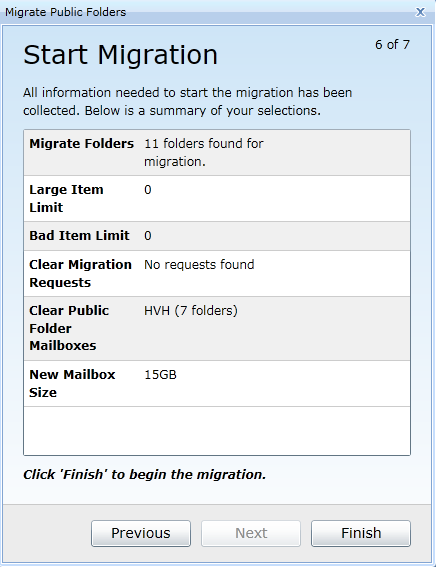
The Start Migration screen appears. Click Finish to begin migration.
-
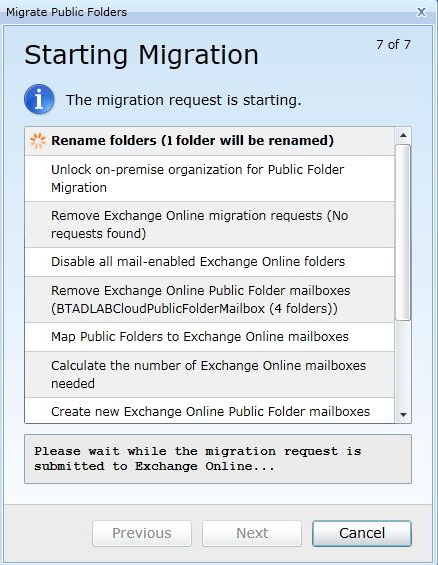
The Starting Migration screen appears. The successful processes are marked with a green checkmark when complete. When complete, Click Next.
|
|
The migration will automatically be suspended at 95%. Once suspended, the migration can do the final cutover by resuming the migration. When there is a PowerShell failure and less than 10% of the known public folders for a public folder server are returned, Migrator Pro for Exchange will not mark them all as deleted. A message stating the number of returned folders will appear in the log. |
To Migrate Public Folders to Exchange Online Using MAPI
Click Public Folders in the main toolbar. The screen displays Source Folders on the left side and Target Folders on the right.
Click on the folders you want to send to the migration queue and drag them to the Target Folders pane. Unlike PowerShell, using MAPI allows for public folders to be migrated one at a time.
|
|
When using MAPI, public folders can only be migrated to a public folder Mailbox existing on the target Office 365 forest. The MAPI migration mode does not have the ability to create public folder Mailboxes on the target, so the PowerShell migration mode should be used in these scenarios. |
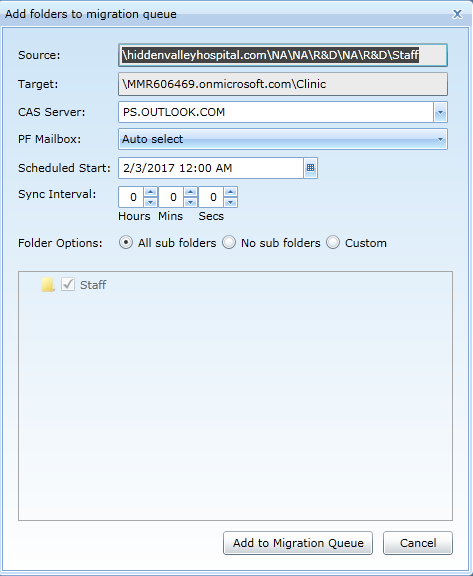
Indicate the settings you want to apply to the job by selecting the options on the screen:

The settings on this screen:
-
Source: The name of the public folder that is being migrated.
-
Target: The destination path of the Office 365 public folder mailbox.
-
CAS Server: Since the destination is an Office 365 tenant, the CAS Server entry should be pointed to the Office 365 remote PowerShell host.
-
PF Mailbox: The public folder mailbox to migrate to in the target. The drop-down list includes all public folder mailboxes available in the target. The default is Auto select, which will be the smallest target PF mailbox.
-
Scheduled Start: Specify the date and time you want the job to start.
-
Sync Interval: Select or enter the interval in minutes at which you want Migrator Pro for Exchange to copy new or changed folders to the target mailbox. Valid values are any value in the range from 0 to 24 hours. Syncs will not continue if a migration error is encountered during a sync. Note also that, while this Sync Interval sets up sync jobs, a sync job will not start to copy new items unless Change Detection is running.
-
Folder options: All sub folders, or No sub folders, or Custom. Note that if Custom is selected, only folders that are selected in the UI will be migrated.
Then click Add to Migration Queue to add the selected folders to the Public Folder Jobs.
The folder will appear in the Target Folders pane.
To Rollback Exchange Online Folders
-
Click Public Folders in the main toolbar. The screen displays Source Folders on the left side and Target Folders on the right.
-
Click on the folders you want to rollback and drag them to the Source Folders pane.
-
The Rollback Public Folders wizard appears. Follow the instructions on the first screen to ensure that you do not lose any email and content received after migration. When finished, click Next.

-
The Clear Exchange Online screen appears. Review the changes and select the check box to confirm that you understand the changes to the Exchange Online environment cannot be undone. Click Next.
-
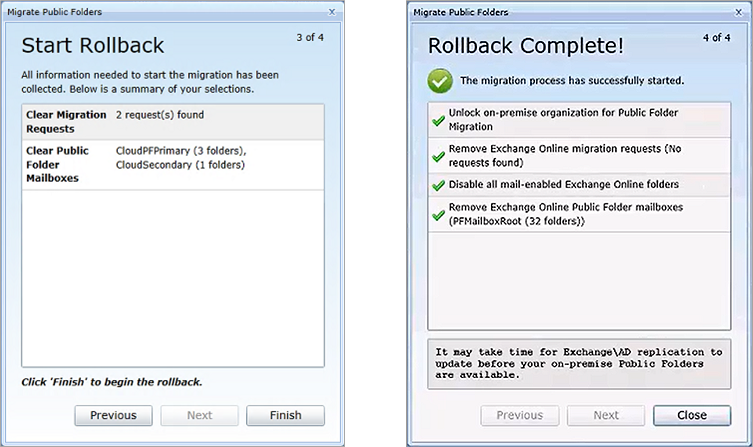
The Start Rollback screen appears. Click Finish to begin the rollback, and the Rollback Complete! screen appears when the rollback finishes. Click Close to close the window.
Migrating Public Folders to Office 365 Groups
Migrator Pro for Exchange can migrate public folders to Office 365 Groups using the MAPI protocol, but not by PowerShell. The MAPI option is selected from the Public Folders Migration Mode drop-down list on the General tab of the Office 365 Forest Configuration Settings screen.
|
|
|
|
|
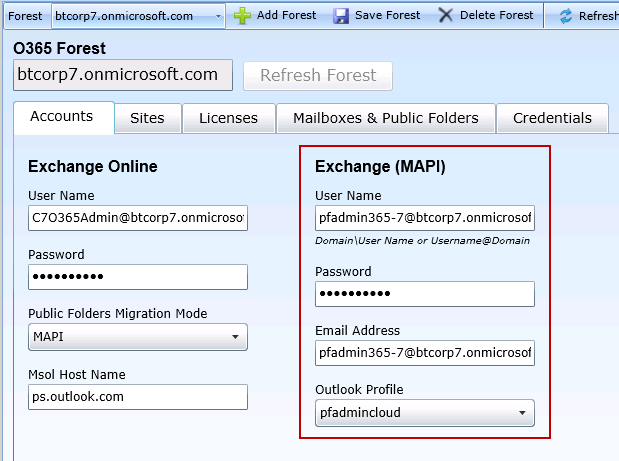
You must use a cloud mailbox originally created in Office 365 (not a federated account or an account that was migrated) as your MAPI account. Migrator Pro for Exchange will be unable to open the Office 365 Group mailbox if a cloud mailbox is not used. The account must also be a Global Office 365 administrator. This account can be configured in the Exchange (MAPI) section of the General tab of Migrator Pro for Exchange’s Office 365 Forest Configuration Settings screen.
|

To migrate public folders to Office 365 Groups using MAPI:
-
Click Public Folders in the main toolbar. The screen displays Source Folders on the left side and Target Folders on the right.
-
On the right (target) side, select the Target Folders drop-down and select Target Groups:

-
On the left (Source) side, click on the public folders you want to send to the migration queue, and (one at a time) drag them to the Target Folders pane. This approach lets you migrate source public folders one at a time to different Office 365 Groups.
|
|
|
You can choose to copy a top-level public folder and all subfolders to a single Office 365 Group. This means (for example) that if you have multiple calendars configured as subfolders, all items contained in the different calendars will be consolidated into the single calendar contained within the target Office 365 Group. With MAPI, public folders can be migrated only to an existing Office 365 Group in the target Office 365 forest. The MAPI migration mode cannot create Office 365 Groups in the target. |
-
Indicate the settings you want to apply to the job by specifying your choices on this screen:
-
Source: The name of the public folder that is being migrated.
-
Target: The name of the Office 365 Group that represents the desired migration endpoint.
-
CAS Server: Since the destination is an Office 365 tenant, the CAS Server entry should be pointed to the Office 365 remote PowerShell host.
-
Scheduled Start: Specify the date and time you want the job to start.
-
Sync Interval: Select or enter the interval in minutes at which you want the program to copy new or changed folders to the target Groups. The valid range is 0 to 24 hours. Syncs will not continue if a migration error is encountered during a sync. Note also that, while this Sync Interval sets up sync jobs, a sync job will not start to copy new items unless Change Detection is running.
-
Folder options: All sub folders, or No sub folders, or Custom. Note that if Custom is selected, only folders that are selected in the UI will be migrated.
-
Click the Add to Migration Queue button to add the selected folders to the Public Folder Jobs.
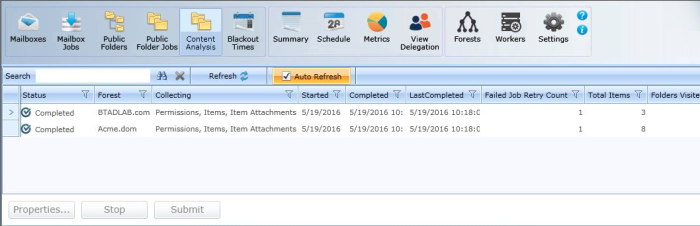
14. Content Analysis View
Content Analysis lets you collect information about the public folder environment and utilize SQL to analyze and remediate before migration. Review Appendix G for more information about content analysis.
At least one Worker must be assigned the Reporting role for this purpose.
To collect information for a forest, click Content Analysis in the main toolbar. Then select a Forest and click Submit (button at the bottom of the Data Table):
To change the information collected, select a Forest and click the Properties button. Then you can edit the properties on the Report Run Settings screen:

The options on this screen:
-
Forest Name: The name of the forest for which you want to collect data.
-
Permissions: Tells Migrator Pro for Exchange to collect public folder permissions.
-
Items: Tells Migrator Pro for Exchange to collect information about items stored in public folders.
-
Attachments: Tells Migrator Pro for Exchange to collect information about public folder item attachments. In order to collect attachment information, you must collect information about public folder items.
-
Number of retries: How many times Migrator Pro for Exchange should attempt to collect information about a public folder if it initially fails. The default is 1 time.
Once Submit is clicked, Migrator Pro for Exchange assigns reporting jobs to any worker with the Reporting role. You can assign a worker to the Reporting role from the Workers tab.
15. The User Portal
The User Portal can be accessed in two different ways. The first is by the Administrator selecting the Mailbox Jobs button, and then clicking on the job status for that user's mailbox. The second way is through the notification emails sent to the user. This is how users will always access the User Portal.
The purpose of this portal is to allow end users to participate in a migration project. Prior to migration, the user can set an external email address to receive notifications, an SMS mobile number, blackout dates, and notification options.
During migration, the User Portal indicates the migration status and the anticipated completion time to the user. After migration, it also indicates the results of the migration. From the Admin Portal, you can access the User Portal for the user by clicking on the link on Scheduled in the Status column.
Opt Out Option
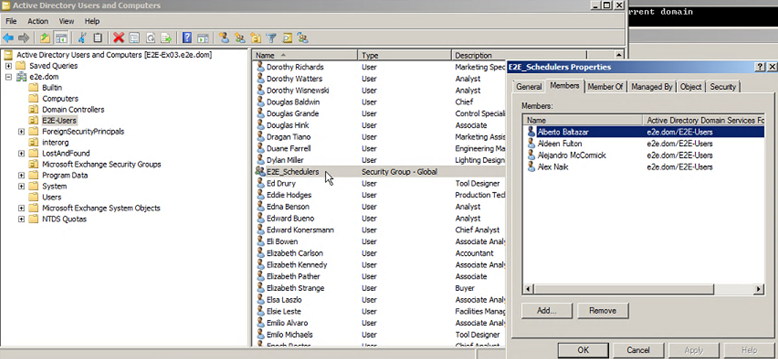
By default, with Migrator Pro for Exchange you have the ability to turn on the Opt Out option or turn this off for all users. However, in some cases you may want to limit the scope of this functionality. Administrators can establish a security group to determine which users can see the Opt Out option and select alternative migration times. The User Portal will look for an AD group named E2E_Schedulers to determine whether the group exists and then check if the logged-in user is a member. If they are not a member, they will not be able to reschedule a migration. Note that the location of the E2E_Schedulers group is not critical and can be placed anywhere in AD that the configured administrator account can access.
The following is a display of a User Portal:
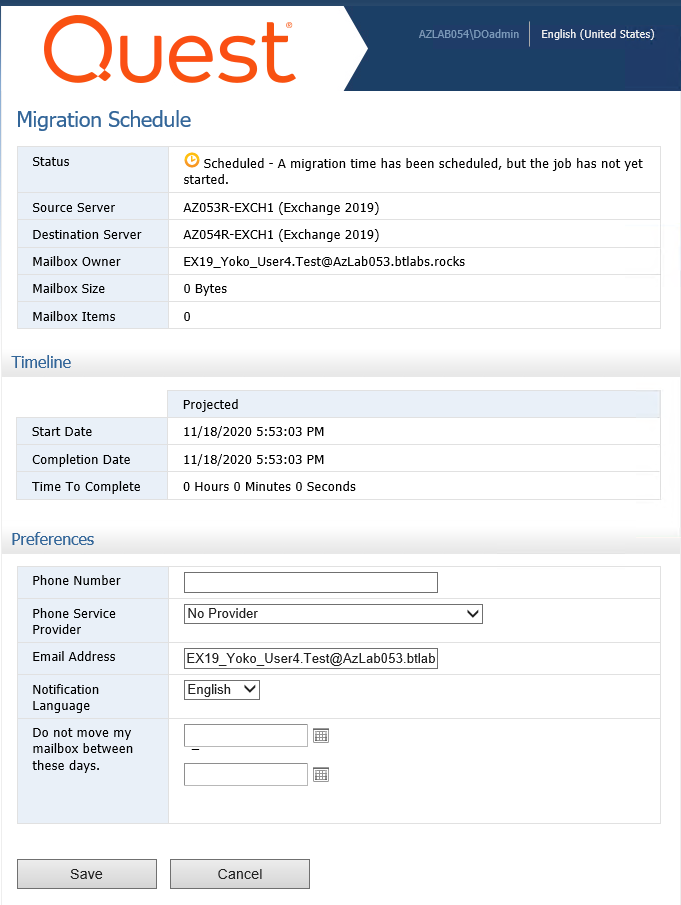
The fields on this screen:
-
Migration Schedule:
-
Status: Status of the user mailbox.
-
Source Server: Name of the Exchange server from where the user mailbox is being migrated.
-
Destination Server: Name of the Exchange server to where the user mailbox is being migrated.
-
Mailbox Owner: Displays the email of the mailbox owner.
-
Mailbox Size: Displays the total size of the user mailbox.
-
Mailbox Items: Number of items in the user mailbox.
-
-
Timeline:
-
Start Date: Date on which the user migration is expected to begin.
-
Completion Date: Projected date on which the user migration will complete.
-
Time to Complete: Estimated time (in hours and minutes) to complete the user migration.
-
-
Preferences:
-
Phone Number: Allows user to specify the phone number to send SMS notifications.
-
Phone Service Provider: Allows the user to specify the phone service provider used by Migrator Pro for Exchange to send notifications to the user’s phone. The AT&T, Sprint and Verizon providers are recommended for US customers. Many other providers are available, but they have not been tested.
-
Email Address: The alternate email that will be used while the mailbox is migrated.
-
Notification Language: Select the language in which you want to receive notifications.
-
Do not move my mailboxes between these days: Allows user to specify blackout dates. If the administrator has selected Do not let users postpone their migration (in Migration Options), then users will be unable to customize their migration by setting blackout periods.
-
After all the settings are specified, click the Save button located in the lower left of the form. Or you can click Cancel to cancel the settings.
|
|
Windows Authentication is enabled for this virtual application. When performing cross forest migrations, if the users in the source forest attempt to connect to the Migrator Pro for Exchange server in the target forest and a trust has not been established between the two forests, the users will be prompted for their target credentials. |
Multi-lingual Support
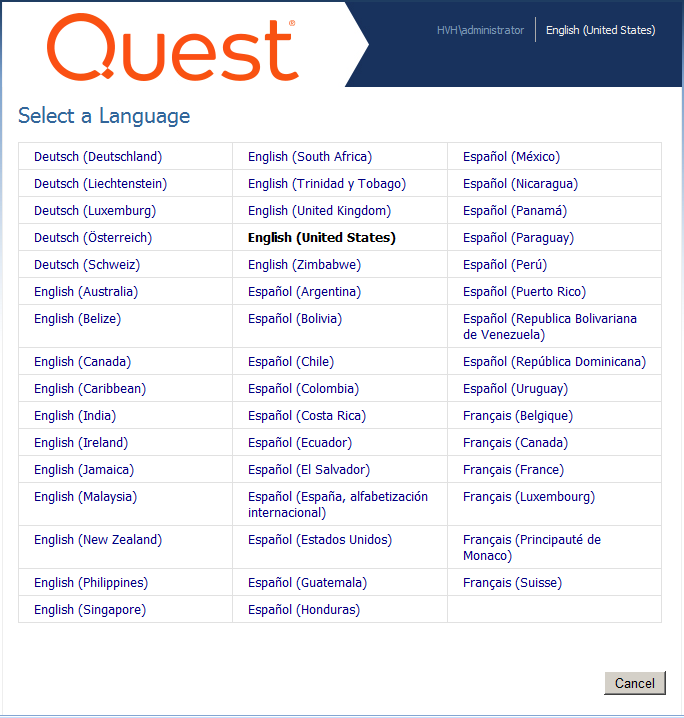
Click on English (United States) at the top right of the screen, and then select More choices to view a list of available languages. If a user changes their default language, all future End User notifications will be sent in this language.
Customizing the User Portal
The User Portal web page can be customized by modifying the C:\Program Files\Exchange Pro\User\Default.aspx configuration file that resides on the Migrator Pro for Exchange server. For example, an administrator may want to hide the Outlook Profile information that appears on the User Portal page after a migration has completed:
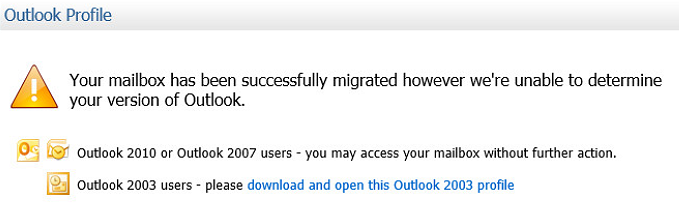
If you want to hide that information, you can comment out the OutlookProfile ID line in the Default.aspx file. The line appears like this (marked by the red arrow) by default:

To comment out this line, add the "%" character at the beginning and end of the line:
<%--<uc3:OutlookProfile ID="OutlookProfile1" runat="server" />--%>
16. Troubleshooting
Browser-Based Help Fails to Load
If the online browser-based Help doesn’t load correctly after an Migrator Pro for Exchange upgrade, clear the temporary files in the browser. We recommend you set your browser to clear temporary files and history upon exit.
Public Folder Migration Error
Problem:
When migrating public folders, the following error message is received:
Error: MapiExceptionNetworkError: Unable to make connection to the server. (hr=0x80004005, ec=2423)
There are a number of steps to correct this issue below. Necessary steps are marked as required. The other steps may or may not be necessary to resolve this issue.
Resolution:
-
Configure Outlook Anywhere (required).
-
Open RPC ports 6001, 6002, 6004 (required).
-
Start RPC Locator service.
-
Update SSL certificate to include autodiscover.domain.com in the subject.
-
Open MRS ports 808, 135.
Problem with Production Licenses After Upgrading from Trial Licenses
Problem:
There's an issue with Migrator Pro for Exchange when you try to implement a new production license key after running Migrator Pro for Exchange with free trial licenses.
The system doesn't let you mix license key domains. If you implement the solution with the trial keys, you will not be able to easily upgrade to a production license.
You would be required to uninstall and re-install the product which removes all their metrics from running the pilot migrations.
Workaround:
-
Open the Migrator Pro for Exchange SQL database.
-
Go to the CMTEUP_Checksum table.
-
Delete the current row listed in this table.
-
Now you can apply a new license from within the Migrator Pro for Exchange UI.
Mail Delivery Getting Stuck in a Loop
Problem:
When migrating a Resource Forest mailbox to an Exchange server in a different domain than where the Global Catalog and PowerShell host reside, Exchange may periodically fail to clear the targetAddress. This results in mail delivery getting stuck in a loop.
Resolution:
Clear the targetAddress for any target mailbox when this occurs.
Conflict Resolution Issues with Bi-Directional Public Folder Synchronization
Problem:
If a public folder is initially migrated using a one direction synchronization, and a customer then decides that they want to setup a scheduled bi-directional synchronization job, conflict resolution does not work properly.
Resolution:
The original records of the one direction synchronization should be deleted. This will ensure that conflict resolution works properly in the bi-directional synchronization.
This is done by clearing the BT_TracDoc table in the Migrator Pro for Exchange SQL database and can be done with the following query:
delete FROM [ ].[dbo].[BT_TracDoc]