
Target Forest Configuration | Accounts Tab
To view or edit the Accounts tab for target forest configuration: From the Forest view toolbar, select the previously defined target Forest from the drop-down list, and then click the Accounts tab. On this tab, all fields are displayed whether or not the Advanced checkbox is marked.
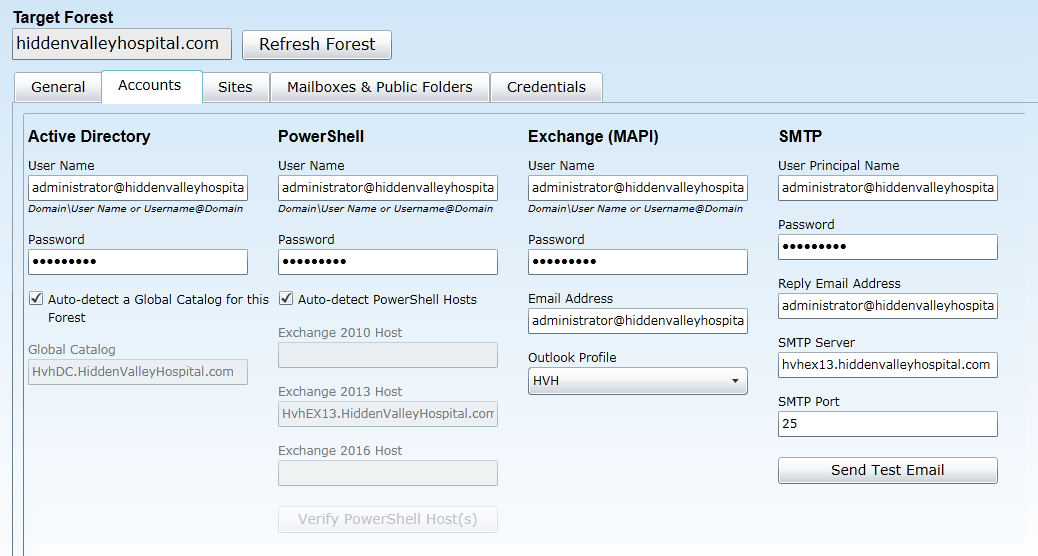
Active Directory Section
Enter the User Name and Password for the account Migrator Pro for Exchange should use for Active Directory calls, and specify the Global Catalog for this forest.
You can mark the Auto-detect a Global Catalog checkbox to have Migrator Pro for Exchange scan your environment and determine the Global Catalog for you, or manually enter the Global Catalog into the text box. Make sure that the designated GC is physically close to the Migrator Pro for Exchange server. (If you know of another GC that is physically closer than the one found by the Auto-detect feature, you may want to disable Auto-detect and manually specify the nearer option.)
PowerShell Section
Enter the User Name and Password for the account Migrator Pro for Exchange should use for PowerShell calls. This account should have PowerShell Remoting access within the Exchange organization.
Leave the Auto-detect PowerShell Hosts checkbox marked if you want Migrator Pro for Exchange to automatically find and specify the PowerShell hosts, or unmark the checkbox if you want to manually specify the hosts in the respective text boxes: Exchange 2010 Host, Exchange 2013 Host and Exchange 2016 Host. Make sure the designated PS hosts are physically close to the Migrator Pro for Exchange server. (If another PS Host is physically closer than the one found by the Auto-detect feature, you may want to disable Auto-detect and manually specify the nearer option.)
|
|
A PowerShell host must be specified here as a Fully Qualified Domain Name (FQDN). An IP address will generate an SSL certificate error. |
If you specify PowerShell hosts manually, be sure to click the Verify PowerShell Host(s) button to test connectivity to the PowerShell host servers.
Exchange (MAPI) Section
These settings are required only when migrating public folders in cross-forest migrations where no trusts exist.
Enter the User Name, Password and Email Address for the account Migrator Pro for Exchange should use for Exchange (MAPI) calls, and select the Outlook Profile.
SMTP Section
These settings are necessary for Migrator Pro for Exchange to use SMTP (Simple Mail Transfer Protocol), which is the Internet standard for electronic mail transmission across Internet Protocol (IP) networks.
Complete the fields here, and then click the Send Test Email button to verify connectivity. When you Send Test Email, Migrator Pro for Exchange posts a status response:
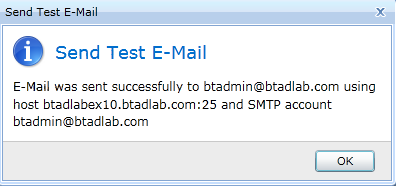
If the test succeeds, click OK to continue. If the test fails, modify the above SMTP settings and test again.
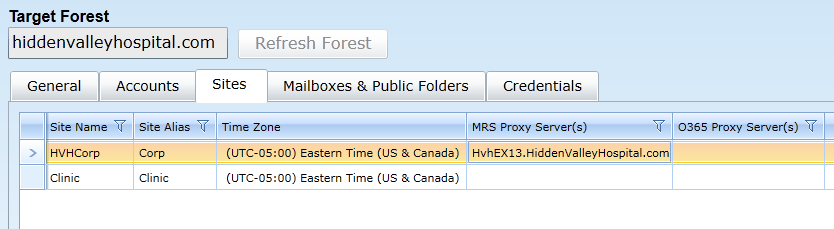
Target Forest Configuration | Sites Tab
To view or edit the Sites tab for target forest configuration: From the Forest view toolbar, select the previously defined target Forest from the drop-down list, and then click the Sites tab. On this tab, all options are displayed whether or not the Advanced checkbox is marked.
The table in this view displays a list of the AD sites that were found in your environment for the selected forest:
Most of the settings in this table can be edited:
-
Site Name: Displays the name of the migration site.
-
Site Alias: Displays the user-defined name for the migration site. Actual Site Names are often cryptic or otherwise difficult to read, so Migrator Pro for Exchange lets you assign "friendlier" shorthand names ("aliases") to identify the sites in Migrator Pro for Exchange features. This is an optional but popular feature, which can also be useful to differentiate among duplicate or very similar Site Names—as sometimes occurs if you add external forests to your project. To edit the alias value, click inside the cell and the value becomes editable.
-
Time Zone: Displays the time zone of the migration, which Migrator Pro for Exchange uses to calculate configured blackout periods for a given site. An AD site may span several time zones, but Migrator Pro for Exchange associates each site with a single time zone. To change a time zone setting: Click inside the cell to make the value editable (a small triangle appears), then click the triangle to view a list of available options, and select the time zone you want to assign to this forest.
-
MRS Proxy Server(s): Displays the Exchange Mailbox Replication Service (MRS) proxy servers that Migrator Pro for Exchange has discovered for the site. Server names are separated with commas. You can manually define the publicly addressable names of the MRS proxy servers for the site. Manually entered server names are not overwritten by scheduled or manual forest refreshes. To manually define MRS Proxy Server(s): Click inside the cell to make the values editable, and enter publicly addressable names for the site's MRS proxy servers, separating multiple names with commas.
|
|
Remember to click Save Forest (in the Forest toolbar above the tabs) to save any changes you make to these settings. |
Target Forest Configuration | Mailboxes & Public Folders Tab
To view or edit the Mailboxes & Public Folders tab for target forest configuration: From the Forest view toolbar, select the previously defined target Forest from the drop-down list, and then click the Mailboxes & Public Folders tab. On this tab, all options are displayed whether or not the Advanced checkbox is marked.
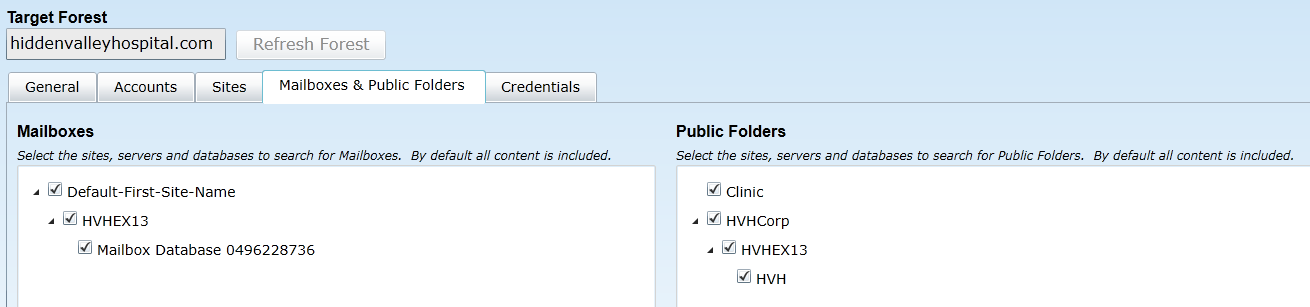
Mailboxes Section
Select the sites, servers and databases in this forest you want to search for mailboxes to migrate. All content is selected by default. You can right-click in the list area to select options to expand/collapse levels of the tree.
Public Folders Section
Select the sites, servers, and databases in this forest you want to search for public folders to migrate. All content is selected by default. You can right-click in the list area to select options to expand/collapse levels of the tree.
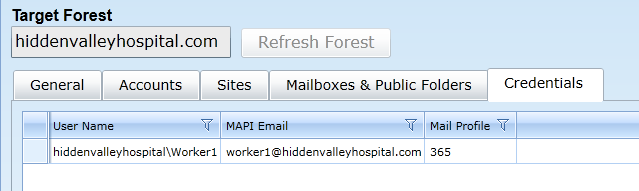
Target Forest Configuration | Credentials Tab
To view or edit the Credentials tab for target forest configuration: From the Forest view toolbar, select the previously defined target Forest from the drop-down list, and then click the Credentials tab. On this tab, all options are displayed whether or not the Advanced checkbox is marked.
The table in this tab shows the credentials that are available for Migrator Pro for Exchange to use for its public folder Workers in the selected forest. (Source and Target credentials are selected in the Worker’s settings, and the credentials defined here make up the list of selectable credentials for the Workers.)
To define a credential for this forest: Click the Add button (below the table) to open the Forest Credential screen:
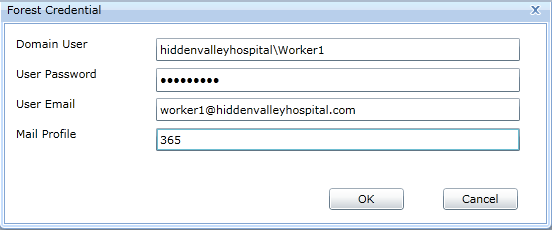
... and enter this information:
-
Domain User: The Domain user (in Domain\Username format).
-
User Password: The password for the user
-
User Email: The email address of the user
-
Mail Profile: The name of the Outlook profile that has been preconfigured on the Worker machine. A Worker machine without Outlook installed cannot use credentials with Outlook Profiles. This field should remain blank to create a credential for Workers that do not have Outlook installed.
Then click OK to create a new credentials record and dismiss the Forest Credential screen.
You can also Edit or Delete a previously defined credential.