
Custom Visualizations
Custom visualizations currently require changes to be made to server side code, so an Evolve development environment to develop a new visualization and a new build of Evolve are required.
What Do You Need?
The setup of a new custom visualization requires one of each of these files to be placed in the correct locations so they are recognized by Evolve.
-
Visualization File
-
Style File
-
Evolve Designer Configuration File
It also require the following file to be updated with a reference to the new visualization.
-
Visualization List File
A rebuild of Evolve is required for a new custom visualization to be used in Evolve Designer.

Visualization File
Language: HTML / JavaScript / JQuery
File Extension: .js
Location: \webDesignerStatics\webDesigner\custom\client\libs\cwBehaviours\
Reference: www.w3schools.com/html/ www.w3schools.com/js/ www.w3schools.com/jquery
The visualization file contains the code that describes how the visualization will be displayed on a page.
(function () {
var myVisualization = function () { };
myVisualization.setup = function (properties, allItems, searching) { };
cwBehaviours.myVisualization = myVisualization;
}());
The file should be structured as followed:
The setup Method
$('div.' + properties.NodeID).html(“HTML String”);
The setup method is the first method that is called when the visualisation is loaded, it should contain any code that will manipulate the data available and build up a HTML string the UI for the visualisation you wish to create. The HTML string should then be appended to the page’s DOM like so:
Parameters
properties
This parameter contains all the information for the visualisation you have created. You will need this information in the next section to access the correct data list from the allItems parameter. See DataStructure: properties for an example of the full data structure.
allItems
allItems[properties.NodeID];
This parameter contains the list of object and their data for each page in Evolve, to access the data for the page you’re coding against use the link of code below.
The list will contain all the objects and it’s information that should be displayed on the page, when searching this list will be updated to show only objects that match the search criteria. See Data Structure: allItems for an example of the full data structure.
searching
This is a Boolean parameter that tells you whether the page is currently being searched using Evolve’s in-page searching capability. You do not need to do anything special to have your page be searchable, this is provided as default by default.
Style File
Location: \webDesignerStatics\webDesigner\custom\client\libs\cwBehaviours\
A style file should accompany the visualisation file in the same directory defining the styles used in the HTML output. See Style Development for more information on how to produce this and the options available in Evolve.
EvolveDesigner Configuration File
Language: C#
File Extension: .cs
Location: \webDesigner\Sources\Nodes\Behaviours\
class cwWebDesignerTreeNodeBehaviourMyVisualisation: cwWebDesignerTreeNodeBehaviour
{
public cwWebDesignerTreeNodeBehaviourMyVisualisation(
cwWebDesignerGUI cwWebIndexGui,
cwPSFTreeNode parent)
: base(cwWebIndexGui, parent, "myVisualisation"
wWebDesignerTreeNodeBehaviour.CategoryBehaviourOtherCharts)
{
updateText("My Visualisation");
}
public override bool checkNodeStructureCustom()
{
return true;
}
}
Reference: msdn.microsoft.com/en-gb/vstudio/hh341490.aspx
Visualisation List File
Language: C#
Location: \webDesigner\Sources\Libs\cwWebDesignerBehaviourManager.cs
Reference: msdn.microsoft.com/en-gb/vstudio/hh341490.aspx
The Visualisation List File contains a list of the visualizations available in Evolve by linking to their configuration file (described above), so any new visualisation should be added to this list so EvolveDesigner can recognise it and make it available for use.
public cwWebDesignerBehaviourManager(cwWebDesignerGUI webDesignerGui, cwWebDesignerTreeNodeLayout parentLayout)
{
this.AddBehaviour(new cwWebDesignerTreeNodeBehaviourAccordion(webDesignerGui, parentLayout));
this.AddBehaviour(new cwWebDesignerTreeNodeBehaviourGoogleMap(webDesignerGui, parentLayout));
this.AddBehaviour(new cwWebDesignerTreeNodeBehaviourMyVisualisation(webDesignerGui, parentLayout));
this.SortBehaviours();
}
The line of code should be added as the example in red (below) shows.
Further Development
Layout Restriction
this.allowedLayouts.Add("Layout Name");
You can restrict the layout your visualisation can be attached to in EvolveDesigner by adding an extra line of code in the EvolveDesigner Configuration File. The following line of code should be added for each layout you will allow your visualisation to be attached to.
Additional Properties
Object Properties
If you require extra properties for the objects that are being provided to you, this can be configured in Evolve designer.
-
Load EvolveDesigner with the model and site you’re configuring.
-
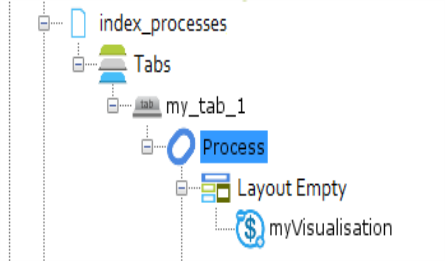
Expand the tree for the Index page you have attached your visualisation to and select the object type. The example below shows this for a process object type.
-
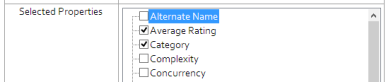
On the right hand side select the additional properties you require in your visualisation, these will then be available in the allItems properties payload. See Data Structure: allItems for an example of the data structure.
Data Structure: allItems
{
project1: Array[4]
0 {
accessRights {
CanDelete: true
CanUpdate: true
}
associations { }
iName: null
iObjectAccessRights: Object
iObjectTypeScriptName: ""
iProperties: Object
label: "Object Name"
layoutName: "cwLayoutEmpty"
name: "Object Name"
nodeID: "project1"
objectTypeScriptName: "project"
object_id: 23
properties {
name: "Object Name"
}
}
1: Object
2: Object
3: Object
4: Object
project2: Array[17]
}
Data Structure: item
{
accessRights {
CanDelete: true
CanUpdate: true
}
Associations {
iName: null
}
iObjectAccessRights {
iObjectTypeScriptName: ""
}
iProperties {
label: "Object Label"
layoutName: "myLayout"
name: "Object Name"
nodeID: "diagram"
objectTypeScriptName: "diagram"
object_id: 1234
}
properties {
cwaveragerating: 0
exportflag: 0
name: "Object Name"
}
}
Data Structure: properties
{
Behaviour {
AuthorizedLayouts: Array[0]
JSMethodName: "cwCostBenefit"
Name: "My Visualisation"
Options: Object
node_name: "My Visualisation"
}
LayoutName: "empty"
LayoutOptions {
DisplayPropertyScriptName: ""
HasLink: true
LayoutID: ""
}
NodeID: "project1"
ObjectTypeScriptName: "project"
PageName: "index_projects_cb"
PageType: 0
ParentNodeID: null
TabID: null
}