
Configure Evolve Server
Load Balancing with erwin Web Modeler
Previously if you wanted to use Web Modeler you were restricted to a single server installation. We have now extended the configuration to allow for multi-server (or load balanced) environments.
Configuring MongoDB Replication
This topic explains the process to configure MongoDB Replication. This process is only required if you are serving Evolve Web Platform from more than one web server, in a load balanced array.
Configure MongoDB Replication
-
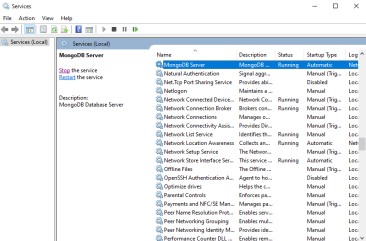
Press the Windows key and then click Start.
-
Search for Services.
The Services window appears.
-
Select MongoDB Server.
-
Click Stop.
MongoDB Server service stopped.
-
Go to MongoDB bin folder available at C:\Program Files\MongoDB\Server\4.2\bin.
-
Open `mongod.cfg` file in text editor (For example, Notepad).
-
Update replication property as follows:
replication:
replSetName: "rs0"
-
Bind your system IP address in the following format:
net:
port: 27017
bindIp: <enter system ipv4>, 127.0.0.1
-
Save the`mongod.cfg` file.
-
Start MongoDB Service.
-
Go to C:\Program Files\MongoDB\Server\4.2\bin and open the command Prompt.
-
Run the mongo.exe command.
-
Run the following command:
rs.initiate({_id : "rs0",members: [{ _id: 0, host: "<enter system ipv4>:27017"}]})
|
|
The default MongoDB port number is 27017. If required, you can update it to a different port number. |
|---|

-
Run the rs.status() command to check whether replication is configured successfully.

Successful MongoDB replication is indicated by a response where the members array has the name and IP properties according to the values configured in step 13.
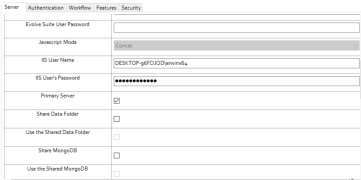
Configure Evolve Server
The instructions below explain Evolve Server Configuration to publish your sites on it.
On the main/master server:
-
Start Evolve Designer.
-
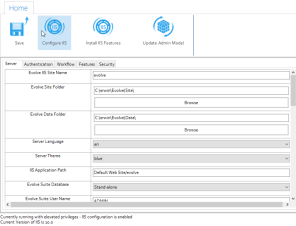
On the Evolve Designer Models launcher dialog, click the Configure Evolve Server button.
The Evolve Server Configuration dialog opens.
-
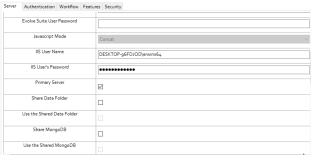
Under Server, select the Primary Server, Share Data Folder and Share MongoDB check boxes.
|
|
In the MongoDB URL option, the IPv4 address will be replaced with the host address, unless you manually update the main machine IP address. |
|---|

-
Click Save.
-
Click Configure IIS and perform full deployment.
On the secondary server:
-
Start Evolve Designer.
-
On the Evolve Designer Models launcher dialog, click the Configure Evolve Server button.
The Evolve Server Configuration dialog opens.
-
Under Server, select the Use the Share Data Folder and Use the Shared MongoDB check boxes.
-
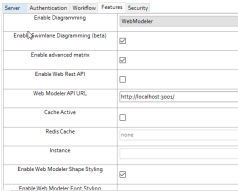
Click Features and in the Web Modeler API URL box, replace your host IP address with "localhost".
|
|
The address should be “http://localhost:3001/” after replacing IP address. |
|---|
|
|
Before deploying, ensure that MongoDB and Diagrammer services are running. |
|---|
-
Click Save.
-
Click Configure IIS and perform full deployment.
|
|
Verify whether the database property is added to the environment variables. |
|---|
-
Restart the secondary server.
-
Open erwin Web Modeler.
Verify whether it displays the main server’s erwin Web Modeler drafts and data. This indicates that both machines are connected to the same MongoDB database.
Automatic Diagrams (Diagram Designer)
Create an Automatic / Visualization Diagram
Diagram Designer allows the automatic creation of diagrams in erwin EA / BP.
You will be able to:
Create an Automatic / Visualization Diagram
Diagram Designer allows the automatic creation of diagrams in erwin EA / BP.
You will be able to:
Enabling a Model
The first time you launch Diagram Designer, you may not have any models enabled. You need to enable a model in order to use Diagram Designer.
To enable a model,
-
Start Diagram Designer (You can find this in your Window's Start Menu)
-
Once it has loaded, and you have logged in, click on the “Enable a Model Icon”
-
Select the model you want to enable for Diagram Designer from the drop down.


This operation take some time depending on your model’s size, when done your application will restart. When the application has restarted you may then choose your model.
-
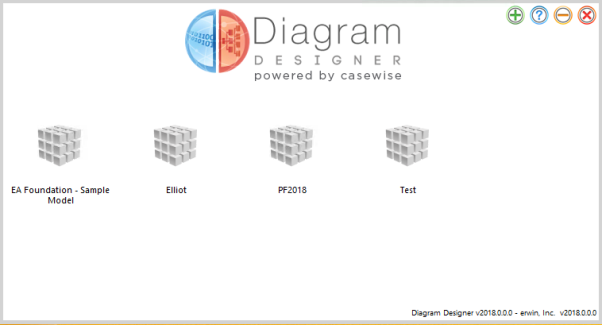
Choose a Model by clicking on the "Model icon”
with the name of your model.
Related Topics