|
1 |
On the navigation panel, under Dashboards, click Application Servers > Administration > Application Servers Administration. |
|
2 |
On the Application Servers Administration dashboard, click Java Administration. |
|
3 |
On the Java Administration dashboard, click the Installations tab. |
|
5 |
In the menu that opens, click Uninstall. |
|
6 |
Read the caution and click Uninstall to confirm that you want to remove the entire installation. |
|
7 |
Click Close to close the box when the process is finished. |
|
1 |
On the navigation panel, under Dashboards, click Application Servers > Administration > Application Servers Administration. |
|
2 |
On the Application Servers Administration dashboard, click Java Administration. |
|
3 |
On the Java Administration dashboard, click the Installations tab. |
|
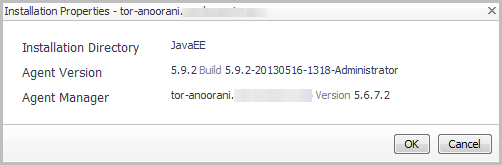
5 |
In the menu that opens, click Properties. |
|
6 |
Click OK to close the dialog box. |
|
1 |
On the navigation panel, under Dashboards, click Application Servers > Administration > Application Servers Administration. |
|
2 |
On the Application Servers Administration dashboard, click Java Administration. |
|
3 |
On the Java Administration dashboard, click the Installations tab. |
|
4 |
On the Installations tab, look at the Upgradeable column for the installation you are interested in. If the word “Yes” appears, you can upgrade the installation. |
|
6 |
In the menu that opens, select Upgrade. |
|
7 |
The dashboard refreshes, and the task appears in the Task History list, with a description such as: Upgrade Installation (<installation name>). |
|
8 |
A progress indicator appears in the Result column while the task is in progress. The indicator is replaced by the text Success or Failure when the task is complete. |
|
2 |
In the menu that opens, click Properties. |
|
3 |
Type the correct value in the Java Home box. |
|
4 |
Click Save. |
|
5 |
Click OK to close the confirmation message box. |
|
6 |
Click the name of the integration configuration again, and select Reintegrate targets. |
