Overview Grid
The main purpose of the grid is to resolve differences between database objects as a part of Schema Compare. You can also use other tools to filter the differences or mark them via context menu as:
- Read/Unread
 /
/ - signifies whether you have already reviewed the difference or not
- Important
 /
/ - simply marks the difference as important, has no influence on the result of the comparison
- Excluded
 - the difference is ignored and removed from the grid unless you enable the Show Excluded Items option
There are two main types of differences:
- Only in source/target - objects that are found only in one of the two compared databases
- Different - objects that are linked (same name or linked by user) but their SQL code is different
In case you want to compare an unlinked object in source with an unlinked object in target, you will have to map them.
To map an unlinked object to any other unlinked object
- In the grid, find an object that is not linked yet by looking in the Only in source/target nodes
- Notice the [map] text in the other database column. It is a drop down menu from which you can select the object that should be mapped to your original object

- After selecting the object, the two objects are now linked. You can unlink them again by clicking the unlink icon

Once you link objects as you wish, you can go through the differences and decide on how to resolve them.
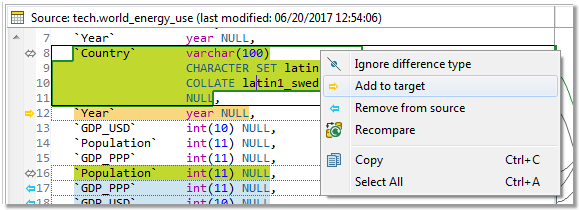
To resolve differences between two database objects
- In the Overview Grid, locate any row that marks a difference between two objects
- Click on the arrow in the cell between the object names to specify how the difference is going to be resolved.
The following table lists all possible resolution actions and their meanings:
 |
Change target |
The generated change script will change target so it matches source |
 |
Change source |
The generated change script will change source so it matches target |
 |
Change both |
(Different objects only) All differences between the two objects are marked as ignored. You can go through the specific differences one by one and resolve them in the Comparison Area |
 |
Ignore |
The differences between the two objects are ignored and not included in the generated change script |
Overview Grid Toolbar
 |
Recompare All |
Compares the source and the target again |
 |
Save As |
Saves the comparison as a .compare file that can be loaded and displayed at any time |
 |
Previous Unread Change |
Switches to the previous difference marked as unread () |
 |
Next Unread Change |
Switches to the next difference marked as unread () |
 |
Export Report |
Exports an HTML report detailing the detected differences |
 |
Generate Script for Source |
Generates a change script for the source schema/database according to the resolution actions you have set. The script can be generated to clipboard, a worksheet or a file |
 |
Generate Script for Target |
Generates a change script for the target schema/database according to the resolution actions you have set. The script can be generated to clipboard, a worksheet or a file |
 |
Update Objects in Database |
(Repository only) Updates objects in database according to the resolution actions you have set. The drop down menu allows you to only generate a change script instead. The script can be generated to clipboard, a worksheet or a file |
 |
Overwrite Files on File system |
(Repository only) Updates objects in file system repository according to the resolution actions you have set. The drop down menu allows you to only generate a change script instead. The script can be generated to clipboard, a worksheet or a file |
 |
Filter by Action |
Displays only the differences that you have resolved by the selected action(s) |
 |
Group by |
Groups the differences by the selected criteria |
 |
Filter |
Filters the differences according to the input. It is possible to use wildcards (? and *) and regular expressions as well as filter by multiple comma separated values |
 |
Show/Hide Excluded Items |
Shows/Hides differences marked as Excluded |
 |
Hide Empty Nodes |
Hides object type nodes with no detected differences |
 |
Export Settings |
Exports the Schema Compare settings and Detailed Settings which can be configured in the Outline View |
Comparison Area
This part of Schema Compare displays specific differences between the SQL code of two given database objects. It also allows you to export the SQL code of any of the two objects in various ways and you can also deploy changes based on the actions that you have used to resolve the differences.
Comparison Area has the following tabs:
- Script Definition - displays the SQL code of both objects and the differences between them
- Change Script - displays the change script SQL code that will be generated in order to resolve the differences
In the Script Definition tab, differences can be resolved one by one with different actions.
To resolve differences between two objects in Script Definition
- In Overview Grid, select a row with two different objects
- You should now see the specific differences displayed in the Comparison Area | Script Definition tab
- Select a specific difference by simply clicking on it. A border should appear to signal that the difference is currently selected
- Right-click and select the action that you would like to use to resolve the difference
Once you resolve all the differences, you will probably want to deploy the changes. This can be done in two scopes:
- Deploy changes of all objects - in this case, you generate and run a change script for all objects that are resolved/not excluded in the Overview Grid
- Deploy changes of a single object - this method uses the Change Script tab
To deploy changes of a single object
- Resolve all differences as described in the walkthrough above
- When you are done, switch to the Change Script tab
- You should see a generated change script that is based on the resolution actions you have used. To deploy the changes, simply click the Deploy button
 /
/ . If you just want to generate the script rather than deploy it immediately, use one of the three buttons to the right of the Deploy button
Comparison Area Toolbar
| |
Deploy |
Runs the generated change script in the source/target to address the differences |
 |
Export/Copy/Open SQL Worksheet |
Exports the generated change script for source/target to a file/clipboard/Worksheet |
 |
Set Action |
Resolves all differences between the two objects using the selected action |
Continuous Integration and Delivery
About Continuous Integration and Delivery in Toad Edge®
Toad Edge aims to simplify Continuous Integration and Continuous Delivery (CI and CD) processes by providing build steps that can be used in your CI/CD systems (Jenkins, TeamCity and others).
CI/CD process can be comprised of multiple build steps. Consider this illustrative workflow where changes made in development database are deployed to staging database:
- Compare the staging database with a baseline to check for unintended changes made since the last deployment
- Compare the development database with the staging database
- Generate HTML reports
- Generate change SQL script
- Create a snapshot of the staging database as a backup
- Deploy the change script to the staging database
- Create a new baseline snapshot of the staging database
To create a build step in your CI/CD system, several files are required:
- Batch file or shell script (generated by Toad Edge)
- Connection information in XML format (generated by Toad Edge)
- Toad Edge JAR file with additional libraries (available for download here)
In general, each build step can be broken down into three stages:
- Your CI/CD system runs the batch/shell script generated by Toad Edge
- The script launches Toad Edge JAR with specific arguments to perform the desired operation
- If there are no errors, the build step is successfully finished
The way to create build steps depends on whether you are using Jenkins or a different CI/CD system.
Creating Build Steps - Jenkins
|

|
IMPORTANT: To perform build steps correctly, Toad Edge requires a 64-bit installation of Java Development Kit (JDK), however, 32-bit Java is usually used by default. It is therefore necessary to create a JAVA_HOME system variable pointing at 64-bit JDK directory.
Please do the following steps to perform the configuration:
- Right-click This PC and select Properties | Advanced System Settings | Environment Variables
- Click New in System Variables
- In the Variable Name field, enter JAVA_HOME
- In the Variable Value field, enter your JDK installation path, e.g. C:\Progra~1\Java\jdk-11.0.1
|
|
|
NOTE: Toad Edge CLI works for JDK >= 11. The CLI has been tested with JDK 11. |
Creating build steps in Jenkins is easier than in other CI/CD systems since Toad Edge provides its CI/CD functionality in the form of a Jenkins plugin. This topic explains how to install the plugin and use it to create build steps.
The Toad Edge Jenkins plugin can be downloaded here.
To install and configure Toad Edge plugin in Jenkins
- In Jenkins, go to home page and select Manage Jenkins from the left menu
- Select Manage Plugins
- Switch to the Available tab and type Toad Edge into the Filter box
- Check the checkbox next to the Toad Edge plugin name and then select Install without restart or Download now and install after restart
- Once the plugin is installed, download Toad Edge JAR file with additional libraries in zip archive from here
You will now need to configure the plugin:
- In Jenkins, go to home page, then select Manage Jenkins from left menu
- Select Configure System
- Scroll down until you see Toad Edge for Jenkins. Fill in the path to the Toad Edge zip archive that contains the JAR file and a library folder

- Save or Apply the changes
With the plugin installed and configured, you can start creating new build steps.
In this example, we are going to create a new Generate create SQL script build step. We assume that a project has already been created in Jenkins.
To create a new build step (Generate create script) in Jenkins
- In Jenkins, click on your project, and select Configure from the left menu.
- On the configuration page, scroll down to the Build section
- Click Add build step and then select Toad Edge: Generate Create Script
- Enter the path in Input file/folder field. The input can be:
- Connection XML file
|
|
NOTE: Connection XML files can be obtained by exporting a build step in CI/CD Wizard. |
- Repository folder structure
- Snapshot file
- In the Output file, enter the destination folder and the file name for the generated create script
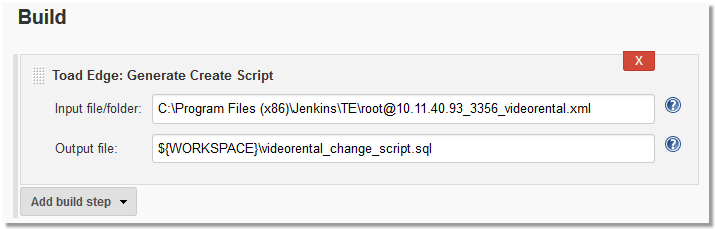
- Save or Apply the changes.
- Build the Project and you should see the generated create script file in the destination folder
