Synchronizing Calendars
After you successfully migrated objects from Active Directory to Microsoft Office 365 you may start synchronizing calendars with Microsoft Exchange Online. To do that, you need to perform the following steps in the Migration Manager for Exchange console:
|

|
TIP: To provide co-existence of calendars between on-premises Exchange organization and Microsoft Exchange Online, calendar synchronization is performed apart from the mailbox migration by a separate instance of Migration Agent for Exchange. However, you may skip this step; in this case calendars will be migrated as a part of a mailbox migration. |
Resource Mailbox Synchronization Specifics
By default, Migration Manager for Exchange processes resource mailboxes such as equipment mailboxes and room mailboxes as regular user mailboxes. To convert those mailboxes to proper Microsoft Office 365 shared mailboxes you need to perform the following steps:
Exchange 2010 or higher
- Synchronize resource mailboxes as regular calendars within a separate Office 365 calendar collection with a two-way synchronization turned on for it.
- After those mailboxes are provisioned in Microsoft Exchange Online, you may convert each of them to appropriate type of Microsoft Office 365 shared mailbox. For that, invoke the following PowerShell cmdlet under any Office 365 administrative account:
Set-Mailbox -Identity <MailboxIdParameter> [-Type <Regular | Room | Equipment | Shared>]
Exchange 2007
- Synchronize resource mailboxes as regular calendars within a separate Office 365 calendar collection with a two-way synchronization turned on for it.
- After those mailboxes are provisioned in Microsoft Exchange Online, you may convert each of them to appropriate type of Microsoft Office 365 shared mailbox. For that, invoke the following PowerShell cmdlet under any Office 365 administrative account:
Set-Mailbox -Identity <MailboxIdParameter> [-Type <Regular | Room | Equipment | Shared>]
- After that, go to https://portal.microsoftonline.com and sign in under the Office 365 administrative account.
- In the header, click Admin.
- On the Admin page, in the center pane, under Outlook settings and protection, click Manage.
- In the Exchange Control Panel, select Manage My Organization | Another User.
- Finally, open settings of each shared mailbox you converted on the step 2 and adjust necessary settings (for instance, the Automatically process meeting request and cancellations option). Be sure to click Save after modifying any settings for the shared mailbox.
|
|
Note: You may revoke Microsoft Exchange Online license for each migrated resource mailbox as that license is not required in Microsoft Office 365 for shared mailboxes. |
Setting Up a New Office 365 Calendar Synchronization Job
To add a new Office 365 calendar synchronization migration job, right-click the Calendar Synchronization node in the management tree and after that click Add Office 365 Calendar Synchronization Job on the shortcut menu. This will start the Add Office 365 Calendar Synchronization Job wizard, which will install a Migration Agent for Exchange instance and help you to set up and configure the job.
This section guides you through each step of the wizard and explains the calendar synchronization with Office 365 options.
Step 1: Specifying Source Exchange Organization
Select the source Exchange organization, source Active Directory account and separate source Exchange account if necessary for the Office 365 calendar synchronization job.
Step 2: Specify Office 365 Tenant
Select the Microsoft Office 365 tenant to synchronize calendars with from the list of registered in Migration Manager for Exchange console ones. For information how to register new Microsoft Office 365 tenant, refer to Registering Microsoft Office 365 as Migration Destination.
Step 3: Specifying Migration Agent for Exchange Installation Settings
In this step, you need to specify agent host server and path where Migration Agent for Exchange performing Office 365 calendar synchronization job should be installed. The default installation path is in the hierarchy of the Program Files system folder. You can customize the path, but your custom path will be used only if there are no previously installed instances of the Migration Agent for Exchange on the computer. Otherwise, the agent will be installed to the same location as the other existing instances regardless of the path you specify.
You can also override the default credentials that the agent will use. However, note that in this case you will be changing the credentials not only for the agent instance you are installing, but also for any existing agent instances on the agent host.
Step 4: Completing the Wizard
Finally you need to review the changes that will be made and apply them. When done, you can start dividing mailboxes you plan to migrate into Office 365 calendar collections in Migration Manager for Exchange console.
Adding a New Office 365 Calendar Collection
To create a new Office 365 calendar collection for an existing Office 365 calendar synchronization job, right-click the job in the management tree and click Add Collection on the shortcut menu.
This will start the Add Office 365 Calendar Collection wizard, which will help you to set up and configure a new collection for the Office 365 calendar synchronization job. Each step of the wizard is described below.
|
|
Note: All configuration settings that you specify for the collection during the wizard can be later changed. For that right-click the collection node in the management tree and select Properties. |
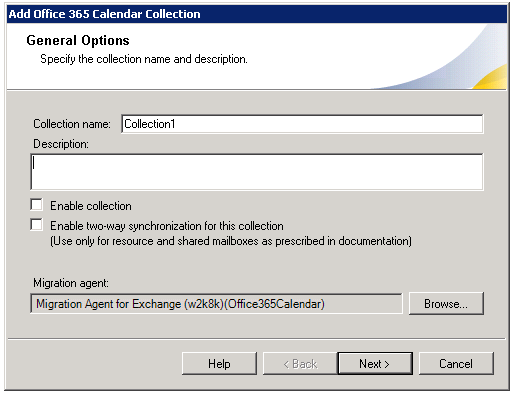
Step 1: Specifying General Options
In the first step of the wizard, specify a name for the collection. You can optionally provide a text description for the collection. Also you can specify the Migration Agent for Exchange instance that should process the collection.
Enable the collection to force the corresponding agent to start processing the collection at scheduled time that will be specified on the next step of the wizard. Otherwise, the collection will not be involved in the migration process until you enable it.
|
|
Note: The corresponding Migration Agent for Exchange instance must be running to start processing the collection. To check the agent state, go to the Agent Management node in the management tree. |
|

|
Caution: For regular calendar synchronization, the Enable two-way synchronization for this collection option should stay cleared. Select it only if your calendar collection contains shared and/or resource mailboxes which will be used by source and target users at the same time during co-existence period. |
Step 2: Specifying Workflow
Set the preferred start date and other options for migrating the collection. By default, the option to start as soon as possible is selected. You can also specify a particular date and time to start synchronizing calendars from the collection.
Step 3: Populating the Collection
You can add mailboxes to the collection in the following ways:
- Explicitly add mailboxes to the collection by clicking the Add User button and selecting mailboxes from the list.
- Implicitly add mailboxes located in the containers by clicking the Add Container button and selecting the appropriate container check box. To add the mailboxes from the subcontainers as well, select the Include subcontainers check box. You can create and apply a LDAP filter to mailboxes of the Exchange organization using the Advanced tab.
- Implicitly add mailboxes listed in the groups. To add the mailboxes listed in the nested groups, select the Expand nested distribution groups check box.
To preview the list of mailboxes added to the collection, click the Preview button.
Step 4: Selecting Subscription Plan
Select the subscription plan for users whose calendars will be synchronized within the collection from ones available in the Microsoft Office 365 tenant specified as migration target for the Office 365 calendar synchronization job. By default, each user that does not have Exchange Online license yet, will be assigned all licenses from the selected subscription plan when the migration starts. That will give the user access to the licensed services provided by the plan. Assigning the license will also cause provisioning a mailbox for user in Microsoft Office 365.
|
|
Caution: Make sure the plan you selected contains Exchange Online service. |
|
|
TIP: You can configure Migration Agent for Exchange to assign users only Exchange Online license instead of all licenses at once. For more information how to do that, refer to the Knowledge Article 136629. |
|
|
TIP: The information about the selected subscription plan is displayed for your information. |
Step 5: Configuring Office 365 Settings
At the final wizard step, specify Microsoft Online Services ID and password of Office 365 administrative account under which Migration Agent for Exchange specified on step 1 will access Microsoft Office 365.
Starting Calendar Synchronization
To start synchronizing the calendars with Microsoft Office 365, perform the following:
- Select the Office 365 calendar synchronization job in the management tree, and then click the Agent Manager toolbar button.
- After that in the agent host pane select the agent host where the agent instance specified for the calendar collections you plan to synchronize is installed.
- Finally, right-click the corresponding agent instance from the list of agent instances below and select Start from the shortcut menu.
|
|
Note: You can temporarily disable any collection so that it will not be involved in the synchronization process until you enable it. For that, select Disable in the collection context menu. |
You can get track the calendar synchronization migration using the Statistics dashboard. For information on how to do that, refer to the corresponding section of this document.
