Chat now with support
Chat with Support

QoreStor 7.4.0 - User Guide

Introducing QoreStor Accessing QoreStor Configuring QoreStor settings
Licensing QoreStor Configuring SAML Configuring an SSL Certificate for your QoreStor System Configuring Active Directory settings Securing QoreStor server root logins Understanding system operation scheduling Configuring Secure Connect Enabling MultiConnect Configuring and using Rapid NFS and Rapid CIFS Configuring and using VTL Configuring and Using Encryption at Rest Configuring and using the Recycle Bin Configuring Cloud Reader Configuring RDA immutability
Managing containers Managing local storage Managing cloud storage Managing replications Managing users Monitoring the QoreStor system Managing QoreStor remotely Support, maintenance, and troubleshooting Security recommendations guide About us

Configuring cleaner schedules

Performing scheduled disk space reclamation operations are recommended as a method for recovering disk space from the system. The recommended method is to schedule a time when you can run the Cleaner on your QoreStor system with no other planned processes running.

Even if no Cleaner schedule is set, but the system detects that there is disk space that can be reclaimed, the Cleaner process runs. However, the Cleaner will not start until the following conditions are met:

  • it detects that there are no active data ingests,
  • that two minutes of system idle time have elapsed since the last data file ingest was completed,
  • and that the Replication process is not running (the Cleaner process runs as a lower system priority operation than the Replication process).

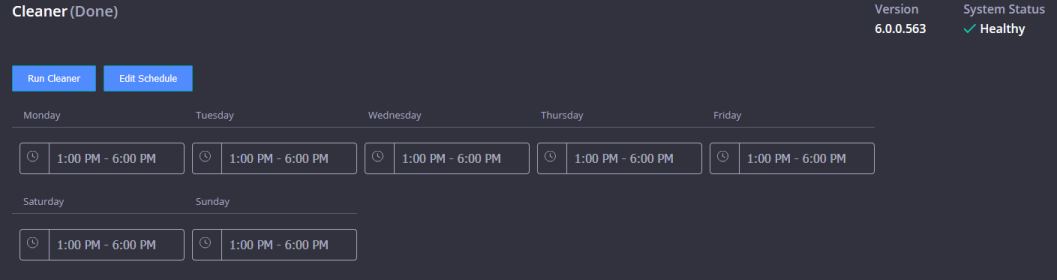
To schedule cleaner operations on your system using the GUI:

  1. On the navigation menu, click Local Storage to expand the menu, then click Cleaner..
  2. On the Cleaner page, click Edit Schedule.

    The schedule lists a Start Time and End Time for each day of the week.

  3. For each day of the week, click the time selector field. Select the From and To times to configure a window during which replication can run. Click Set.
  4. Click Save Schedule.
  5. Click Submit

    NOTE: Even if no Cleaner schedule is set, but the system detects that there is disk space that can be reclaimed, the Cleaner process runs. However, the Cleaner will not start until the following conditions are met: it detects that there are no active data ingests, that two minutes of system idle time have elapsed since the last data file ingest was completed, and that the Replication process is not running (the Cleaner process runs as a lower system priority operation than the Replication process).

To schedule cleaner operations on your system using the CLI:

NOTE: The procedure below is a summary. Please refer to the QoreStor Command Line Reference Guide for detailed information on accessing the command line interface for your system as well as using the QoreStor commands.

NOTE: Running the Cleaner while ingesting data reduces system performance. Ensure that you schedule the Cleaner to run when backup or replication is not in progress.

  1. Access the QoreStor command line interface.
  2. Use the QoreStor command line interface (CLI) to create and delete the cleaner schedule. The available commands are:
      schedule --add --day <Day of the Week> --start_time <HH:MM> --stop_time <HH:MM> --cleaner   
    
      schedule --delete --day <Day of the Week> --cleaner

    For full details on running the cleaner schedule commands, help is available by entering:

      schedule --help

Viewing cleaner status

On the Cleaner page, you can also view graphs showing Cleaner runtime and bytes processed. You may also use the stats --system command to view the cleaner status via the QoreStor command line interface.

Viewing cleaner statistics

To view additional detailed cleaner statistics, you can use the QoreStor CLI stats --cleaner command to show the following categories of statistics:

  • Last Run Files Processed (number of files processed by Cleaner)
  • Last Run Bytes Processed (number of bytes processed by Cleaner)
  • Last Run Bytes Reclaimed (number of bytes reclaimed by the Cleaner)
  • Last Run Start Time (indicates date and time last Cleaner process started)
  • Last Run End Time (indicates date and time last Cleaner process ended)
  • Last Run Time To Completion(s) (indicates the number of times that Cleaner process has successfully completed)
  • Current Run Start Time (indicates date and time current Cleaner process started)
  • Current Run Files Processed (number of files processed by current Cleaner process)
  • Current Run Bytes Processed (number of bytes processed by current Cleaner process)
  • Current Run Bytes Reclaimed (number of bytes reclaimed by the current Cleaner processed)
  • Current Run Phase 1 Start Time (indicates date and time for start of current Cleaner process phase 1)
  • Current Run Phase 1 Records Processed (lists the number of data records processed in current Cleaner process phase 1)
  • Current Run Phase 1 End Time (indicates date and time for end of current Cleaner process phase 1)
  • Current Run Phase 2 Start Time (indicates date and time for start of current Cleaner process phase 2)
  • Current Run Phase 2 Records Processed (lists the number of data records processed in current Cleaner process phase 2)
  • Current Run Phase 2 End Time (indicates date and time for end of current Cleaner process phase 2)
  • Current Run Phase 3 Start Time (indicates date and time for start of current Cleaner process phase 3)
  • Current Run Phase 3 Records Processed (lists the number of data records processed in current Cleaner process phase 3)
  • Current Run Phase 3 End Time (indicates date and time for end of current Cleaner process phase 3)
  • Current Run Phase 4 Start Time (indicates date and time for start of current Cleaner process phase 4)
  • Current Run Phase 4 Records Processed (lists the number of data records processed in current Cleaner process phase 4)
  • Current Run Phase 4 End Time (indicates date and time for end of current Cleaner process phase 4)

For more information about QoreStor CLI commands, see the QoreStor Command Line Reference Guide.

Configuring Secure Connect

The sections below contain information necessary for the proper configuration of Secure Connect. The procedures for configuring Secure Connect differ depending on your plug-in version.

Enabling Secure Connect for OST and RDA plug-ins prior to 4.1.0.265

IMPORTANT: The procedure below is for plug-in versions prior to 4.1.0.265. To enable or disable Secure Connect on plug-in version 4.1.0.265, refer to Managing Secure Connect with OST or RDA plug-in 4.1.0.265 or later.

Secure Connect is enabled through the use of environmental variables on the client machine. No configuration is required on the QoreStor server.

To enable Secure Connect on a Windows client

  1. On the client server, press Win+R to open the Run window.
  2. Type sysdm.cpl and click OK.
  3. Click the Advanced tab, then Environment Variables.
  4. In the System Variables section, click New.
  5. In the Variable name field, enter SECURE_CONNECT.
  6. In the Variable value field, enter one of the following:
    • 0 - disables Secure Connect
    • 1 - Secure Connect is enabled, but QoreStor will failback to an unsecured connection if the Secure Connect server is unavailable.
    • 2 - Secure Connect is enabled. Connection will fail if Secure Connect server is unavailable.
  7. Click OK, then OK.

IMPORTANT: After enabling Secure Connect, you will need to change the BypassPorts configuration in the sc_client.properties file. Refer to Configuring Secure Connect properties for information.

IMPORTANT: After enabling Secure Connect, you must restart the DMA application services.

To enable Secure Connect on a Linux client

  1. At the command prompt on the client machine, enter the following command
    echo 'export SECURE_CONNECT=<0|1|2>' >> ~/.bashrc

    Where:

    • 0 - disables Secure Connect
    • 1 - Secure Connect is enabled, but QoreStor will failback to an unsecured connection if the Secure Connect server is unavailable.
    • 2 - Secure Connect is enabled. Connection will fail if Secure Connect server is unavailable.
  2. Log out of the QoreStor system, then log in.

IMPORTANT: After enabling Secure Connect, you will need change the BypassPorts configuration in the sc_client.properties file. Refer to Configuring Secure Connect properties for information.

IMPORTANT: After enabling Secure Connect, you must restart the DMA application services.


Related Documents

The document was helpful.

Select Rating

I easily found the information I needed.

Select Rating