You have the option of renaming users and groups as part of the migration. This includes merging multiple source users or groups into a single target user or group.
Renaming of objects is performed using a specially formatted plain-text file, which should be imported on the Select Objects in Source Domain step of the Migration Wizard (see the Creating a Migration Session procedure).
All entries in the file should be tab-separated. The header is mandatory and should contain at least these two entries (note that the white space is a tab character):
SAMAccountName SAMAccountName
One object per line should be specified. Here is a sample import file:
SAMAccountName SAMAccountName
sourceuser01 targetuser1
sourceuser02 targetuser2
sourceuser03 targetuser3
sourceuser04 targetuser4
|
|
Caution:
SAMAccountName SAMAccountName name sourceuser01 targetuser01 targetuser1
SAMAccountName SAMAccountName name Executive Users Target Executive Users Target Executive Users |
The same file format can be used to populate other target attributes; here is a syntax sample:
SAMAccountName SAMAccountName name displayname userprincipalname
sourceuser1 targetuser1 targetuser1 Target User1 targetuser1@dom.com
sourceuser2 targetuser2 targetuser2 Target User2 targetuser2@dom.com
sourceuser3 targetuser3 targetuser3 Target User3 targetuser3@dom.com
The same import file can be used for merging with existing objects. When using such a file, you can merge two completely different accounts, for example Peter M. from the source domain can be merged with James T. from the target domain. The same applies to groups. In rare cases, the same approach is used to merge a built-in group with another (regular) group. When merging users or groups using sAMAccountName<tab>sAMAccountName, make sure that matching by sAMAccountName is enabled in the domain pair properties; otherwise DSA will attempt to create a new user with the same sAMAccountName and post a conflict instead of doing a merge.
|
|
Caution: The CN attribute cannot be changed using the CN as syntax. In order to modify the CN value, the Name attribute must be used. This will change the CN name on target. |
Finally, note the following specifics:
LDAP error 0x13. Constraint Violation (00002082: AtrErr: DSID-03050B04, #1:0: 00002082: DSID-03050B04, problem 1005 (CONSTRAINT_ATT_TYPE, data 0, Att 3 (cn):len 130).
If you want to re-assign the directory migration task to some other person without revealing key credentials (like administrative accounts and passwords to access source and target domains), you can delegate migration to that person and even limit the scope of the delegated migration to certain organizational units (OUs) belonging to the source and target domains.
The results and status information on the delegated migrations will be added to the project, so no matter how many delegated administrators are involved, you can keep track of the overall project.
Since the delegated administrators get access to only the tasks to which you grant them access, you can be sure that they do not interfere with other tasks.
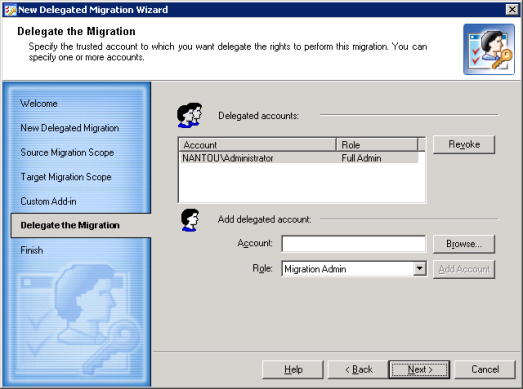
A person to whom the migration task is delegated is called a Migration Admin. This person will be able to create migration sessions using the Migration Wizard. However, the objects available for migration will be limited to the scope you specified when you delegated the task. The Migration Admin to whom the task was delegated will not be able to select the agent to perform migration or the custom add-in to process the objects being migrated.
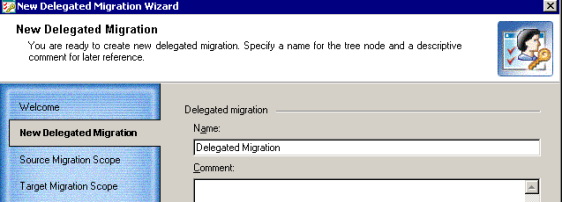
To delegate a migration task, right-click the domain pair node and select New Delegated Migration from the shortcut menu. The New Delegated Migration Wizard will help you delegate a part of migration to another person.
Specify a name for the delegated migration and enter comments.
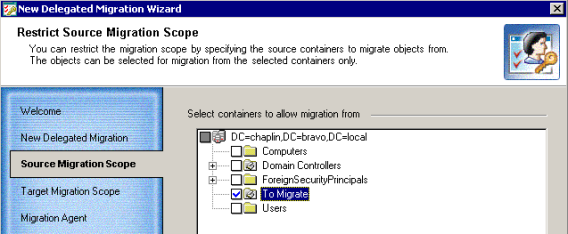
This step allows you to select the OUs from which the objects can be migrated within the delegated migration scope.
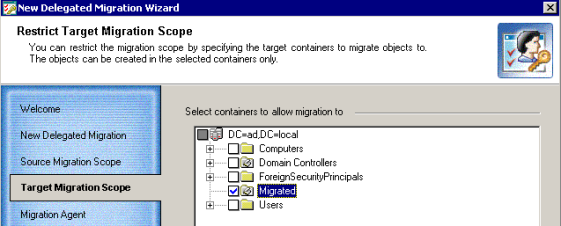
This step allows you to select the OUs to which the objects can be migrated within the delegated migration scope.
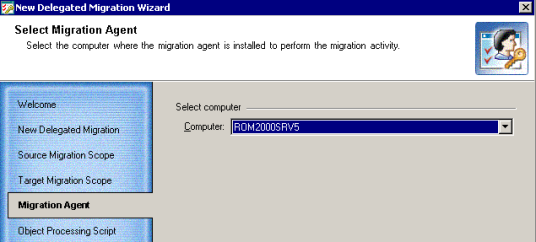
A person to whom the migration task is delegated will be able neither to install the Directory Synchronization Agent nor to select the agent’s instance for performing migration. Therefore, in this step you should select the instance of the Directory Synchronization Agent which will perform the delegated migration.
|
|
NOTE: If you have only one agent installed in your environment, you will not be presented with this step. |
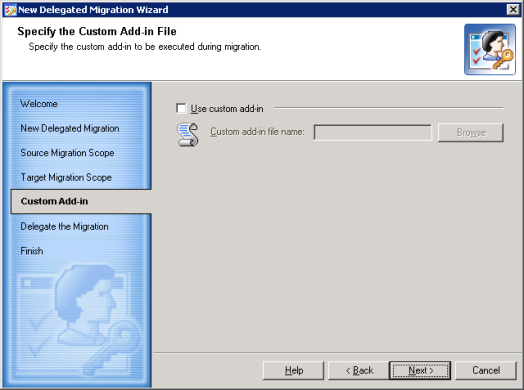
A person to whom the migration task is delegated will not be able to select a custom add-in file for processing objects being migrated. Therefore, on this step you should select the custom add-in file if the migrated objects should be processed with the script before copying to the target server. Select the Use custom add-in checkbox and browse for the .xml custom add-in file.
This step allows you to assign the Migration Admin role to the account you select. The Migration Admin will be able to create migration sessions and make migration settings within the scope you just selected.
The wizard displays the delegation settings you made.
You can roll back the changes made to the target directory by each migration session independently.
All the changes made to the target domain by the session will be rolled back exactly to the state before the session started. The following example illustrates this behavior:
In other words, when you undo a session, only changes made by that session are rolled back. Another example of such behavior is the following:
|
|
Caution:
|
To undo the results of a migration session, select the Migration node in the migration project tree, right-click the session displayed in the right-hand pane and select Undo from the shortcut menu. The Undo Wizard will start.
This step allows you to select the objects for which the migration should be undone.
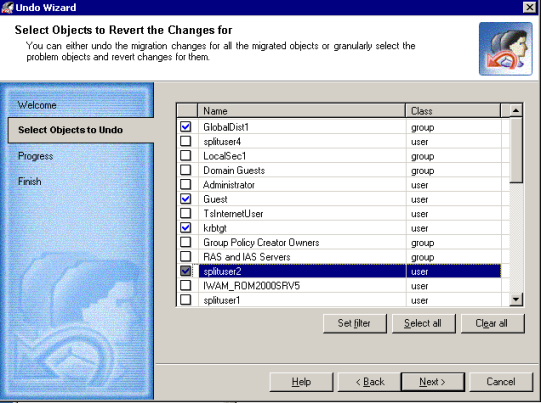
To select the objects, you can either click Select all or select particular objects by selecting the check boxes next to those objects. Click Set filter to specify the object classes for which you want to undo changes. All object classes are selected by default.
The wizard now removes the migrated objects you selected from the target domain and reverts changes made during the migration session. Wait while the wizard completes.
|
|
NOTE: If the source object was merged with the existing target object during migration, the target object will not be deleted from the target directory during the undo. All changes made to the target object during the merge operation (including moving to another organizational unit and changing attribute values) will be rolled back to the state the object had before the migration and merge. |
If errors occurred during the rollback process, you can view more detailed information by clicking View log and inspecting the log file for the failed objects.
Before you start your migration, you should create the domain pairs that will be involved in the migration or synchronization process. Refer to the Creating a Domain Pair topic for more details.
If only Active Directory objects are being migrated from one forest to another, then directory synchronization is recommended but not required. If inter-org Exchange messaging system migration is performed, then directory synchronization is mandatory.
Since large migration projects can last for a long time, there is a period when the source and target environments have to coexist and be kept in sync. Migration Manager not only allows you to migrate accounts, but also to continuously synchronize these accounts and groups.
Full re-synchronization deletes the last state information and resynchronizes the directories. It overwrites single-valued attributes and merges multi-valued attributes. For example, if a group has member User1 on the source and the corresponding group has User2 on the target, after you re-sync from source to target the target group will have both User1 and User2.


