Here are some activities that will deepen your understanding about formatting views in a grid.
You probably noticed that the layout in this tutorial leaves quite a bit of room for improvement. The Properties dialog box for each view in the grid’s layout is a good place o start.
Experiment with making these changes to the layout properties:
|
• |
Remove the title and border from the Host Chooser DDL T4 view. There is no need for these items because they take up space needlessly. For future reference, realize that setting a title automatically ensures that a border appears, but setting a border does not automatically cause a title to appear. |
|
• |
Set the widths of the two charts to Automatic and the horizontal alignment to Fit Cell. Set the vertical alignment to a fixed number. This causes the charts to align themselves nicely. Later, you can also experiment with weights to see how using simple small numbers adjusts the proportion of space given to one component in comparison to another. |
|
• |
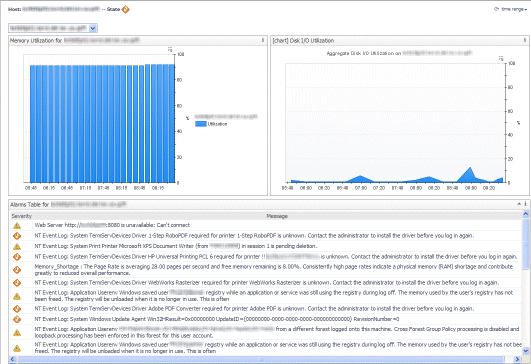
The following figure gives and indication of the expected result:
|
TIP: You can create reports easily using the Reports home page. For instructions, see the Foglight® User Help. While the online help provides detailed information about reports and hands-on instructions, this tutorial exposes a deeper level of report generation and is geared toward a technical audience. |
|
• |
The objectives of Tutorial 6 are:
This tutorial requires a list of hosts, just as in Tutorial 2, but this time we demonstrate a way of accomplishing the objective by using both a query and a context setting. First, you build a query that returns a HostModel, and then you will a context setting to select hosts from the HostModel object returned by the query.
|
1 |
|
2 |
In the Add Query dialog box, on the Create a Blank Query tab, in the Name column, click Host Model (with Monitoring in the Namespace column), and then click OK. |
|
3 |
|
4 |
|
5 |
Ensure that the UI Query and Public check boxes are clear, Comments and Context Help empty, and Relevant and Allowed Role(s) unchanged. |
|
6 |
Click the Root Reference box and choose Data Sources > Monitoring (Default Instance) from the list that appears. |
|
7 |
Most objects are grouped at some level down from the root. In this example, the path to the object we want is in HostModel > Hosts. Click the Path box and choose ModelRoots from the list that appears. |
|
8 |
Click Save to save the query. |