ServiceNow – PUSH DATA
To use the adapter for ServiceNow, to push data to the system, fill the field “Web Service Home URL” with the ServiceNow instance URL you want to connect to.
Then provide a valid instance URL, username/password to connect.
.svg)
The .svg) button steps into the next window that shows the available operations of that Web Service; choose “PUSH DATA”, to query data stored in ServiceNow tables.
button steps into the next window that shows the available operations of that Web Service; choose “PUSH DATA”, to query data stored in ServiceNow tables.
.svg)
After selecting the desired operation, it is required to enter a name and a description for the adapter into the appropriate fields; the user must browse the file system for the adapter folder (used to save intermediate and result file for adapter execution).
The button steps into the next window that allows the user to set values for the Web Service parameters.
When a lens icon shows beside the parameter name, as for “Import Set Table name”:
.svg)
this means that user may set the parameter value from a list of available items.
In case of ServiceNow “push data” operation, with the double-click on the lens icon, a table appears, with the available import set tables:
.svg)
Select the proper one and apply the selection, and the desired import set table name fills the “Import Set Table name” parameter value:
.svg)
Should the provided account not be granted to read system tables, as the one containing the list of user tables, the popup will be blank, but the parameters can always be manually filled.
After that, user complete push operations configuration, filling the parameters (select the parameter, write value and press .svg) button ):
button ):
•Transform after load: set to “true” if there is a Transformation Map set between the Import Set Table and ServiceNow target table to be applied after staging table load, “false” or blank otherwise
•CSV separator: comma as default
Documentation about import set tables and transformation map can be found at the ServiceNow website:
Pressing the .svg) button stores all the entered parameters for the web service adapter in the DT database.
button stores all the entered parameters for the web service adapter in the DT database.
The .svg) button closes the data preview window and goes back to Web Service configuration form.
button closes the data preview window and goes back to Web Service configuration form.
SmartSheet
To use the adapter for SmartSheet, fill the field “Web Service Home URL” with the SmartSheet home page URL you want to connect to.
.svg)
Then, provide a valid access token to connect. To generate an access token, requested to authenticate the SmartSheet service, follow instructions from https://smartsheet-platform.github.io/api-docs/?shell
The button steps into the next window that shows the available operation of that Web Service, which is “READ SHEETS”, allowing user to query all data stored in user worksheets.
.svg)
After selecting the desired operation, it is required to enter a name and a description for the adapter in the appropriate fields; the user must browse the file system for the adapter folder (used to save intermediate and result file for adapter execution).
The next button steps into the next window that allows the user to set values for the Web Service parameters.
When a lens icon shows beside the parameter name:
.svg)
this means that user may choose the parameter value from a list of available items.
In case of SmartSheet “read sheets” operation, with the double-click on the lens icon, a table appears, with the available sheets to query:
.svg)
Select and apply the selection, and the desired sheet name (as expected by Smartsheet export service) fills the “Sheet name” parameter value:
.svg)
Pressing the .svg) button opens a new pop-up window and the response resulting from the Web Service call is displayed.
button opens a new pop-up window and the response resulting from the Web Service call is displayed.
.svg)
Pressing the button stores all the entered parameters for the web service adapter in the DT database.
The button closes the data preview window and goes back to Web Service configuration form.
SharePoint Online
To use the adapter for SharePoint Online, fill the field “Web Service Home URL” with the SmartSheet home page URL you want to connect to.
.svg)
To provide required parameters, please ensure that erwin DT is registered on target tenant Azure Active Directory.
See: https://docs.microsoft.com/en-us/azure/app-service/app-service-mobile-how-to-configure-active-directory-authentication#optional-configure-a-native-client-application about registering a native application.
Register DT with:
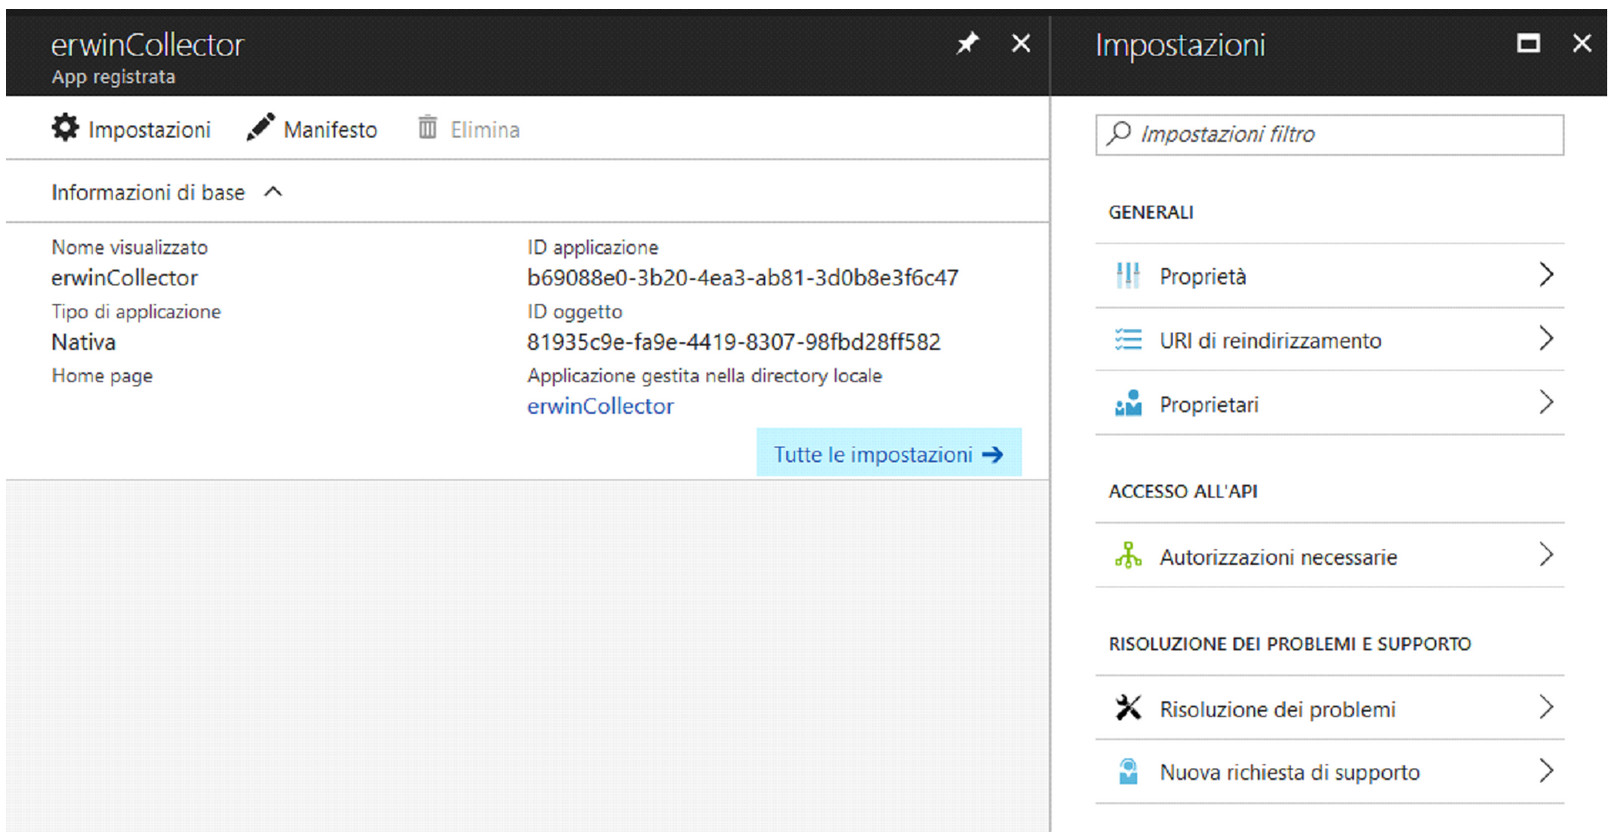
•Name: erwinCollector
•Application Type: Native
•Redirect URI: http://erwinCC
.svg)
and provide all grants to read site list, for specific Microsoft API:
•Microsoft Graph:
oRead items in all site collection
oAccess directory as the signed in user
•Microsoft Azure Active Directory:
oRead all users' basic profiles
oSign in and read user profile
•Office 365 SharePoint Online (Microsoft.SharePoint)
oRead and write items and lists in all site collections
oRead and write items in all site collections
oRead items in all site collections
oRead managed metadata
The button steps into the next window, which requires user to browse to authorization URL and provide grant to the application:
.svg)
Wait for the browser to complete the request; a new page will be presented, with a URL like:
http://erwinCC/?code= AwABAAAAvPM1KaPlrEqdFSBzjqfTGBCmLdgfSTLEMPGYuNHSUYBrqqf_ZT_p5uEAEJJ_nZ3UmphWygRNy2C3jJ239gV_DBnZ2syeg95Ki-374WHUP-i3yIhv5i-7KU2CEoPXwURQp6IVYMw-DjAOzn7C3JCu5wpngXmbZKtJdWmiBzHpcO2aICJPu1KvJrDLDP20chJBXzVYJtkfjviLNNW7l7Y3ydcHDsBRKZc3GuMQanmcghXPyoDg41g8XbwPudVh7uCmUponBQpIhbuffFP_tbV8SNzsPoFz9CLpBCZagJVXeqWoYMPe2dSsPiLO9Alf_YIe5zpi-zY4C3aLw5g9at35eZTfNd0gBRpR5ojkMIcZZ6IgAA&session_state=7B29111D-C220-4263-99AB-6F6E135D75EF&state=D79E5777-702E-4260-9A62-37F75FF22CCE &session_state=7B29111D-C220-4263-99AB-6F6E135D75EF&state=D79E5777-702E-4260-9A62-37F75FF22CCE
Copy the entire URL to DT text area:
.svg)
The button steps into the next window that shows the available operation of that Web Service, which is “READ LISTS.
After selecting the desired operation, it is required to enter a name and a description for the adapter in the appropriate fields; the user must browse the file system for the adapter folder (used to save intermediate and result file for adapter execution).
The next button steps into the next window that allows the user to set values for the Web Service parameters.
Select the list – double click on lens icon beside “List GUID” open a list of available lists – and apply the selection, and the desired list GUID (as expected by Sharepoint export API) fills the parameter value
Pressing the button opens a new pop-up window and the response resulting from the Web Service call is displayed.
.svg)
Pressing the button stores all the entered parameters for the web service adapter in the DT database.
The button closes the data preview window and goes back to Web Service configuration form.
Generic data provider - CSV
To use the adapter for a generic http data provider, fill the field “Web Service Home URL” with the URL to the data provider service, ex:
.svg)
Then, provide a valid User/Password if service requires (basic) authentication, or select “Anonymous” access option
The button steps into the next window that shows the available operation of that Web Service, which is “GET DATA”, allowing user to query web data.
.svg)
After selecting the desired operation, it is required to enter a name and a description for the adapter in the appropriate fields; the user must browse the file system for the adapter folder (used to save intermediate and result file for adapter execution).
The next button steps into the next window that allows the user to set values for the Web Service parameters.
When a lens icon shows beside the parameter name:
.svg)
this means that user may choose the parameter value from a list of available items. In case of this example, with the double-click on the lens icon, a table appears, with the available encoding:
.svg)
.svg)
Select and apply the selection, and the desired values for other fields, like the CSV column separator and parameters should the service require them.
Pressing the button opens a new pop-up window and the response resulting from the Web Service call is displayed.
.svg)
Pressing the button stores all the entered parameters for the web service adapter in the DT database.
The button closes the data preview window and goes back to Web Service configuration form.