Chat now with support
Chat with Support

Foglight 5.9.1 - Administration and Configuration Guide

Administering and Configuring Foglight Extending Your Monitoring Reach with Foglight Cartridges Administering Foglight Configure Rules and Metric Calculations to Discover Bottlenecks Customizing Your Foglight Environment with Tooling

Manage Lockboxes

This dashboard is a starting point when creating credentials. Credentials are stored in lockboxes. Ensure that you have the appropriate lockboxes in place before creating credentials. The dashboard displays a list of all lockboxes that are defined on the server, in addition to the System lockbox that is included with the Management Server. This lockbox is not password-protected. Its contents are accessible to all clients in your system. The System lockbox is only intended for use with some agent types, and it is always available for selection in the flow for adding credentials initiated from the Manage Credentials dashboard. For that reason, any purpose-specific wizards included with cartridges whose agents do not support the System lockbox do not provide this lockbox as an option when creating credentials.

Default: This lockbox is password-protected. The default password is foglight. Consider changing this password after the installation to protect its contents.

Use the Manage Lockboxes dashboard to view a list of lockboxes that exist in your system, to create and delete lockboxes, to change their password, and to release them to credential clients.

By default, the following columns are displayed:

Alarms: The total counts of outstanding credential alarms, broken down by alarm types (Fatal, Critical, and Warning).
Name: The lockbox name.
Credential Count: The number of credentials contained in the lockbox.
Credential Clients: Lists the clients to which this lockbox is released. This column is populated only if the check box Show lockboxes currently assigned to each client is selected on the View Clients dashboard. For more information, see Explore the View Clients dashboard.

Use the Add button to add a lockbox to the existing collection.

To delete a lockbox, In the left-most column in the list, select the check boxes for one or more lockboxes, then click Delete.

For more information, see Add or delete lockboxes.

A lockbox contains one or more credentials, can be password-protected, and can be released to credential clients. If a lockbox is password-protected, you must know the password in order to release the lockbox to a client.

Typically you need one lockbox per client. In case your business scenario requires different encryption keys for different credentials, or managing user access through password control, it is possible to define multiple lockboxes for an individual client.

Delete lockboxes that are no longer needed. Deleting a lockbox deletes all credentials contained in the lockbox. It causes the clients using these credentials to receive a delete notification and stop using those credentials for authentication.

2
In the New Lockbox dialog box, in the Name box, type a unique name for the lockbox. For example, My Production Server Access.
a
Select the Secure using a password check box.
b
In the Password and Confirm Password boxes, type the lockbox password.
4
Click Add.
The New Lockbox dialog box closes and the Manage Lockboxes dashboard refreshes, showing the newly created lockbox in the list.
2
Click Delete.
3
In the Confirm Deleting Lockboxes dialog box, click Confirm.
The Confirm Deleting Lockboxes dialog box closes.

Lockboxes can be password-protected. Associating passwords with lockboxes enforces access control, allowing only authorized users to release lockboxes to credential clients. Removing a lockbox password enables any user to access the credentials stored in the lockbox.

2
In the Add Password To Lockbox dialog box, type the new password in the New Password and Confirm New Password boxes.
3
Click Confirm.
The Add Password To Lockbox dialog box closes and the Manage Lockboxes dashboard refreshes, showing the button in the Add or Remove Password column, indicating that a lockbox password is added and can be removed.
2
In the Remove Password of Lockbox dialog box, type the existing lockbox password in the Lockbox Password box.
3
Click Confirm.
The Remove Password of Lockbox dialog box closes and the Manage Lockboxes dashboard refreshes, showing the button in the Add or Remove Password column, indicating that a lockbox password no longer exists and can be added.

Lockboxes can be password-protected. Associating passwords with lockboxes enforces access control, allowing only authorized users to release lockboxes to respective credential clients.

2
In the Change Password of Lockbox dialog box, type the current password in the Old Password box, and the new password in the New Password and Confirm New Password boxes.
3
Click Confirm.
The Change Password of Lockbox dialog box closes, indicating success.

A lockbox contains a set of credentials and keys for their encryption and decryption. Credentials are released to credential clients unencrypted. When a lockbox is released to a credential client, the client passes the credential information to its agents. The agents use this information to establish connection with target resources.

The Release Lockbox to Credential Clients dialog box opens.
2
If the lockbox is password-protected, in the Release Lockbox to Credential Clients dialog box, type the lockbox password and select one or more credential clients for lockbox release.
3
Click Release.
The Release Lockbox to Credential Clients dialog box closes, indicating success.
4
Optional — Ensure the Credential Clients column is populated.
b
On the View Clients dashboard, ensure that the Show lockboxes currently assigned to each client check box is selected.
f
On the Manage Lockboxes dashboard, observe the Credential Clients column of the newly released lockbox entry. The column lists the credential clients to which the lockbox is assigned.

Manage Credentials

This dashboard lists the available lockboxes, the credentials associated with them, and the related information. It allows you to add new and edit existing credentials. Credentials are stored in lockboxes. Lockboxes can be created beforehand, or during the process of creating credentials.

Credential information consists of a name, type, policies, and resource mappings. The credential name uniquely identifies the credential. A range of different types allows you to choose a credential type that suits your organization’s security requirements. A credential type can consist of a user name, password, Windows domain, no input, or the available combinations of these parameters.

A credential can have none, one, or multiple policies. A credential policy defines the number of times a credential can be used, the number of allowed authentication failures, the time range during which the credential is valid, or the length of time the credential data can be cached on the client.

Resource mappings identify secured resources. The mappings typically contain a combination of literal expressions, regular expressions, or an IP address range.

By default, the following columns are displayed:

Edit: Click to edit a credential’s name, properties, resource mappings, or policies.
Lockbox: The name of the lockbox where the credential is defined.
Name: The name of the credential.
Alarms: The total counts of outstanding credential alarms, broken down by alarm types (Fatal, Critical, and Warning).
Valid Until: The date and time at which the credential expires.
Relative Order: The order in which credentials are returned to credential clients.
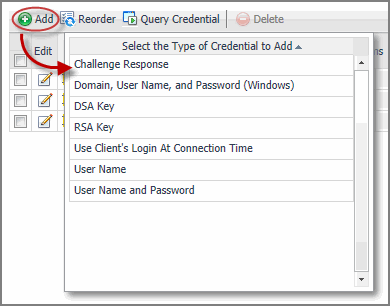
Type: Shows the credential type. The following credential types are available:
Challenge Response: Uses one or more challenge and response pairs to grant access without requiring any interaction in the browser interface. The answers are sent by the agent and are part of the agent configuration. Use this type for SSH keyboard-interactive credentials.
Domain, User Name, and Password (Windows): Requires a user name and password to access a monitored resource. The domain name is optional.
DSA Key: Uses the Digital Signature Algorithm (DSA) Key for authentication.
RSA Key: Uses the RSA (Rivest, Shamir and Adleman) Key for authentication.
Use Client’s Login At Connection Time: Uses the currently logged in user’s account to access secured resources. This is not the user currently logged into the Management Server, but the user under which the credential client is running. For example, a credential provided to a Foglight Agent Manager instance launched by a user on a remote machine, causes the connection to the secured resource to be made using this user’s identity.
User Name: Requires a user name to access a monitored resource.
User Name and Password: Requires a user name and password to access a monitored resource.
Resource Mappings: Lists one or more resource mapping expressions associated with the credential.
Policies: Lists the policies associated with the credential. Hovering over this column displays a dwell that shows you this information in tabular form.

Credentials are stored in lockboxes. Lockboxes can be created beforehand, or during the process of creating credentials.

Credentials are released to credential clients unencrypted. If the agent uses a standard connection mechanism supported by the Foglight Agent Manager such as WinShell, WMI, or SSH, when a lockbox is released to the Agent Manager, the Agent Manager establishes a connection with the monitored resource, and passes the connection to the agent. If the agent uses a different connection mechanism, the client passes the credential information to the agent. The agent uses this information to establish a connection with secured resources.

When creating a new credential you have an option to start from a blank credential or copy an existing credential. Credential type, policies, and resource mappings are all preserved and copied over to the new credential. Unlike credential name, policies, and resource mappings, once defined, credential types cannot be changed. Copying an existing credential is useful in situations when you need to quickly create a slightly modified version of the existing credential. For example, if your organization enforces periodic password changes, when this happens, simply copy the credential and change its password.

Credentials that are no longer in use can be deleted.

Challenge Response: Uses one or more challenge and response pairs to grant access without requiring any interaction in the browser interface. The answers are sent by the agent and are part of the agent configuration.
Domain, User Name, and Password (Windows): Requires a user name and password to access a monitored resource. The domain name is optional.
DSA Key: Uses the Digital Signature Algorithm (DSA) Key for authentication.
RSA Key: Uses the RSA (Rivest, Shamir and Adleman) Key for authentication.
Use Client’s Login At Connection Time: Uses the currently logged in user’s account to access secured resources. This is not the user currently logged into the Management Server, but the user under which the credential client is running. For example, a credential provided to a Foglight Agent Manager instance launched by a user on a remote machine, causes the connection to the secured resource to be made using this user’s identity.
User Name: Requires a user name to access a monitored resource.
User Name and Password: Requires a user name and password to access a monitored resource.
The credential type depends on the agent that will use the credential to access the monitored resource. For example, some agents support the use of the Use Client’s Login At Connection Time and User Name and Password credential types, while others can only accept the Challenge Response or User Name types. A selected credential type dictates the type and structure of resource mappings associated with a credential. Resource mappings identify the parts of the monitored system that selected agents can access based on their credentials. For example, the User Name and Password credential type, that requires a valid user name and password pair to access a monitored system, can have one or more resource mappings for accessing Unix-based targets based on a condition that evaluates the target port number. Similarly, a credential of the Use Client’s Login At Connection Time type does not require any authentication information, and can have a resource mapping that selects a group of hosts based on their user name. For details about credential types required by specific agents, see the respective cartridge documentation.
For most credential types, the workflow starts with the Credential Properties page open. For other credential types, the workflow can start with a different page.
3
Click Next.
4
Editing credential properties. On the Credential Properties page, specify the authentication properties based on the credential type selected in Step 2, and click Next.
The layout of this page depends on the selected credential type. For example, creating a credential of the Domain, User Name, and Password (Windows) type requires the domain name, user name, and password.
If you selected Domain, User Name, and Password (Windows) as the credential type, type the domain name, user name and password that you want to associate with this credential using the Domain, User Name, Password, and Confirm Password boxes.
a
On the Credential Name And Lockbox page, provide a unique name for the credential that you are about to create.
b
Select the lockbox where you want to store the credential from the Select A Lockbox list. Choose from the existing lockboxes (like the System lockbox), or create a new one, if required.
NOTE: The System lockbox is only intended for use with some agent types, and it is always available for selection in the flow for adding credentials initiated from the Manage Credentials dashboard. For that reason, any purpose-specific wizards included with cartridges whose agents do not support the System lockbox do not provide this lockbox as an option when creating credentials.
To create a new lockbox, click Add. In the New Lockbox dialog box that appears, type the lockbox name and, optionally, secure it with a password, then click Add.
c
Click Next.
6
Indicate if you want un-encrypted credential data to be accessible by clients using the Unencrypted Credential Data Accessible to Clients check box.
7
Mapping monitored resources. On the Resource Mapping page, specify the resources that you want to monitor with the agent that will use this credential.
a
To add a resource mapping, click Add and specify the resource mapping using the New Resource Mapping Condition dialog box that appears.
The Select the Credential To Copy Resource Mapping From dialog box opens.
c
On the Resource Mapping page, click Next.
8
Editing policies. On the Policies page, add one or more authentication policies to the credential.
a
To add a policy, click Add and select a policy type from the menu that appears.
The Select the Credential To Copy Policies From dialog box opens.
c
On the Policies page, click Finish.
2
Click Copy From An Existing Credential.
The Select An Existing Credential To Copy From dialog box opens.
The Select An Existing Credential To Copy From dialog box closes and another dialog box opens, allowing you to edit the credential.
To choose from existing lockboxes, click the Lockbox box and select a lockbox from the list that appears.
To create a new lockbox, click Add a New Lockbox, and in the New Lockbox dialog box that appears, type the name and password, then click Add.
6
7
At the bottom of this dialog box, specify the authentication data based on the credential type selected in the original credential. For example, if you selected User Name and Password as the credential type, type the user name and password required to associate with this credential using the User Name, Password, and Confirm Password boxes.
8
Click Next to specify the credential policies and resource mappings, or click Finish to exit the flow. Add additional information including credentials policies and resource mapping at a later time, if required.
2
Click Delete.
3
In the Confirm Deleting Credentials dialog box, click Confirm.
The Confirm Deleting Credentials dialog box closes.

Credential properties contain authentication data needed to access monitored resources. Each credential type has a unique set of authentication properties.

The user name of the account accessing the monitored resource.

Question/answer pairs that are sent and received by the agent.

The domain the user account belongs to. This property is optional.

The user name of the account accessing the monitored resource.

The password associated with the user account.

The private key of the DSA key.

The pass phrase for the DSA key. This property is only requried if the private DSA key is generated using a pass phrase.

The user name of the account accessing the monitored resource.

The private key of the RSA key.

The pass phrase for the RSA key. This property is only requried if the private RSA key is generated using a pass phrase.

The user name of the account accessing the monitored resource.

The user name of the account accessing the monitored resource.

The user name of the account accessing the monitored resource.

The password associated with the user account.

A menu appears. The options in the menu represent the components that are defined for the selected credential type. For example, editing a credential of the Domain, User Name, and Password (Windows) type shows Credential Data, Credential Name, Resource Mappings, and Policies in the menu, while a credential of the Use Client’s Login At Connection Time only includes Credential Name, Resource Mappings, and Policies.
2
Click Credential Properties in the menu.
The Update Credential Properties dialog box opens.
The layout of this page depends on the selected credential type. For example, creating a credential of the Domain, User Name, and Password (Windows) type requires the domain name, user name and password.
If you selected Domain, User Name, and Password (Windows) as the credential type, type the domain name, user name and password that you want to associate with this credential using the Domain, User Name, Password, and Confirm Password boxes.
3
In the Update Credential Properties dialog box, edit the credential properties, as required.
4
Click Save.

Credential names are specified during creation. They can be changed at a later time, if required.

2
Click Credential Name in the menu.
3
In the Update Credential Name dialog box, in the Name box, type the new name.
4
Click Save.
The Name column of the credential entry shows the newly updated name.

A credential can have none, one, or multiple policies. The policy type defines the number of times a credential can be used, the number of allowed authentication failures, the time range during which the credential is valid, or the length of time the credential data can be cached on the client.

Policies can be specified during credential creation or at a later time. You can delete existing policies, add new policies, or edit existing policies. When editing an existing policy, you can only change the settings associated with the policy type, but cannot change the actual type.

2
Click Policies in the menu.
The Update Policies of Credential dialog box opens.
a
Click Add in the Update Policies of Credential dialog box.
Use Count: The maximum number of times the credential can be used, successfully or unsuccessfully, by a selected client.
Failure Rate: The maximum number of authentication failures allowed over a specific time period.
Validity Window: The time period during which the credential can or cannot be used.
Cache Time: The time period during which the credential data is cached on the credential client, without requesting it from the Management Server.
c
Provide additional information required by the selected policy type. For example, if you selected Use Count in Step b, you need to provide the maximum number of times the credential can be used.
d
Click Add.
The dialog box containing the policy settings closes, and the Update Policies of Credential dialog box refreshes, showing the newly added value in the list.
4
Copying policies from an existing credential. You can copy credential policies from any credential type.
a
Click Copy in the Update Policies of Credential dialog box.
The Select the Credential To Copy Policies From dialog box opens.
The Select the Credential To Copy Policies From dialog box closes and the Update Policies of Credential dialog box refreshes, showing the newly added value in the list.
2
Click Policies in the menu.
The Update Policies of Credential dialog box opens.
2
Click Policies in the menu.
The Update Policies of Credential dialog box opens.
3
In the Update Policies of Credential dialog box, in the row containing the policy that you want to edit, click .
The type and range of the available settings depend on the policy type. For example, if the policy is of the Cache Time type, you need to provide the maximum amount time during which the credential is cached on the Management Server.
b
Click Save.
The dialog box containing the policy settings closes, and the Update Policies of Credential dialog box refreshes, showing the newly edited policy in the Details column.

Resource mappings identify the parts of the monitored system that can be accessed using the credentials in which they are defined. A credential can have one or more resource mappings that include or exclude specific sets of targets. Resource mappings are combined using the logical OR operator. A resource mapping can have one or more conditions, combined using the logical AND operator. Each resource mapping uses a set of predefined building blocks to identify the monitored targets. For example, you can have a credential with multiple resource mappings (one for each usage, for example, if multiple usages exist in the credential type), and each resource mapping can have one or more resource mapping conditions to select secured resources. You can further refine the mapping, if required.

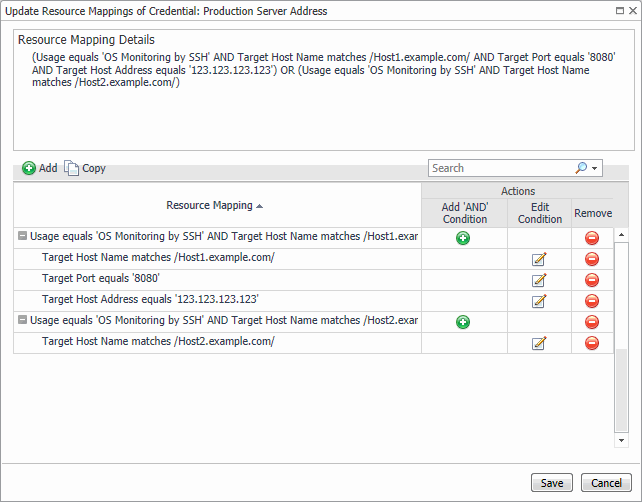
The type and structure of resource mappings depend on the selected credential type, which in turn depends on the range of installed cartridges. Some cartridges, for example, support the Use Client’s Login At Connection Time and User Name and Password credential types, while others can only accept the Challenge Response or User Name types. A Domain, User Name, and Password (Windows) credential type, for example, that requires a valid domain name, user name, and password to access a monitored system, can have one or more resource mappings for accessing Windows-based systems based on a condition that evaluates the target host name.

Usage: Defines the type of the system that is mapped. For example: OS Monitoring by WMI.
Access Resources Using: Identifies the resource component that is evaluated by the resource mapping. For example: Target Host Name, Target Host Address, Target Port, or Is Local Host. Other options may be available.
Equal or Not Equal: Indicates if the targets selected by the matching expression should be included or excluded from the mapping. For example, you can create one resource mapping to select a group of hosts and another to exclude a different set of hosts.
Matching Type: Specifies the condition type. For example, conditions can contain regular expressions or domain names.
TIP: Regular expressions support case insensitive matching when the (?i) flag is used. For example, (?i)host1.example.* returns Host1.example and host1.example.com as matches. Regular expressions run through the JRE Pattern class that supports case insensitivity. For syntax information and usage tips, visit http://rd-www.prod.quest.corp/static/sun_docs/jdk-1_6_0/docs/api/java/util/regex/Pattern.html.
Evaluate This Condition: Indicates if the condition is used during the credential matching.
Matching Values: One or more expressions that are used to scope on the target resource. For example, you can create an expression that defines a host name. Multiple matched values are combined with the logical OR operator, meaning that if one expression evaluates to True, the resource is mapped even though another expression may evaluate to False.

The selections available with each building block in a resource mapping depend on the resource mapping’s Usage type, which in turn depends on the selected credential type and the range of installed cartridges. The selections mentioned above do not reflect the values available with all of the cartridges that support credentials. For information about the available credential types supported by a specific cartridge and the related resource mappings and their building blocks, refer to the cartridge documentation.

When using IPv6 addresses in Credential Mappings it is preferable to use IP Range or CIDR matchers. Since an IPv6 address can have more than one textual representation using String or RegEx matches may lead to confusing server behaviour.

2
Click Resource Mappings in the menu.
The Update Resource Mapping of Credential dialog box opens.
a
In the Update Resource Mapping of Credential dialog box, click Add.
The New Resource Mapping Condition dialog box opens.
Click Usage and choose from the available selections. For example, OS Monitoring by WMI. Other options may be available.
Click Access Resources Using and choose from the available selections. For example, if you selected OS Monitoring by WMI in Step b, you have the option of selecting Target Host Name, Target Host Address, or Is Local Host. Other options may be available for other usage types.
equals: Select this option to select the resources the credential can access.
does not equal: Use this option to select the resources the credential cannot access.
Click Matching Type and choose from the available selections. For example, if you selected Target Host Name in Step c, you have the option of selecting Domain Name or Regular Expression. Other options may be available when evaluating other types of resource components.
f
Select or clear Evaluate This Condition.
h
Click Add.
The New Resource Mapping Condition dialog box closes and the Update Resource Mapping of Credential dialog box refreshes, showing the newly added mapping condition.
a
In the Update Resource Mapping of Credential dialog box, click Copy.
The Select the Credential To Copy Resource Mapping From dialog box opens.
The Select the Credential To Copy Resource Mapping From dialog box closes and the Update Resource Mapping of Credential dialog box refreshes, showing the newly added mapping condition.
2
Click Resource Mappings in the menu.
The Update Resource Mapping of Credential dialog box opens.
4
To edit an existing resource mapping condition, in the row containing the resource mapping, click and edit the condition in the Edit Resource Mapping Condition dialog box that appears.
2
Click Resource Mappings in the menu.
The Update Resource Mapping of Credential dialog box opens.
The Confirm Deleting Resource Mapping dialog box opens.
5
The Confirm Deleting Resource Mapping dialog box closes and the Update Resource Mapping of Credential dialog box refreshes, no longer showing the newly deleted entry.

When a credential client retrieves a set credentials, the credentials are listed in their relative order. For example, a credential with the order of 100 has operator-level privileges, while another one with the order of 200 has administrative privileges that grants access to a far wider range of resources. Given the order values, any queries that return both credentials retrieve the operator-level credentials first. If you need to retrieve the credential with administrative access first, you can do so by simply changing the relative order of both credentials.

The Reorder Credentials dialog box opens.
To move one credential up or down, use the or buttons in the Move Up and Move Down columns, as required.
3
Click Confirm to close the Reorder Credentials dialog box.

Credential queries help you retrieve credentials using different criteria, such as the target host, a host on which a monitoring agent is running, a credential type, lockboxes to which the credentials belong, and custom properties. You can quickly find out if you can associate existing credentials with monitoring agents rather than create new ones.

The Query Credential dialog box opens.
2
In the Query Credential dialog box, specify the criteria as required.
For example, to look for a credential that can be used to access a specific host using a Domain, User Name, and Password (Windows) credential, in the Query Credential dialog box, type the target host name under Target Host. In the Credential Types table, select Domain, User Name, and Password (Windows).
3
Click Execute.
The Query Credentials dialog box closes and the query results are displayed.

Monitor Alarms

Credential clients generate alarms when certain pre-defined conditions are met. These errors typically happen when a client attempts to access a resource and encounters a policy-related problem. The Monitor Credential Alarms dashboard lists all alarms generated by the existing credential clients and provides additional information about each event. The list includes any alarms generated by the Catalyst Credential Check rule and Credential events generated by the Foglight Agent Manager.

Credential alarms also appear on the main Alarms dashboard, together with other Foglight alarms, while the Monitor Credential Alarms dashboard only lists the alarm generated due to a credential-related condition. Use it to quickly review and manage credential alarms.

For complete information about alarms in Foglight, see the Foglight User Help.

By default, the Monitor Credential Alarms dashboard displays the following columns:

Sev: The alarm severity: Warning , Critical , or Fatal .
Time: The date and time at which the alarm is generated.
Ack’ed: Indicates whether the alarm was acknowledged by the operator: Yes or No.
TIP: Use the Select All or Unselect All buttons to quickly select all alarms, or to clear your selection, as required:
Cleared: Indicates whether the alarm was cleared: Yes or No.
Selecting one or more alarms in the list and clicking Clear allows you to clear the selected alarms.
Instance: The topology object instance against which the alarm is raised.
Message: The alarm message.
Origin: The event that caused the alarm to fire.

To filter the list of alarms, click Alarm Filter in the top right and provide the desired settings.

To view the Credential Alarm dialog box, click any column.

Use this dialog box to find out more about the problem that caused the alarm. From here, click the Diagnostic link to access the part of the browser interface that you can use to further investigate the problem.

Credential queries help you retrieve credentials using different criteria, such as the target host, a host on which a monitoring agent is running, a credential type, lockboxes to which the credentials belong, and custom properties. You can quickly find out if you can associate existing credentials with monitoring agents rather than create new ones.

In a federated environment, Federated Child alarms can be viewed on the Federated Child servers using the above approach. While credentials cannot be administered from the Federation Master, it is possible to view Federated Child alarms from the Alarms dashboard on the Federation Master.

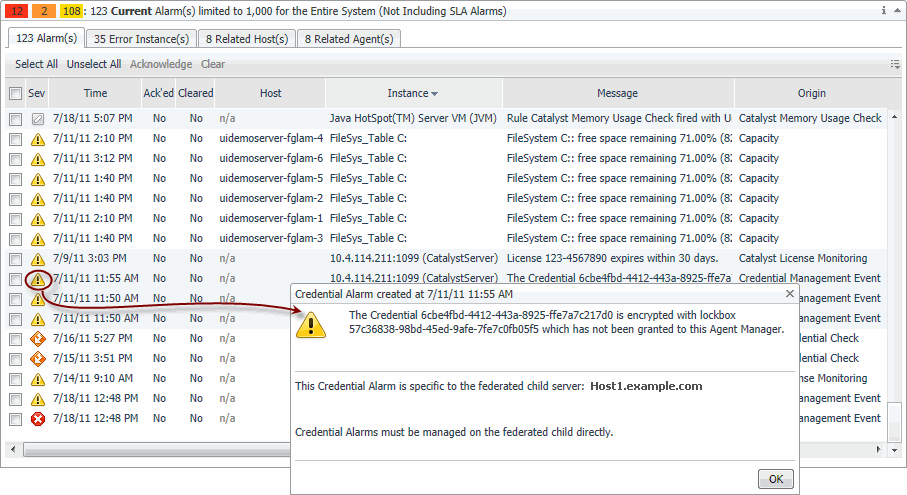
The Credential Alarm dialog box that appears shows a smaller subset of information, containing only the alarm message and the name of the Federated Child server. To retrieve complete information about this alarm, log in to the Federated Child server, navigate to the Monitor Credential Alarms dashboard, and drill down on the alarm to display the common version of the Credential Alarm dialog box.

For complete information about alarms in Foglight, see the Foglight User Help.

Foglight Agent Manager generates credential events based on actions that occur during the processing of credential requests. These events result in the creation of credential alarms of the appropriate severity. The following principles apply:

A connection to the remote host is established.

connection.success

Information

The Agent Manager attempts to establish a connection, but no credentials were retrieved by the credential query.

connection.nocredentials

Warning

Attempt is made to authenticate a connection through the CleartextCredentialService with a credential that is not granted direct access rights.

direct.access.not.assigned

Warning

A lockbox that is associated with a credential is not granted to the Agent Manager Host.

lockbox.not.granted

Warning

The credential used to establish a connection fails to authenticate access to the remote resource.

authentication.failure

Error

A connection to the remote host cannot be established using the retrieved credential.

connection.failure

Error

The Agent Manager cannot process the retrieved credential.

creation.failed

Error

The request to delete an assigned lockbox failed.

lockbox.not.deleted

Error

A credential cannot be used due to a policy violation.

policy.violation

Error

Acknowledging a credential alarm informs other users looking at credential alarms that the alarm is raised due to a known situation. When an alarm is acknowledged, this setting cannot be reverted.

2
Click Acknowledge.
The Acknowledging Alarms progress box appears, indicating that the alarm is being acknowledged.
The Acknowledging Alarms progress box closes, and the Monitor Credential Alarms dashboard refreshes, showing Yes in the Ack’ed column.

In most cases, Foglight clears alarms when the condition that triggered them changes. You can delete certain types of alarms that do not clear themselves if they are no longer relevant.

If the condition that triggered a credential alarm changes, you can manually clear the alarm. For example, a credential alarm fires when an agent fails to connect to a monitored host due to a wrong password. Creating a new credential with the correct password and releasing the new credential to the appropriate credential client remedies the problem, and you can choose to delete the alarm because it is no longer relevant.

When an alarm is cleared, this setting cannot be reverted. You can see a list of cleared alarms using the alarm filter.

2
Click Clear.
The Clearing Alarms progress box appears, indicating that the alarm is being acknowledged.
After a few moments, the Clearing Alarms progress box closes, and the Monitor Credential Alarms dashboard refreshes, no longer showing the newly cleared alarm.

View Clients

The View Clients dashboard lists all credential clients that are registered with the Management Server and provides additional information about each client.

By default, the following columns are displayed:

Alarms: The numbers of Fatal, Critical, and Warning alarms generated against each client, color-coded to indicate the severity.
Name: The name of the credential client.
Client Type: The credential client type. For example, FglAM (Foglight Agent Manager).
Assigned Lockboxes: The name of the lockbox released to the credential client.
Host: The name of the monitored host on which the client is running.

Selecting the check box Show lockboxes currently assigned to each client causes the Credential Client column on the Manage Lockboxes dashboard to be populated. For more information about the Manage Lockboxes dashboard, see Explore the Manage Lockboxes dashboard .


Related Documents

The document was helpful.

Select Rating

I easily found the information I needed.

Select Rating