
Agent Status and Agent Managers
Alternatively, use the agent:deploy command to deploy agent packages from the command line. For complete information about this and other fglcmd commands, see the Command-Line Reference Guide.
|
1 |
|
3 |
Click Deploy Agent Package in the toolbar. |
|
5 |
|
1 |
|
2 |
On the Agent Status dashboard, click Deploy Agent Package in the toolbar. |
|
3 |
In the Deploy Agent Package dialog box, on the Host Selector page, select the monitored host to which you want to deploy the agent package. |
|
4 |
Ensure that the agent package the you want to deploy appears on the Agent Packages page. |
|
5 |
|
1 |
|
2 |
|
3 |
|
5 |
Click Next. |
|
6 |
After a successful agent package deployment, you can proceed to create agent instances using the agent types included in the newly-deployed agent package. For more information, see Create agent instances on monitored hosts.
|
1 |
|
3 |
Click Undeploy Agent Package in the toolbar. |
|
5 |
|
1 |
|
3 |
Click Restart in the toolbar. |
|
1 |
|
2 |
On the Agent Managers dashboard, observe the valuse in the Upgradeable columns. If either the Host or the Agent is eligible for upgrade, the word Yes appears in the column. |
Alternatively, use the agent:create command to create agent instances from the command line. For complete information about this and other fglcmd commands, see the Command-Line Reference Guide.
|
1 |
|
2 |
On the Agent Status dashboard, click Create Agent. |
|
4 |
The Agent Type and Instance Name page of the Create Agent wizard shows a list of agent types and instance names that can be created on the selected host. |
|
• |
To assign a specific name to the agent instance, click Specify Name, then type that name in the Name box. For example, MyAgent. |
|
• |
To assign a generic name, select Generic Name. This option is selected by default. |
|
7 |
Click Next. |
|
8 |
|
1 |
|
3 |
Click Create Agent. |
|
• |
To assign a specific name to the agent instance, click Specify Name, and type that name in the Name box. For example, MyAgent. |
|
• |
To assign a generic name, select Generic Name. This option is selected by default. |
|
6 |
Click Create. |
|
7 |
After creating an agent instance, you need to its properties. For more information, see Edit instance-specific agent properties.
Agent tagging allows you to form logical groupings of agents for sorting and selection. With tags, you can edit properties for a group of agents. For information on how to use tags to select a group of agents in order to edit their properties, see Edit instance-specific agent properties .
Agent instances can have multiple tags. You can modify the tags for each individual agent instance.
|
1 |
|
3 |
Click Edit > Edit Tags. |
|
a |
|
b |
Type a tag name in the box and click Add Tag. |
|
c |
To associate the newly-created tag with the selected agent instance, in the Tags pane, in the row containing the new tag, click the Apply To column and select All. |
|
NOTE: To remove an existing tag association, in the row containing the selected tag, click the Apply To column and select None. |
|
d |
Foglight Management Server allows you to set the debug level of FglAM logs from the Agent Managers dashboard. The amount of debug messages depends on the specified debug level.
|
• |
When “Debug logging disabled” is selected, the debug messages cannot be printed out. |
|
• |
When “Standard debug logging” is selected, the debug messages are written to the log file. |
|
• |
Selecting “Extremely verbose debug logging” results in more detailed logging messages. |
|
NOTE: If the debug level is set to “Extremely verbose debug logging”, many logs are written to the log file and the log file size becomes huge. Therefore it is strongly recommended that you do not select this debug level and print logs over than 20 minutes. |
|
1 |
|
2 |
On the Agent Managers dashboard, select the row containing the FglAM that you want to edit the debug level. |
|
4 |
|
5 |
You have the following options:
|
• |
Edit the properties of an agent instance. This is useful when a monitoring environment includes multiple instances of the same agent type, each monitoring a different monitored host with a specific set of monitoring requirements. For example, if you use the WindowsAgent to monitor different Windows hosts, and the data sampling frequency for Host A needs to be higher than that of Host B, you need to set the sample frequency lists accordingly, for each instance of the WindowsAgent instance. |
|
• |
Edit the properties of all agent instances that have a specific tag. Agent tagging allows you to form logical groupings of agents for sorting and selection. With tags, you can edit the property for a group of agents that have the same tag. |
|
• |
Edit the properties of all agent instances of the selected type. This feature is useful when you need to globally override one or more agent parameters for all instances of that agent type. For example, if you use the WindowsAgent to monitor a number of Windows hosts, and the requirements for their data sampling frequency are the same for each host, but different than their default values, you can set the data sampling properties of all agent instances by doing a global update of the sample frequency property for the WindowsAgent type. |
|
• |
Delete any custom properties of an agent instance. This is useful in situations when an agent instance has one or more properties set to a custom value and you want to quickly revert them to their global defaults, without having to go through each property and setting it to its default value. |
Another way to edit type-specific properties is using the Agent Properties dashboard. For more information, see Edit primary type-specific properties.
|
1 |
|
3 |
Click Edit > Edit Properties. |

|
• |
To edit the properties of the selected agent instance, in the Property Scope area, click Modify the private properties for this agent. |
|
• |
To edit the properties of all agent instances of the same type, in the Property Scope area, click Modify the properties for all Agent Type agent. |
|
• |
To revert the properties of the selected agent instance to their default values, in the Property Scope area, click Delete custom set of properties for this agent. |
|
• |
To edit the properties of all agent instances that have a specific tag, in the Property Scope area, select the tag, and click Modify properties for all Agent Type agents with tag. |
|
5 |
Editing agent properties only. Edit the properties as required. |

|
6 |
When you finish editing agent properties, clicking Back To Agent Status to return to the Agent Status dashboard. |
Alternatively, use the agent:activate or agent:deactivate commands to activate or deactivate agents. These commands come with the fglcmd interface. For complete information, see the Command-Line Reference Guide.
If an agent instance fails to activate, you can use the agent’s log file to determine the cause of the problem. For more information, see Retrieve agent logs.
|
1 |
|
3 |
Click Activate. |
|
NOTE: It may take some time for the Activated ( The Activated icon appears when the Management Server has confirmed that the agent has started and is running. If the activation command was executed successfully but the agent fails after starting, the Activated icon will not appear. |
|
1 |
|
3 |
Click Deactivate. |
|
4 |
You can stop or start data collection for an active agent using the Agent Status dashboard.
|
IMPORTANT: Any changes made to an agent’s data-collection status do not take effect if the agent enters a blackout period. See Suspending Alarms and Data Collection for information about agent blackouts. |
Alternatively, use the agent:start or agent:stop commands to start or stop data collection. These commands come with the fglcmd interface. For complete information, see the Command-Line Reference Guide.
|
1 |
|
3 |
Click Start Data Collection. |
|
NOTE: It may take some time for the Collecting Data icon ( The Activated icon appears when the Management Server has confirmed that the agent has started and is running. If the activation command was executed successfully but the agent fails after starting, the Activated icon does not appear. |
|
1 |
|
3 |
Click Stop Data Collection |
The length of that time window can be controlled with a virtual machine (VM) option, foglight.data_service.max_past_timestamp_delta. Add this option to the configuration file <Foglight_home>/config/server.config to change the length of the store-and-forward period in milliseconds.
|
|
1 |
On the computer on which the Foglight Management Server is installed, locate the <Foglight_home>/config/server.config file and open it for editing. |
|
2 |
In the server.config file, locate the following line of code: |
|
b |
Insert the foglight.data_service.max_past_timestamp_delta option and the length of the store and forward period between the quotation marks. |
Alternatively, use the agent:delete command to delete an agent instance. The command comes with the fglcmd interface. For complete information about this command, see the Command-Line Reference Guide.
|
1 |
|
2 |
|
3 |
Click Delete. |
|
4 |
|
5 |
|
• |
foglight_client_home is the installation directory of the Agent Manager. |
|
• |
cartridge_name is the name of the cartridge. For example, HostAgents. |
|
• |
cartridge_version is the cartridge version. For example, 5.9.1. |
|
• |
agent_type is the agent type. For example, WindowsAgent. |
|
• |
agent_instance_name is the name of the agent instance. |
|
• |
date and time are the date and time the agent was started. |
|
• |
file_ID identifies the log file. |
Alternatively, use the agent:getlog command to obtain an agent’s log file. The command line offers more flexibility in that it allows you to obtain older log files.The command comes with the fglcmd interface. For complete information, see the Command-Line Reference Guide.
|
1 |
|
3 |
Click Get log. |
|
NOTE: Copying agent logs into the <Foglight_home>/logs directory enables them to be added to the server support bundle. For more information about server support bundles, see Managing Support Bundles. |
Some Foglight dashboards have reports associated with them. This allows you to run a report based on the current dashboard. You can generate the report using the Reports menu in the top-right corner.
The Agent Managers and Agent Status dashboards are associated with the Hosts Report. Run this report by choosing Hosts Report from the Reports menu, and specifying the input parameters in the report wizard.

The report wizard provides more information about the Hosts Report and instructions on how to set the input values. For more information about reports in Foglight, see the Foglight User Help.
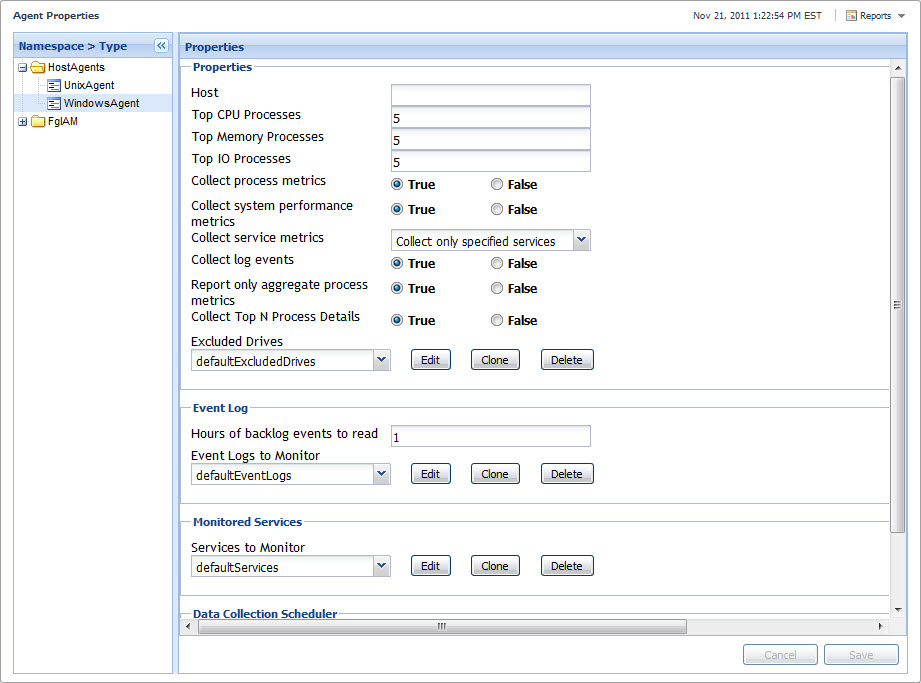
Agent Properties
|
1 |
|
3 |
On the Agent Properties dashboard, in the Properties view, locate the primary property that you want to edit. |

|
5 |
Click Save. |
|
1 |
|
3 |
On the Agent Properties dashboard, in the Properties view, locate the secondary property that you want to clone. |
|
4 |
Click the Clone button to the right of the box that contains the property value. |
|
6 |
Click OK. |
|
7 |
|
1 |
|
3 |
On the Agent Properties dashboard, in the Properties view, locate the secondary property that you want to edit. |
|
4 |
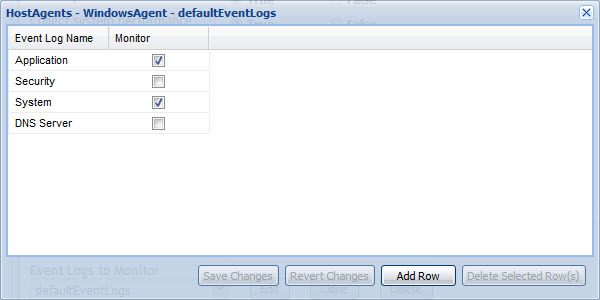
Click the Edit button to the right of the box that contains the property value. |
|
• |
To delete a row from the list, in the dialog box, select that row and click Delete Selected Row(s). |
|
6 |
Click Save Changes and close the dialog box. |
You can only remove cloned lists. Any lists that are included with Foglight cannot be deleted.
|
1 |
|
3 |
On the Agent Properties dashboard, in the Properties view, locate the list that you want to delete. |
|
4 |
Click Delete. |
|
5 |
Click Yes in the message box. |
|
6 |
|
1 |
|
2 |
On the Agent Properties dashboard that appears in the display area, in the Namespace > Type view, expand the FglAM node and click FglAMAdapter. |
|
3 |
In the Properties pane, view the FglAMAdapter properties. These properties control the FglAMAdapter polling rates. |
|
• |
Minimum Polling Interval: The minimum polling interval, in seconds. |
|
• |
Maximum Number of Polls (per minute): The maximum number of polls per minute. Client polling intervals are adjusted to adhere to this. |
|
• |
Polling Max Delay Factor: The multiplier for the maximum delay, based on the computed minimum delay. |
|
• |
Polling Min Timeout: The minimum length of time in seconds before FglAMAdapter checks to see if a host is considered disconnected. |
|
• |
Core Thread Pool Size: The size of the core thread pool. |
|
• |
Maximum Thread Pool Size: The maximum size of the adapter thread pool. |
Some Foglight dashboards have reports associated with them. This allows you to run a report based on the current dashboard. You can generate the report using the Reports menu in the top-right corner.
The Agent Properties dashboard is associated with the Agent Properties Report. Run this report by choosing Agent Proeprties Report from the Reports menu, and specifying the input parameters in the report wizard.

Disconnected Agent Managers
|
1 |
|
2 |

|
1 |
In the Disconnected Agent Manager(s) dialog box, select the disconnected agent manager(s) that you want to remove. |
|
2 |
Click Delete Agent Manager(s). |
To edit tags for the disconnected agent manager(s), see Edit agent tags .
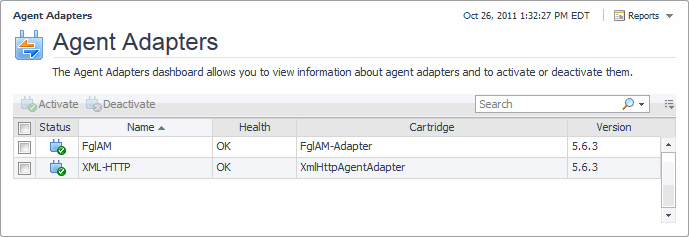
Agent Adapters
|
• |
|
1 |
|
3 |
Click Activate. |
|
1 |
|
3 |
Click Deactivate. |