
Automatic Updates
|
Navigation: Introduction > Automatic Updates |
Metalogix Content Matrix Console can automatically check online to see if a more recent version of the product is available for download. This takes place when Metalogix Content Matrix starts. To help ensure that you are taking advantage of the latest features and fixes, it provides a direct line to download and installation of new Metalogix Content Matrix builds.
Automatic Upgrades requires access to the internet. While Metalogix Content Matrix will check every time it is opened, it is also possible to run a manual check. To do so, go to the main toolbar and choose Help > Check for Updates.
If you are already running the latest build, the Check for Updates dialog will open and you will be informed that you already have the latest version installed. If there is a new build available for download, the Download and Install Update dialog will open.
Running the Automatic Update
When Metalogix Content Matrix checks for updates and finds a newer build available for download, users will be prompted to update with the Download and Install Update dialog.
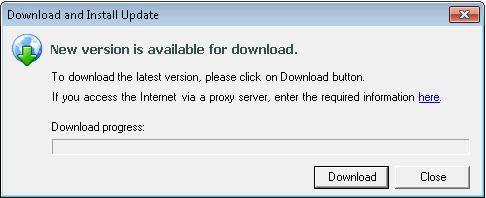
1.Click [Download] to directly download the latest build to your current machine.
The progress of the download is displayed in the Download progress bar.
NOTE: If you are accessing the internet through a proxy server, the here link can be clicked on to open the proxy configuration dialog.
2.Once the download is complete, click [OK] to continue.
The Download and Install Update dialog will still be open, but the Download button will be replaced with the [Install] button.

You will have the option of installing the new build directly from here by clicking the [Install] button. This will open the Installation guide. If you are continuing the installation process directly from this dialog, then the Metalogix Content Matrix Console will close itself down, so the install process can be run.
NOTE: When running the automatic upgrade process, only the latest build of the Metalogix Content Matrix Console will be updated. Any installations of the Metalogix Extensions Web Service will have to be updated manually. See the Metalogix Content Matrix Advanced Install Guide for details.
Activating the License Key
You will be prompted to input an Activation License Key when launching the Content Matrix Console:
·for the first time after it has been installed if an existing license is not detected
OR
·after your license has expired.
NOTE: If users are not required to be a local administrators on the machine where Content Matrix is installed, every user who launches a Console needs to enter a license key. If users are required to be a local administrator, only the first user who launches a Console needs to enter a license key.
IMPORTANT: During installation, all Editions of the Console (SharePoint, eRoom, and Public Folder) are installed. However, the license will only be activated for Editions that are covered by it. If an Edition is not covered by the license, the message Invalid license: License key is not valid for the given product. will display in the Activate License Key dialog.
If you are performing an online activation, you can also do it silently, using Powershell.
To enter a license key:
1.In the Activate License Key dialog, select I have a license key, and enter the license key provided by Quest (the key can be copied and pasted into the provided space).
NOTE: If you are updating from a Metalogix Content Matrix installation older than version 6, select the I am updating from an older version and have an old-style key option, and enter the key in the provided space (or paste into the first field from your clipboard).
2.Select the appropriate activation method.
NOTE: Most systems can use the Online activation method as long as the system has internet access. If you are unable to use the online activation method due to security settings or lack of internet access, the Offline activation option can be used.
Online Activation
|
Navigation: Activating the License Key > Online Activation |
NOTE: In order to activate your license, the following URL must be unblocked by your firewall: https://license.metalogix.com
1.After entering the license key, select Online activation.
2.If you need to configure proxy settings:
§Click the Set proxy link.
§Follow the procedure for Configuring Proxy Settings.
3.Click [Next].
Metalogix Content Matrix will contact the licensing server and attempt to authenticate the license key, after which, on successful activation, a 'Congratulations!' message will be returned, and the license key will be active and in use.
4.Click [Finish] to complete the process.
Offline Activation
|
Navigation: Activating the License Key > Offline Activation |
NOTE: The offline activation option is generally used in cases where you cannot use the online activation due to security settings or lack of internet access. This option will still require some internet access, but allows for the authentication to be done from another machine that is not as restricted by security or has a connection to the internet.
1.Select Offline activation.
2.Click [Next].
A Generate Activation Request dialog displays with a different key. This key can be copied from the window, or the Save to file option can be used to save the key into a text file (in case it needs to be copied to another machine).
3.Copy the Activation URL (listed under the Activation Request) to a web browser that has internet access.
Alternately if the system the Metalogix Content Matrix Console is on does have internet access through a Web browser, click Go to automatically open a web browser to this URL.
4.On a machine that has internet access, use the Activation URL to navigate to the Offline Activation page.
5.Either:
§Enter the key into the Activation data text box.
OR
§If the key was saved to a file, select Browse and navigate to the file.
6.Click [Activate].
Upon successful activation, a new key displays in the text box.
7.Do one of the following:
§To save the key as a DAT file, click [Download file].
OR
§To copy the key to the clipboard (if the license will be activated on the same machine), click [Copy text].
8.Click [OK] to continue.
9.Return to the Activate License dialog.
10.If the Generate Activation Request window is still active, click [Next]. to the Enter your Activation Response window.
11.Use one of the following options:
§If you copied the key to the clipboard on the same machine, paste it into the window.
§If you saved the key to a DAT file, navigate to, and select the DAT file.
12.Click [Next]. The license key will be active and in use.
13.Click [Finish] to complete the process.