
Agents
The Agents view shows all the infrastructure agents monitored in the Infrastructure environment. The Agents table refreshes when a different agent type is selected from the Selected Agent Type drop-down list.
The Agents table includes the following columns:
The Administration view’s toolbar includes the following buttons:
|
• |
Edit Agent Type Defaults: allows you to edit the default agent type properties. |
|
• |
Edit Shared Agent Properties: allows you to edit the shared agent type properties. |
|
• |
Edit Agent: allows you to edit the agent properties for the selected agent or agents. |
|
1 |
Click Edit Agent Type Defaults. |


|
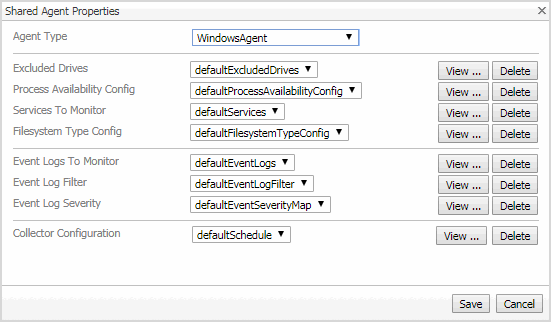
• |
Edit: allows you to edit the currently selected property list, by adding and removing rows. |
|
• |
Copy: allows you to edit the displayed properties and save the copy as a new shared property list. When saved, the copy becomes the selected item in the drop-down list. |
|
4 |
Click Save to save the changes made to the default properties. |
|
1 |
Click Edit Shared Agent Properties. |


|
• |
Edit: allows you to edit the currently selected property list, by adding and removing rows. |
|
• |
Copy: allows you to edit the displayed properties and save the copy as a new property list. When saved, the copy becomes the selected item in the drop-down list. |
|
4 |
Click Save to save the changes made to the shared properties. |
|
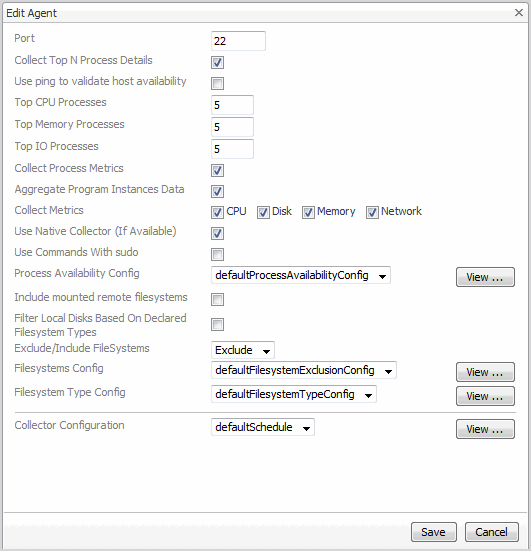
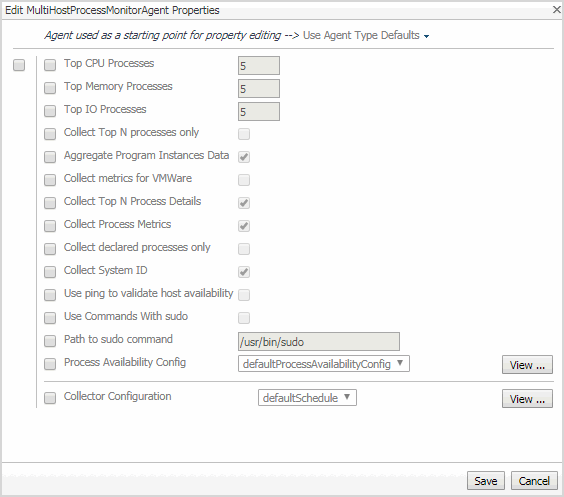
2 |
Click Edit Agent. |


|
2 |
Click Edit Agent. |

|
3 |
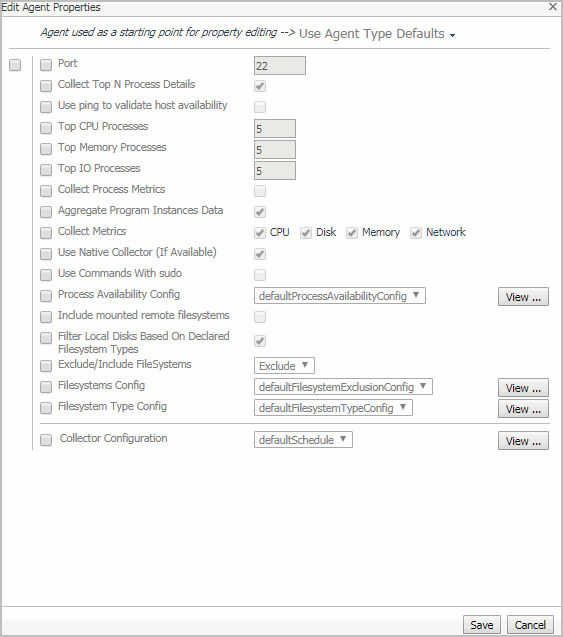
Select the monitoring agent that should be used as a starting point for editing the properties for this agent type. From the drop-down list, select Use Agent Type Defaults or one of the available host names. |
|
5 |
Click Save to save the changes made to the agent properties. |
Rule Configuration
The Rule Configuration view consists of the following:
By default, the following columns are displayed in the Rules view:
|
• |
Enabled: Indicates if the rule is enabled |
|
• |
Rule: Contains the rule name. Click the rule name to start the workflow for viewing and editing rule details. |
|
• |
|
• |
Alarms: Contains the number of alarms (multiple-severity rules only) generated by the rule. Clicking that column shows a list of alarms indicating for each alarm its severity, when the alarm was generated, and the alarm message. |
|
• |
Applies to: Shows the object name that is applied to this custom rule. |
|
• |
Description: Contains the rule description. |
The Rule Configuration dashboard shows a list of existing rules and a set of rule management commands at the top of the list. Use the Enable Rule and Disable Rule buttons to activate or deactivate one or multiple rules at once.
|
3 |
|
4 |
|
5 |
On the Rules list, select one or more check boxes in the left-most column, and then click Enable Rule. |
|
6 |
|
3 |
|
4 |
|
5 |
On the Rules list, select one or more check boxes in the left-most column, and then click Disable Rule. |
|
6 |
The Rule Configuration dashboard shows a list of existing rules and a set of rule management commands at the top of the list. Use the Add Custom Rule button to create a new rule as needed.
|
3 |
|
4 |
|
5 |
|
6 |
In the Create Custom Rule dialog box, specify the following: |
|
a |
Type the name of custom rule in the Name field. |
|
b |
Select an Object Type, and then select a metric from the Metric drop-down list. The value of Metric varies from the Object Type. |
|
c |
|
• |
Threshold: Specify Condition, Time Period, Severity, and then specify whether or not fire actions if the specified data attempts are reached. The value of Condition cannot be negative. |
|
• |
% Change: Specify Condition, Time Period, and Severity Label. The value of Condition cannot be negative. |
|
b |
|
c |
(Optional) Notifications: Click Add New, then the Edit Notification Config - Dialog box appears. In this dialog box, type the E-mail Address and Description as needed, and then click Add. |
|
7 |
Click Save. |
The Rule Configuration dashboard shows a list of existing rules and a set of rule management commands at the top of the list. Use the Remove Custom Rule button to delete existing custom rule(s) as needed.
|
3 |
|
4 |
Click Administration > Rule Configuration. |
|
5 |
|
6 |
Click Yes. |
Using Foglight for Infrastructure agents
For more information, see these topics:
Using the PowerVM HMC agent
For detailed information about monitoring a PowerVM infrastructure, see Monitoring IBM PowerVM environments.